Jump to content


Changing relector rings (window type) at home


piria33
 Share

Recommended Posts

As some of you may know I've been having issues with my abs system due to rusted and warped reluctor rings on the rear. They do affect the tranny as they send the speed outputs to the TCM. When the nearside sensor failed the tranny was surging and hard shifting randomly. Once the sensor was changed all returned to normal.

then the offside went and again but not as severe the tranny started acting differently. Just a few mildly rough shifts. Nothing to make you jolt but not a smooth.

This time I saw the ring was warped. Had 2 high spots and a lot of corrosion underneath. We had a hard winter with lots of snow/sluch/salt.


After contacting a few garages with no luck my local garage just put a shim under the sensor saying the ring was fine!! No not for a ZF tranny. the air gap needs to be consistent and not vary due to high spots! I know my tranny and its feel changes when you vary that critical air gap. I tested it!


Getting fed up with mechanics not wanting to take on a more challenging job I've decided to tackle it myself.


Gavin Moss from reluctorrings.com said the window type will not need heating up to get on. There isn't enough parent material so will slide on and stick on with a good adhesive.

So should be possible to do at home.


Friday night all ready  to start. Nope wrong I thought I had a 36mm socket. 8.10pm and Halfords closed.

Saturday picked up a 36mm impact socket.

Couple of shots with the impact gun the nut started to move. Breaker bar to remove the nut.

Jacked up and acces to hub.

Hours trying to loosen the shaft spline from the hub!!! Wouldn't budge.

So back to shopping - online bought a fairly heafty hub puller (18 thread that bolts onto the hub bolts and not the usual feeble 3 leg pullers).

https://www.amazon.co.uk/gp/product/B004FDMWE0/ref=oh_aui_detailpage_o01_s00?ie=UTF8&psc=1

4lb sledge hammer on order for today also.

So a good pressure with the hub puller and blows with the sledge I hope it will budge. Its been soaking in wd40 also.


Well I put the hub nut back on last night to use the car to get to work.


Fingers crossed for the second attempt this week. At least we have nice weather (although wife/son want me out more to play games after work so its always a struggle).


Link to comment
Share on other sites

  • 3 weeks later...

A mechanic from Rugely should be able to pop over saturday morning with various hub pullers to try. If he can't remove it he won't charge anything.


If that fails my boss knows someone who has a big 30 ton press being assembled. Would have to take in the whole shaft and hub assembly then they'll pop it out in a second probably.


Hope the mobile guy can release the rust bind.

Link to comment
Share on other sites

Hi R2e.


The reluctor rings aren't the issue. Unless you mean cut the old one off. Cut the new one and squeeze it on.

This will deform the new one and it will never be completely cylindrical again.


Link to comment
Share on other sites

SUCCESS!!!


Finallly this Satruday morning a helpful mechanic from Rugely came out and did struggle initially. His 10 ton puller did nothing. His standard copper hammer did nothing.

So he brought out the big guns. The giant copper hammer with a 6 ft handle and 5kg head!

About half a dozen whacks with this it started moving bit by bit. Once it had gone in about an inch he pulled it back with the hub nut and then out again.

Risk of damaging the bearing we took but turned out ok. Bearing felt fine afterwards.


Then I spent half the day cleaning up the CV joint. Wow what a rusty mess. Took a while to get it to just the right size so I heated up the ring in the oven and just tapped it on.

Added a bit of epoxy on the edges as added security.

Sensor back on and a perfect air gap all round.


Then assembled the shaft/hub etc.


Sunday test drive and what a difference. The gearbox has rewarded me!! It is crisper, smoother and more precise.

Now I need to get the other side done!

All I can say is don't overlook these reluctor rings. View the air gap while you spin the hub round. It only takes a small variation in air gap to affect the ecu/tcm.


Gavin from Reluctor rings said they don't need any treatment due to the quality and design.


20180516_172748_resized.jpg

20180714_093613_1531812043158_resized.jpg

20180714_110717_1531812041556_resized.jpg

20180714_141601_1531812044687_resized.jpg

20180714_141607_1531812039557_resized.jpg

Link to comment
Share on other sites

Hi Christopher,

Well done that man, precious few would tackle that job and many have resorted to fitting a new drive shaft.

I'm curious though about how you verified the position of the ring relative to axle and sensor?

Last year I had ABS challenges of my own but managed to get over them - replaced the NS sensor and on the OS thoroughly cleaned out the crusty/rusty bits between the ring slots. As the rust will no doubt continue, your feedback may be valuable this coming winter.

Cheers in advance.

Steve

Link to comment
Share on other sites


nice to see someone having ago at doing the job them self, sounds like it was tough going but your persistence has paid off with a good job done. well done,👍 plus money saved too. nice to see the pictures as the work was progressing as you were going along.  hope it all gets sorted and drives as it should, with no issues. regards dave. 

  • Like 1
Link to comment
Share on other sites


On 7/17/2018 at 7:11 PM, cubist said:

Hi Christopher,

Well done that man, precious few would tackle that job and many have resorted to fitting a new drive shaft.

I'm curious though about how you verified the position of the ring relative to axle and sensor?

Last year I had ABS challenges of my own but managed to get over them - replaced the NS sensor and on the OS thoroughly cleaned out the crusty/rusty bits between the ring slots. As the rust will no doubt continue, your feedback may be valuable this coming winter.

Cheers in advance.

Steve

Thanks Steve. Yes wasn't easy. I didn't really want another used one with the same soft old rusty rings.

I didn't think of the position relative to the axle to be honest. Seemed to be fine. Same would happen if the shaft was removed and re-installed. 

But position relative to the sensor (if I understood your question correctly) - I measured the distance between the inner edge of the old ring and the edge of the CV boot with a feeler guage. Tapped the new one up to the same position very carefully. You could aslo create a spacer.

I assume the position relative to the axle is self-calibrating. As long as the sensor is reading the windows correctly and creates a good strong voltage.

Thanks

Link to comment
Share on other sites

15 hours ago, david moore said:

nice to see someone having ago at doing the job them self, sounds like it was tough going but your persistence has paid off with a good job done. well done,👍 plus money saved too. nice to see the pictures as the work was progressing as you were going along.  hope it all gets sorted and drives as it should, with no issues. regards dave. 

Thanks. Yes few bother to take on these tricky jobs. Well worth it imo.

The ZF boxes rely on all of these inputs to work well.

4th day driving and it feels great. I feel the box is more precise and smoother. I'm sure once the other side is done also I'll see a further improvement.

It has been reiterated that the air gap is critical. If the air gap is varying as it rotates due to a ring that has warped how is the ecu/tcm going to read this? Does it take an average or does the voltage strength vary? If the metal of the ring is in bad shape surely the signal will be weak also.

The new ring is much stronger than the old one as you can see. The metal is better quality and of a harder material also.

The guys at reluctorrings know what they are doing. Not 9.99 ones off eBay probably made of tin metal.

Link to comment
Share on other sites

hmm the shifting had been a bit off again this week. Last week after changing one side there was a nice improvement in smoothness, Its been fading this week as if something is off again. A gradual change which is strange as if the adaptions are a bit squiffy and wondering.

I wonder if its because I haven't changed the other side yet and the 2 rings are quite different designs. Rule of thumb - change everything in pairs!
bit frustrating.

Checked the newly installed ring last night and all looked perfect. (note I do have cheap sensors in right now - not sure what difference there is between expensive ones and cheap ones).

Once the other side is done I might take it in for an fluid level check and adaptions reset also to rule out anything (could be a leak but seen nothing on the drive - had real seal replaced to propshaft a few months ago) .
Not sure where yet.

Link to comment
Share on other sites

Join the conversation

You can post now and register later. If you have an account, sign in now to post with your account.

Guest
Reply to this topic...

×   Pasted as rich text.   Paste as plain text instead

  Only 75 emoji are allowed.

×   Your link has been automatically embedded.   Display as a link instead

×   Your previous content has been restored.   Clear editor

×   You cannot paste images directly. Upload or insert images from URL.

Loading...
 Share


  • Join The Club

    Join the Jaguar Owners Club and be part of the Community. It's FREE!


  • Topics

  • Our picks

    • Simply Jaguar show at Beaulieu - Sunday 23rd June 2024
      Jaguar Owners Club have a stand at this year's Simply Jaguar event at the National Motor Museum at Beaulieu, Hampshire on Sunday 23rd June 2024

      Tickets are available online here: https://www.beaulieu.co.uk/events/simply-jaguar/
        • Like
      • 1 reply
    • JAGUAR’S LAST PETROL SPORTS CAR: F-TYPE ZP EDITION TAKES THE CHEQUERED FLAG
      Jaguar is commemorating the end of its internal combustion sports car lineage in 2024 with an exclusive limited-edition F-TYPE inspired by two iconic 1960s racing E-types

      Just 150 examples of the F-TYPE ZP Edition will be the last internal combustion-engined sports cars designed by Jaguar. These 575PS supercharged petrol V8 F-TYPEs feature specially curated interior and exterior details by the personalisation experts at SV Bespoke.
        • Like
    • UPDATE SHOW INFORMATION !

      Please find attached your club label – please can this be distributed amongst your club members prior to the event. Please ensure that they print this label and display it in their windscreen upon entry to the event, this ensures that all members wishing to park within your club area are directed to the correct parking location by our stewards. Please do not modify or add logos to the club label.

      We do ask that all individuals have purchased their tickets on an individual basis in advance via our website, to speed up the entry process on the day. This can be done on our website here until 2pm on the day when admission closes: https://www.beaulieu.co.uk/events/simply-jaguar.

      Note that we do have two entrances available, one is exhibitors gate at the bottom of the hill as you come in to Beaulieu, with the other being the normal Simply event entrance within the attraction. Either entrance is fine to use and both are open from 9.00am, with the exhibitors entrance closing around 11am.

      Jaguar Owners Club (1).pdf
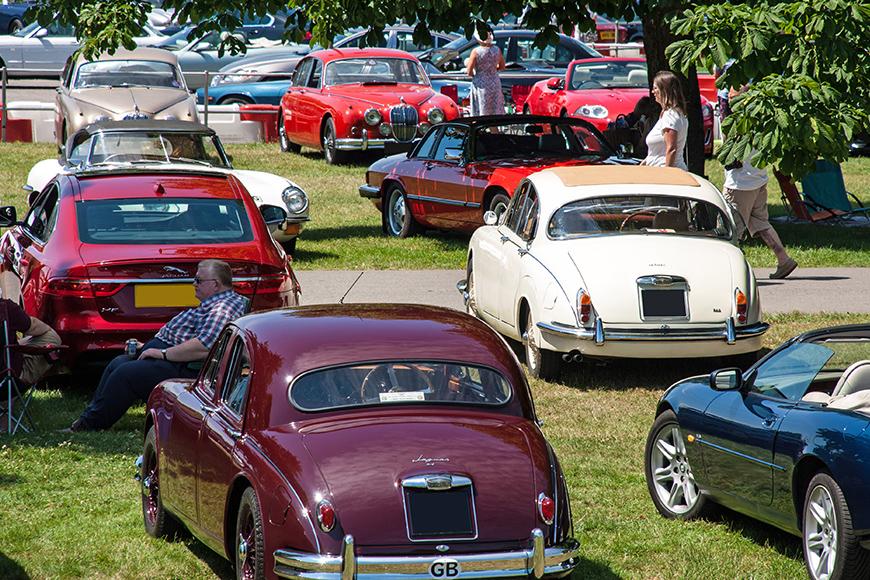
    • Simply Jaguar - Beaulieu Motor Museum - 25th June 2023
      Jaguar Owners Club have a stand at this years Simply Jaguar event at the National Motor Museum at Beaulieu, Hampshire on Sunday 26th June 2023

      Tickets are available online here: https://www.beaulieu.co.uk/events/simply-jaguar/


      TICKETS & PRICES
      Participant prices are only valid if arriving in a Jaguar and taking part in the rally. They are not valid for those arriving on foot.

      Participants can make the most of our EARLY BIRD discount by booking before 28th February 2023.

      Children under 5 require a ticket, this can be booked online free of charge.

      Participant and visitor tickets will include entrance to the rest of the Beaulieu attraction, including the National Motor Museum, Palace House, Little Beaulieu, World of Top Gear, Beaulieu Abbey and its grounds and gardens.

      The best time for viewing the Simply rally is between 10am and 2pm.


      Adult


      Child


      Participants – Early Bird*


      £14.00


      £7.50


      Participants – Standard & On The Day


      £16.00


      £8.00


      Visitors


      Normal admission applies.


      Normal admission applies


      *Early bird tickets are available until 28th February 2023

      VEHICLE ENTRY
      Entry with your Jaguar is from 9am – 2pm. Please make sure you have your ticket printed or available on your phone, ready to be scanned on arrival.

      Please do not arrive early for our Simply rallies as no facilities will be open prior to 9:30am.

      Cars cannot leave and re-enter the grounds for the Simply rallies.

      ________________________________________________________________________________________________________________

      CLUB STAND ATTENDEE LIST

      We do ask for a final update on numbers 2 weeks prior to the event following which we will send out club labels to you via email for you to then distribute out to club members. Club members then need to print and display these in their windscreen on arrival. This helps us then park you all in your club area together.

      1. Trevor (admin)
      2.  Paj
      3.  
       
      • 5 replies
    • F-TYPE marks 75 years of Jaguar sports cars and its final model year update
      The Jaguar F-TYPE is the definitive Jaguar sports car from a rich bloodline spanning 75 years and including some of the most iconic models ever built
        • Like

×
×
  • Create New...


Forums


News


Membership