

piria33
-
Posts
47 -
Joined
-
Last visited
-
Days Won
4
Content Type
Profiles
Forums
Events
Gallery
Store
Premium Membership Discounts
News
Videos
Everything posted by piria33
-
New solenoids/Zip kit and plate for valve body 6HP26
piria33 replied to piria33's topic in Jaguar S-Type Club
You're safe then as you only need a T27 and T40 torx set. No spanners required.
-
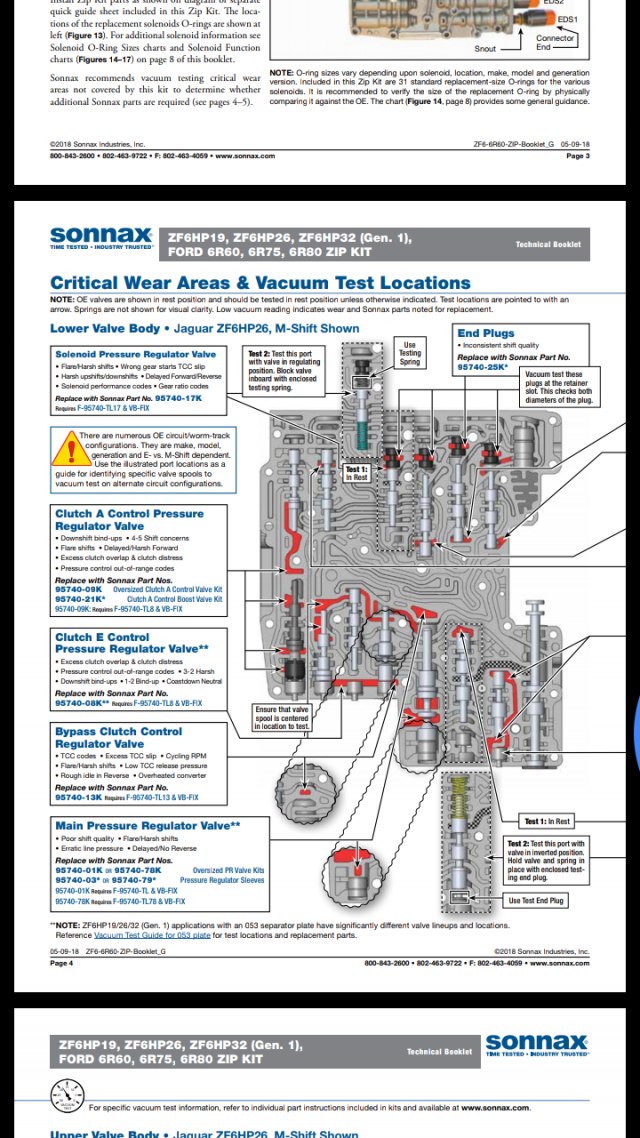
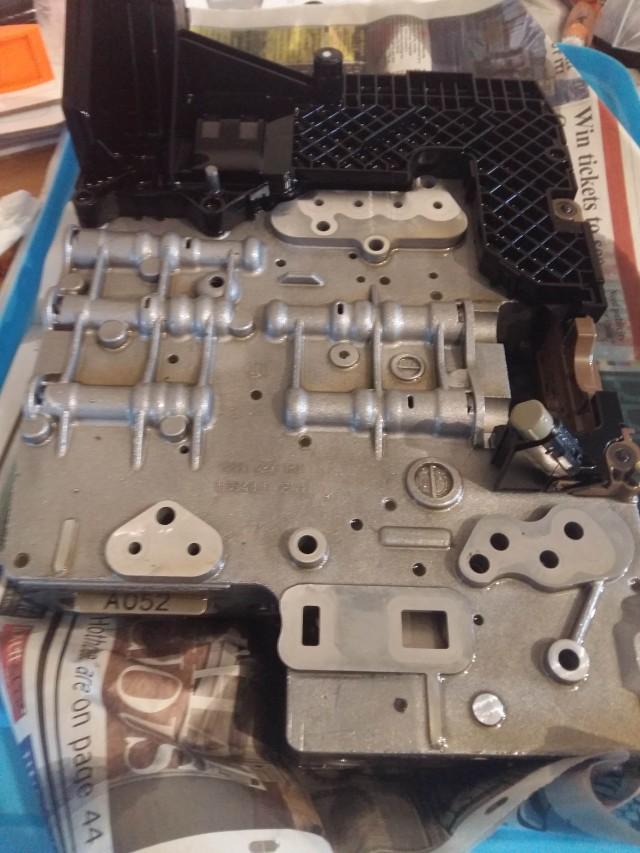
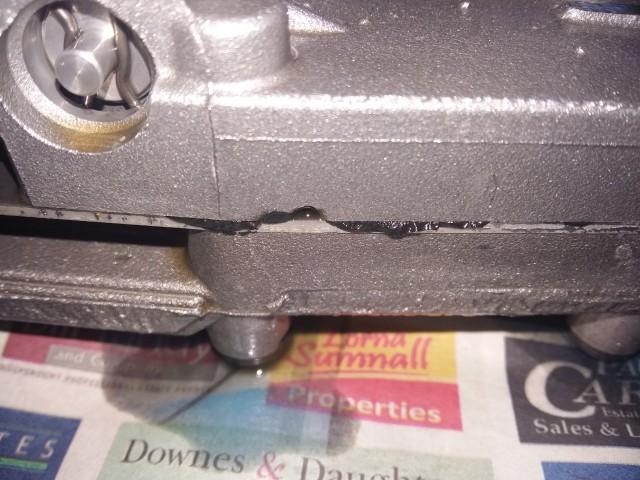
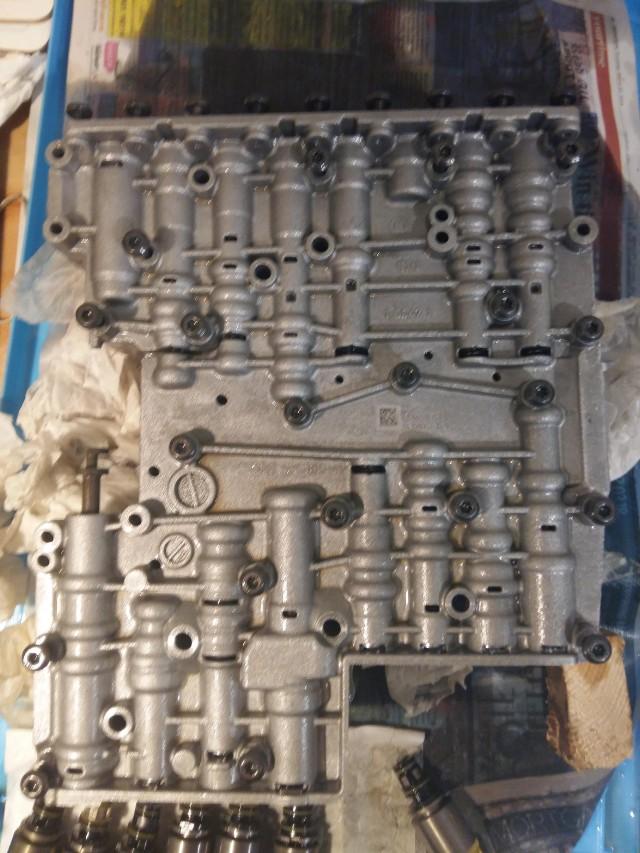
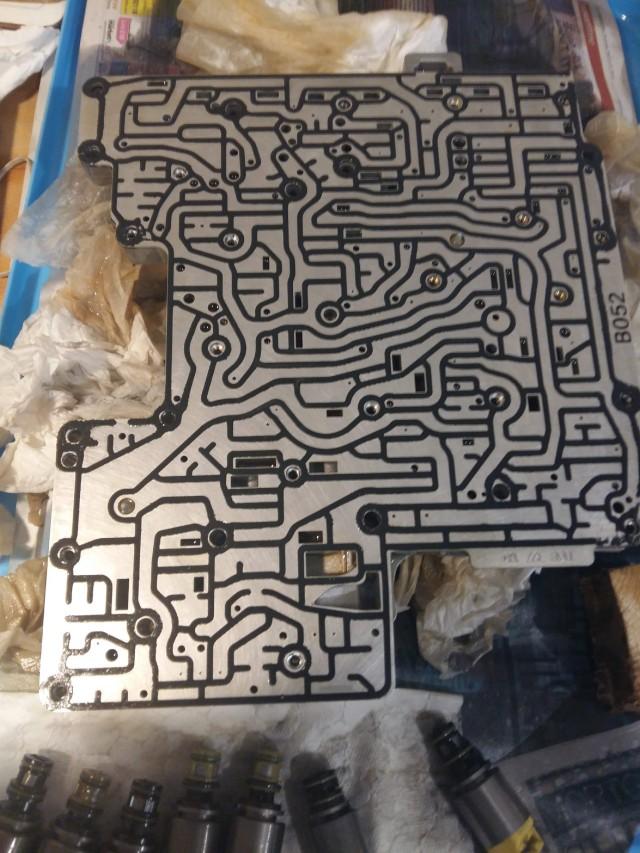
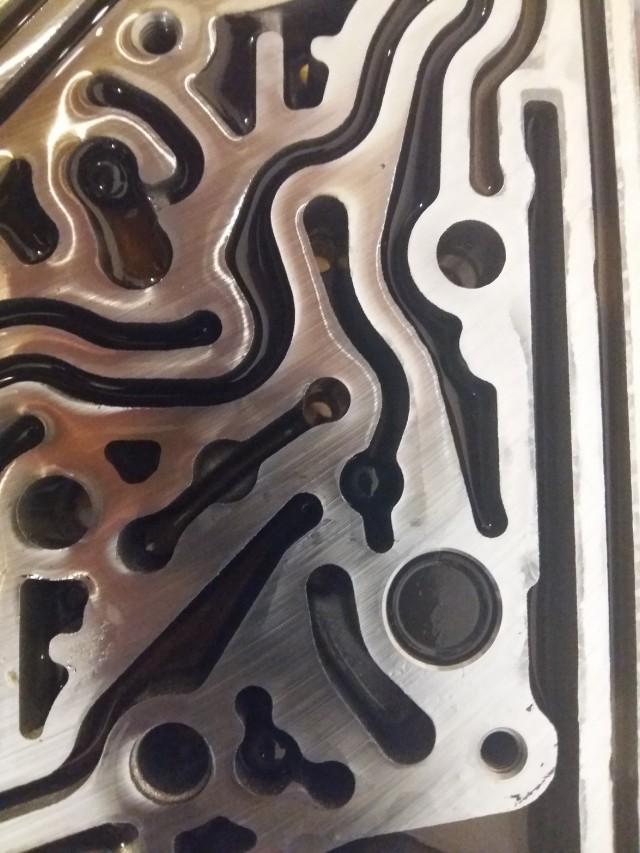
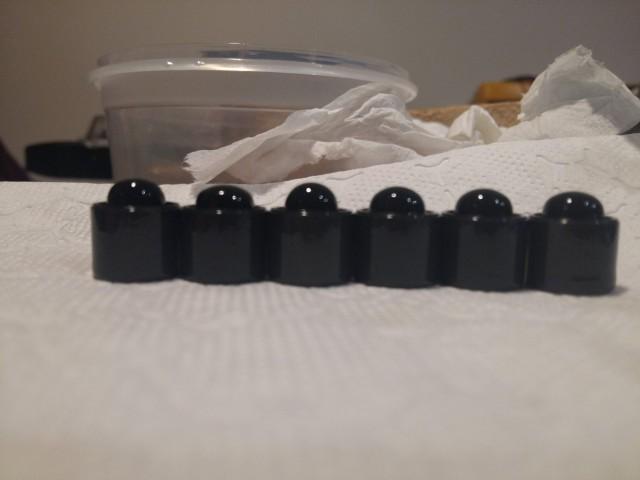
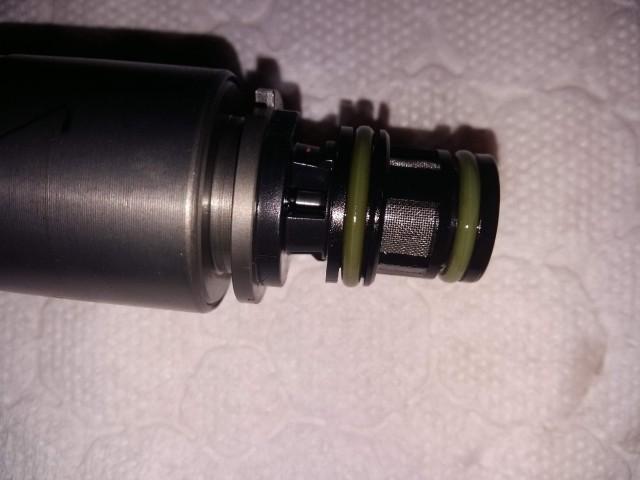
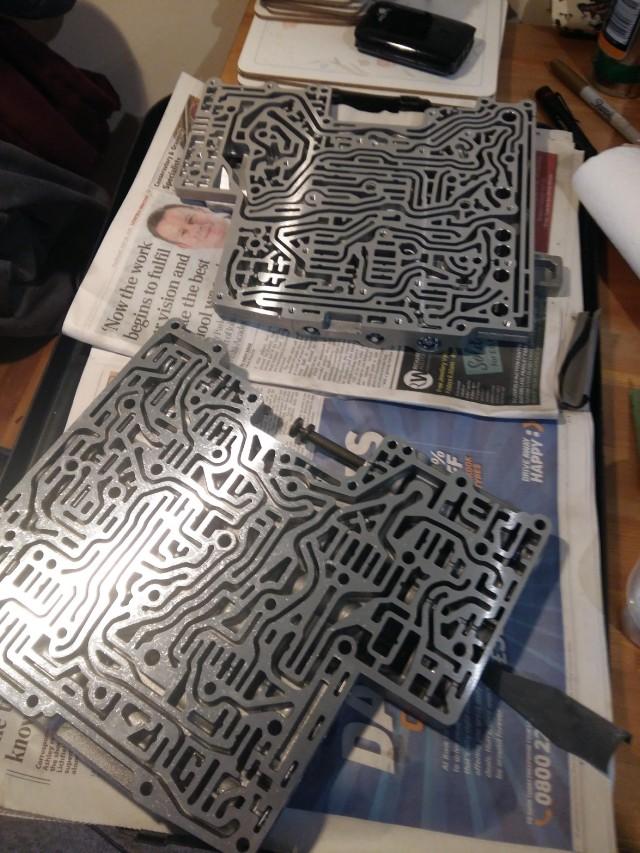
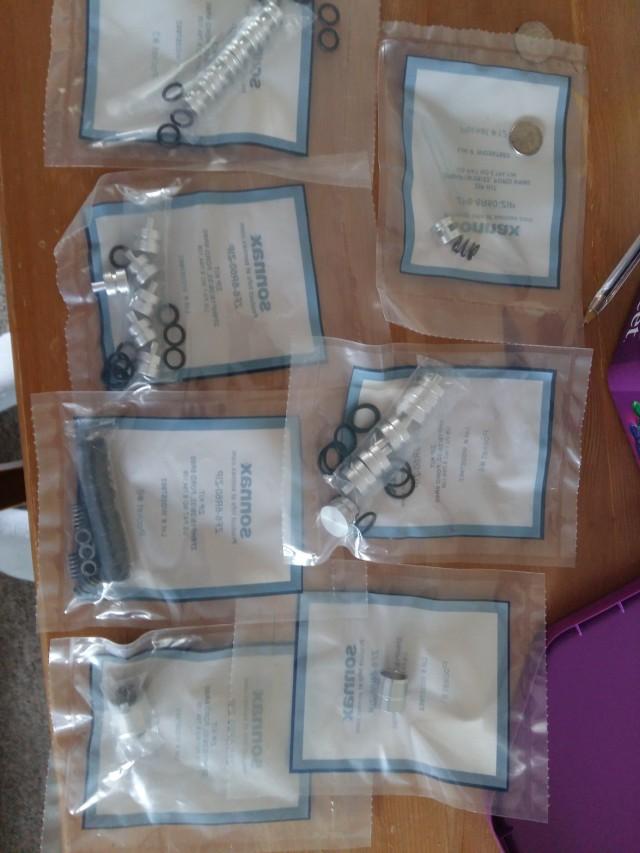
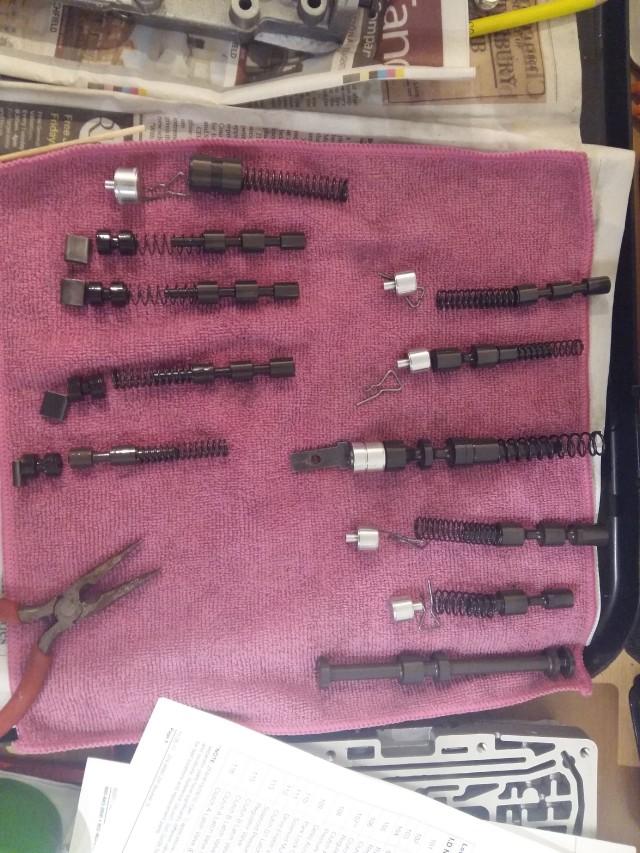
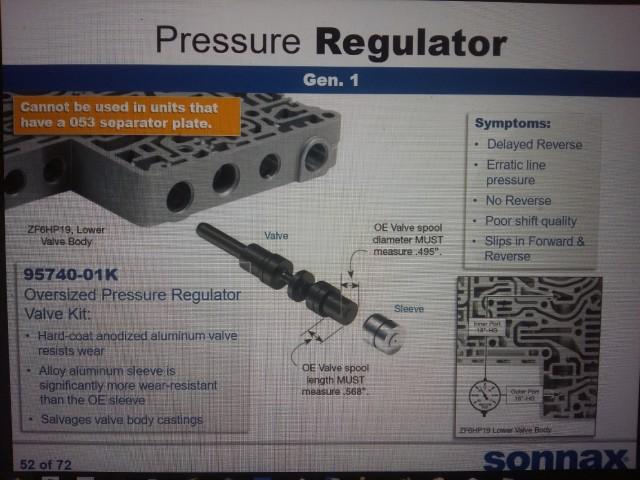
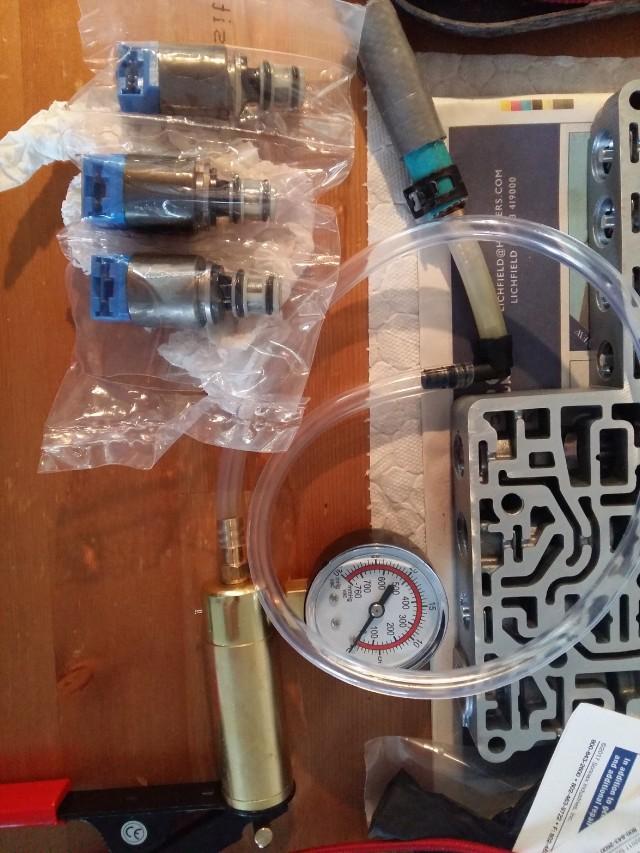
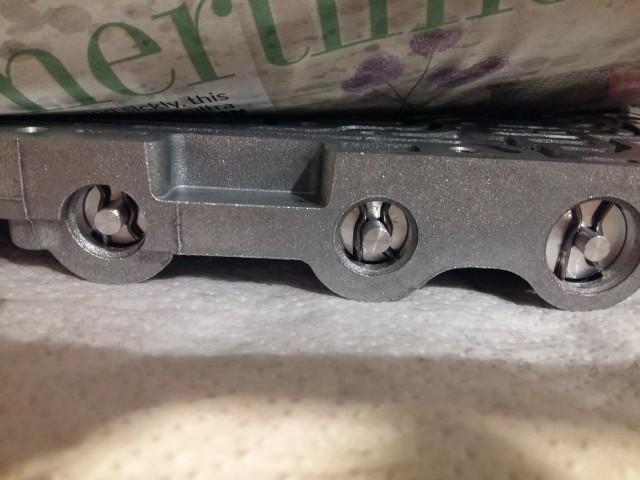
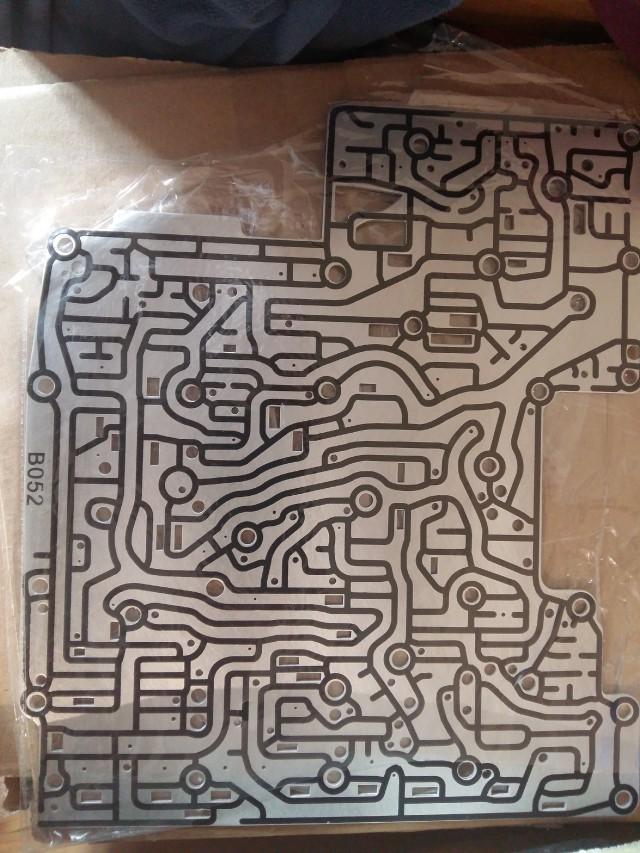
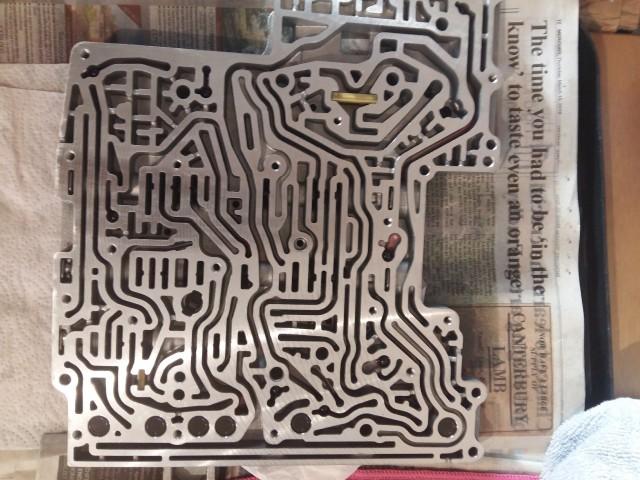
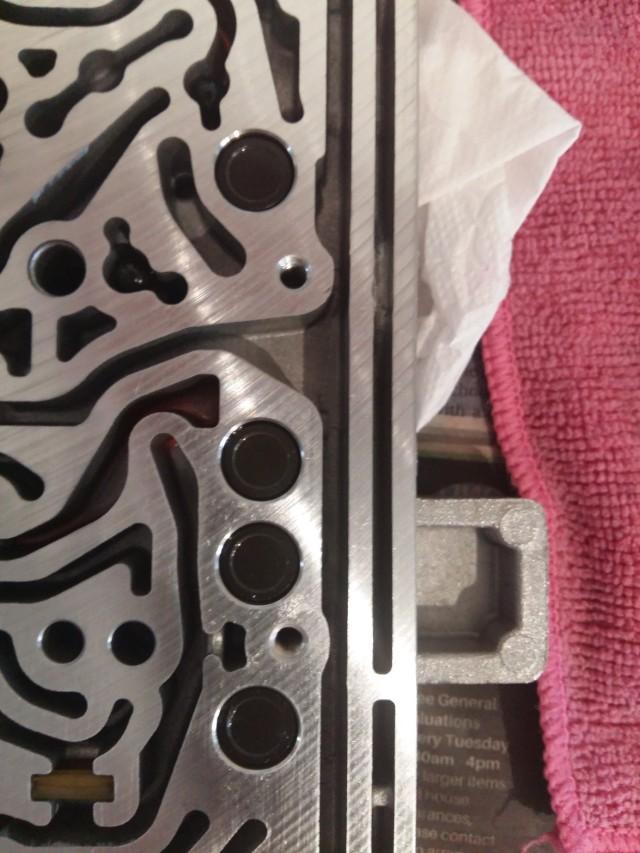
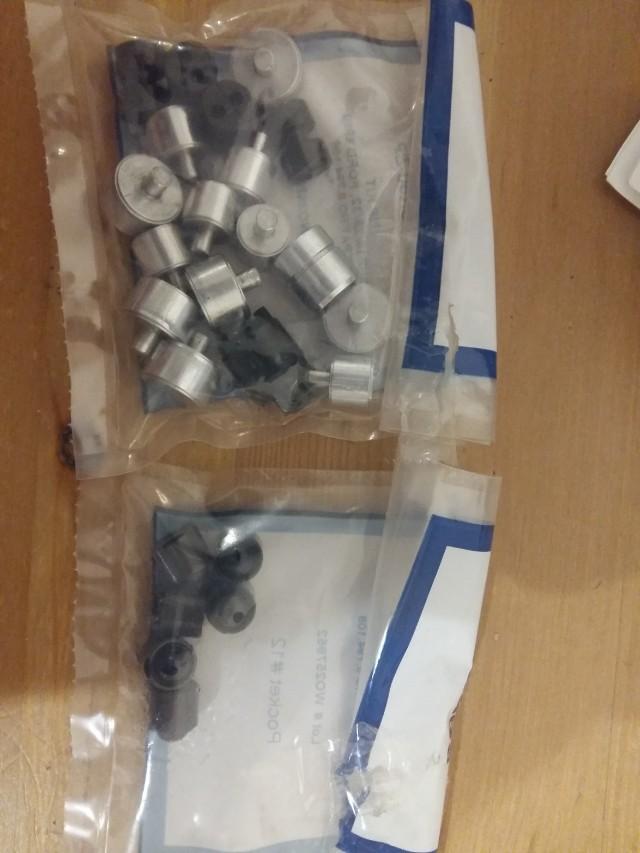
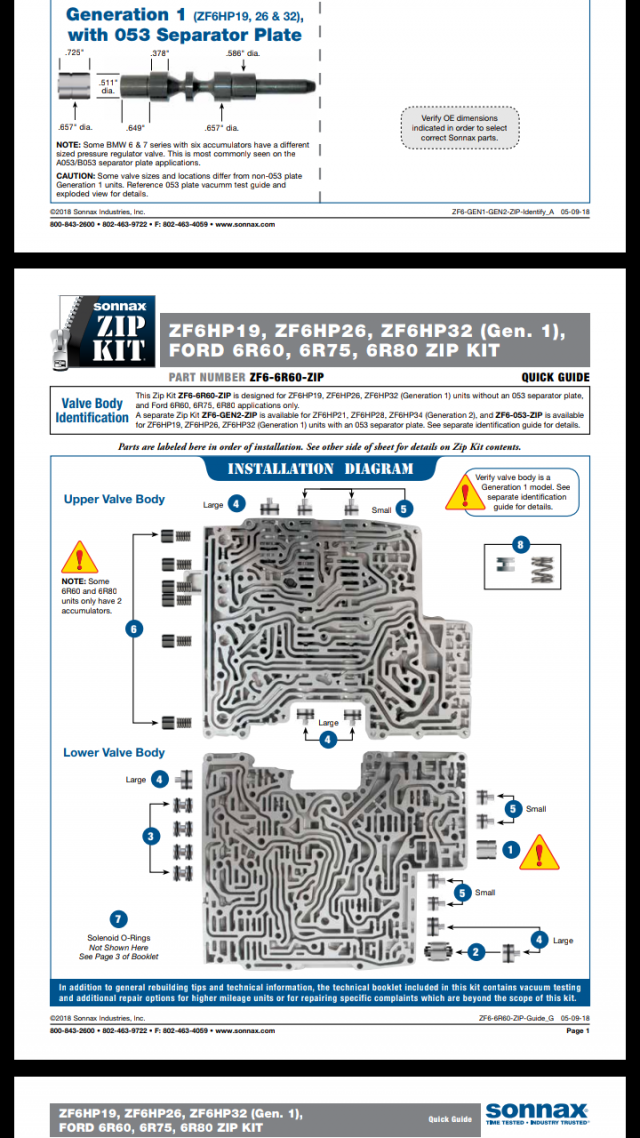
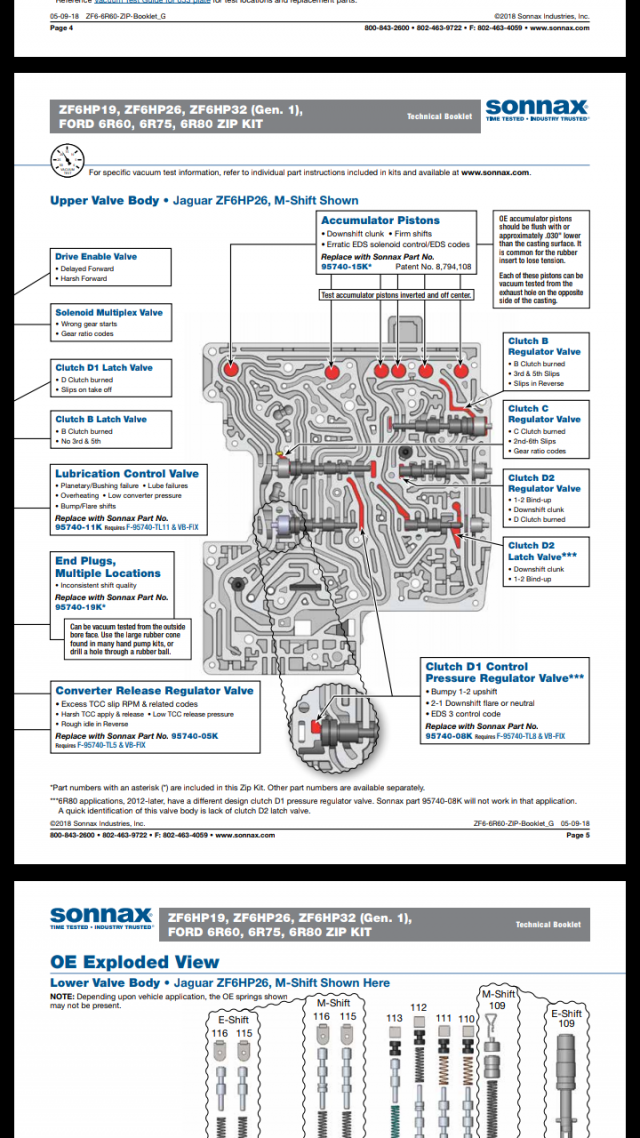
I have just completed a challenging but fun project. I was suspecting worn parts in my vlave body due to a slight flare/delay (not surge) when upshifting. Before looking at the bushings in the tranmission the first place to revise is the valve body as this is the control centre for the pressure control for shitfing. Spending several evenings carefully dissasembling the valve body and cleaning I proceeded to vacuum test the different ports and solenoids. Several weak points were found. The inner seals on the soleoids were all worn. Also some of the areas on the valve body. The separator plate was quite worn also. These can erode over time. So Sonnax provide a zip kit tor restore certain areas of the valve body without the need for reaming. New end plugs, o-rings, 6 accumulators, A clutch valve sleeve and pressure valve end sleeve installed. New plate and new ZF original solenoids. (ESD cable was used at all times when touching the TCM) Everything was spotless. Had an oil change in March but wasn't happy with the shifting quality. All installed and torqued up correctly, double checking everything. New oil went in again. SDD to check for codes - adaptions reset. After some initial hard shifts due to the adaptions adjusting all gears 2-6 felt vastly improved. No shift flare and faster smoother shifting. 1-2 was still harsh. But after about 90 miles 1-2 is now smoothing out. Re-checked oil level after 2 weeks. Added just 200ml . All good now. I can say this box still has a lot of life left in it (currently at 141k). The new parts on the valve body has injected new life into it without the need for a full rebuild. Let me know if you want to view some photos. Thanks
-
S Type, massive failure, any ideas welcomed
piria33 replied to Harley2002's topic in Jaguar S-Type Club
As explained very well by Steve the ABS must be working well. In fact a faulty ABS sensor can put the gearbox into limp mode (stuck in 1 gear) as it disables itself to prevent damage. Let us know what fault codes show. Hope its an easy 15 pound fix. Thanks -
I've been working on a home set up with SDD and Mongoose interface cable. V130 SDD set up on a dedicated XP Dell laptop. Drew MongoosePro driver 32 bit installed. No internet connection. BIOS date set to overide the actual days to less than 21 days of last sdd update in system information. Works a treat. Battery voltage must be maintained between 13-14 volts with a source that can suppy a sustantial amount of current. Wife's car idling with jump leads to my battery worked perfectly. Recently had to clear adaptions on my transmission and look for codes. Very useful tool - I will spend some time going deeper into all the engine parts to see if there are other hidden warnings or codes. Even datalog as you are driving.
-
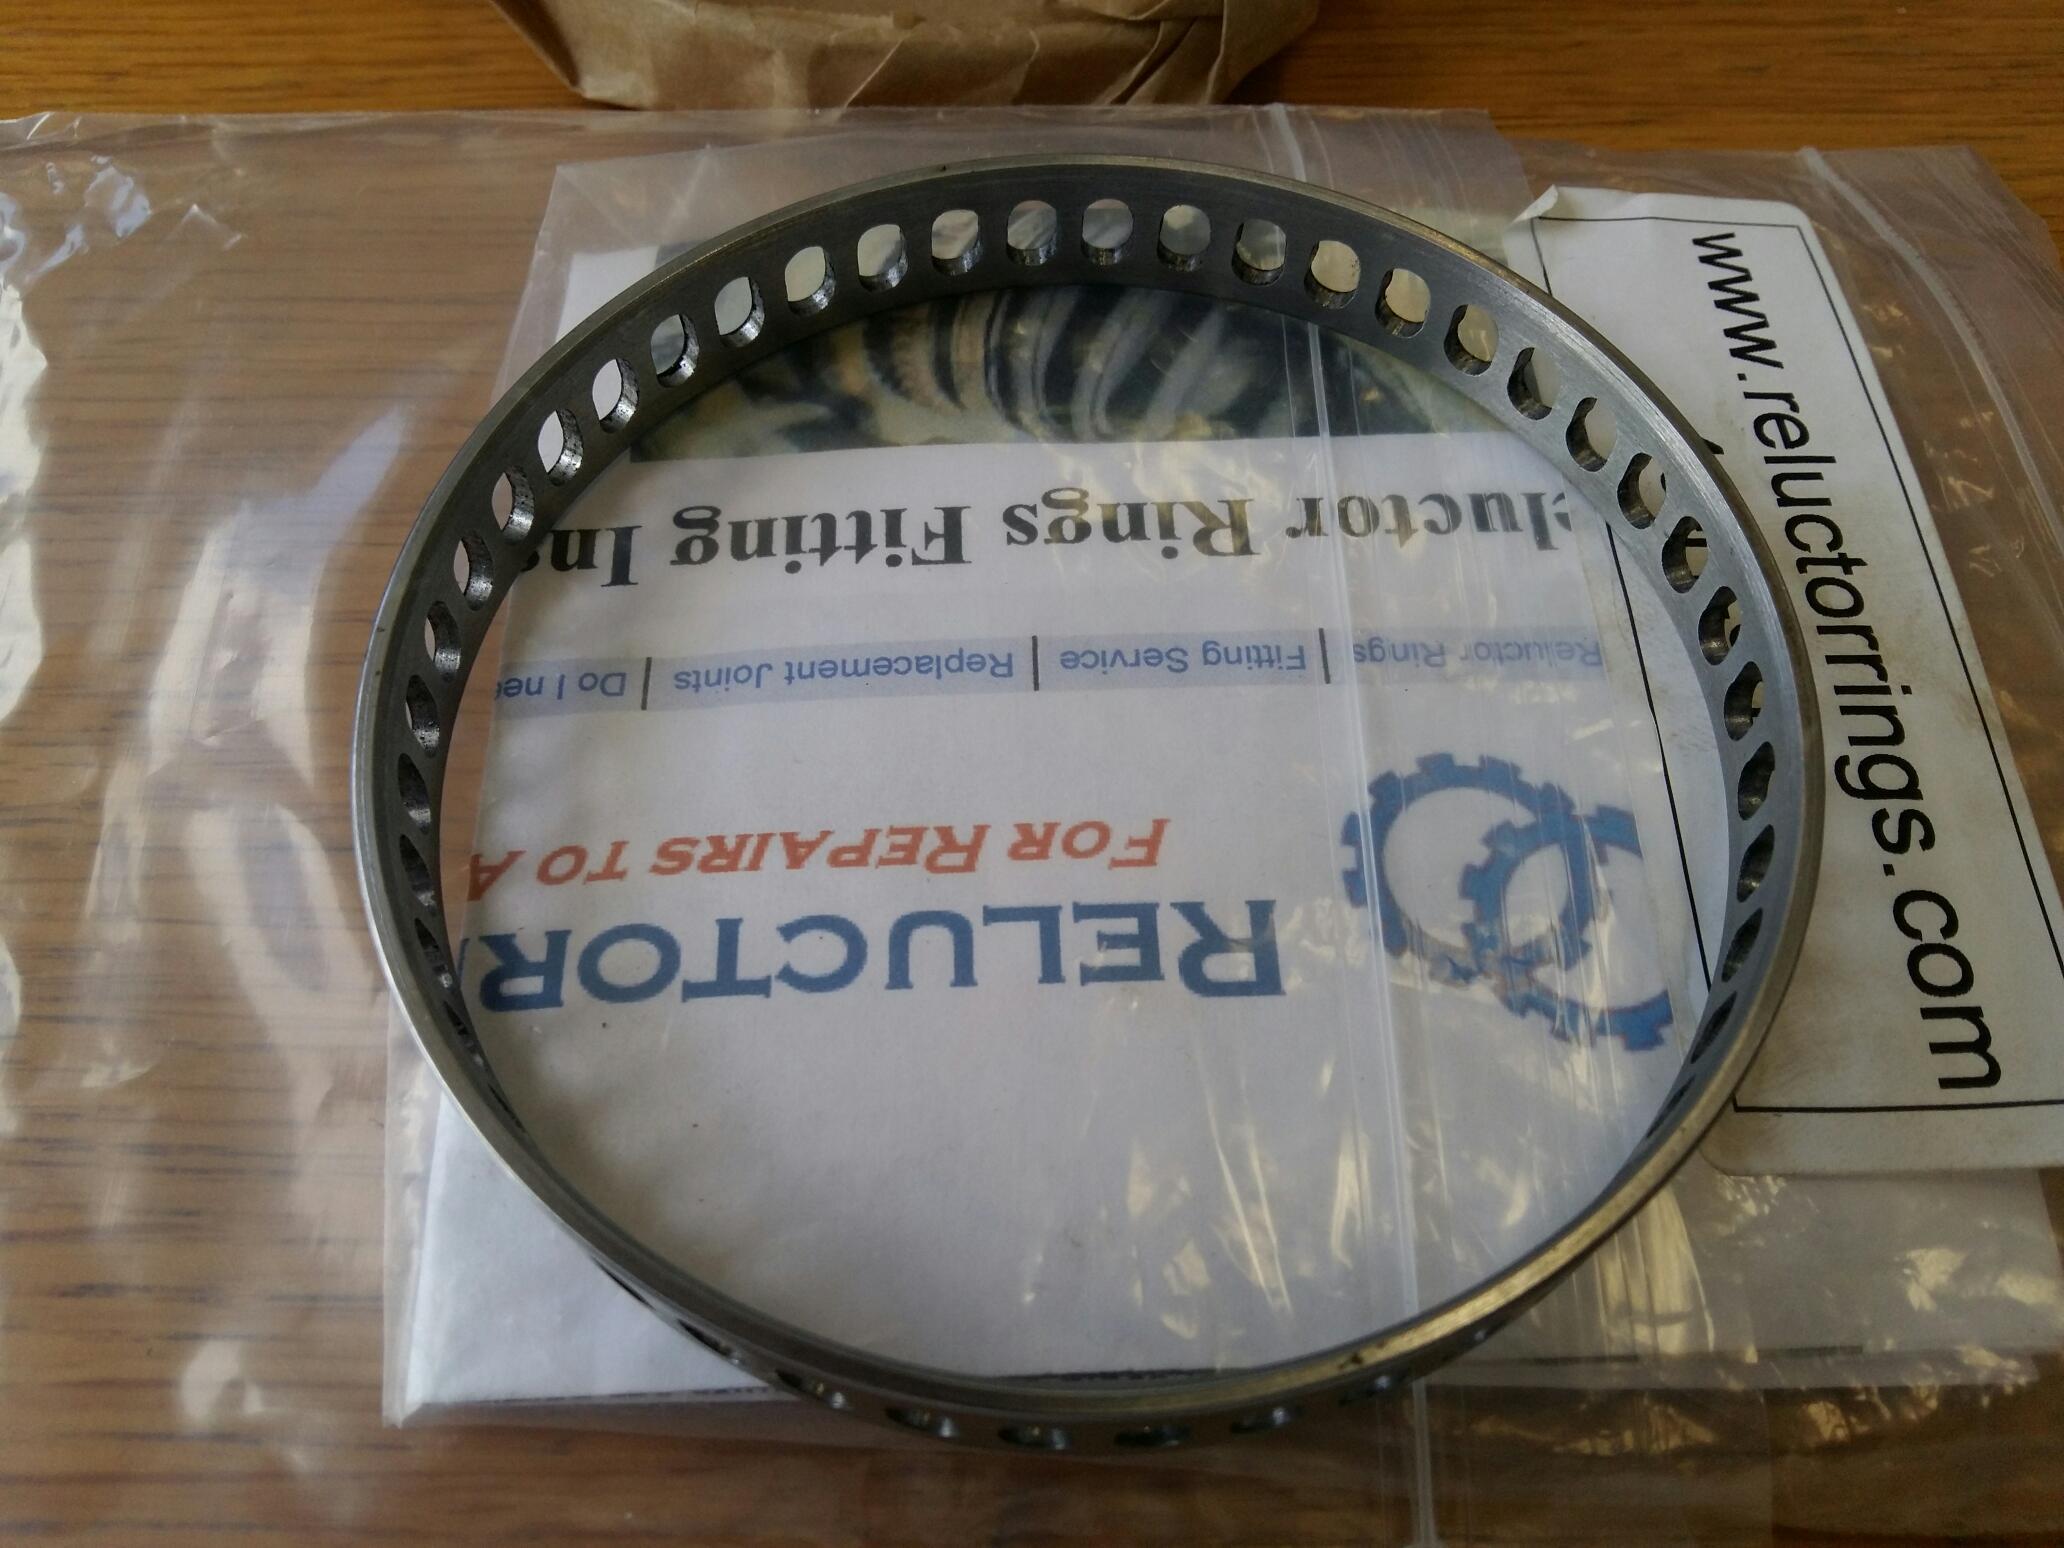
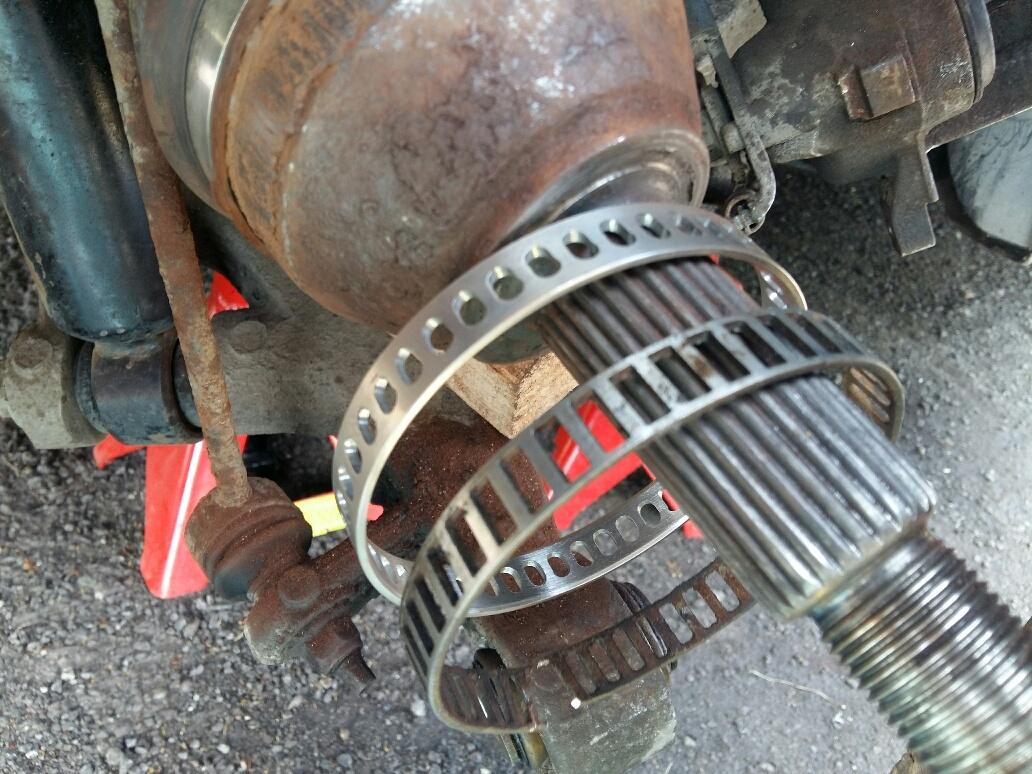
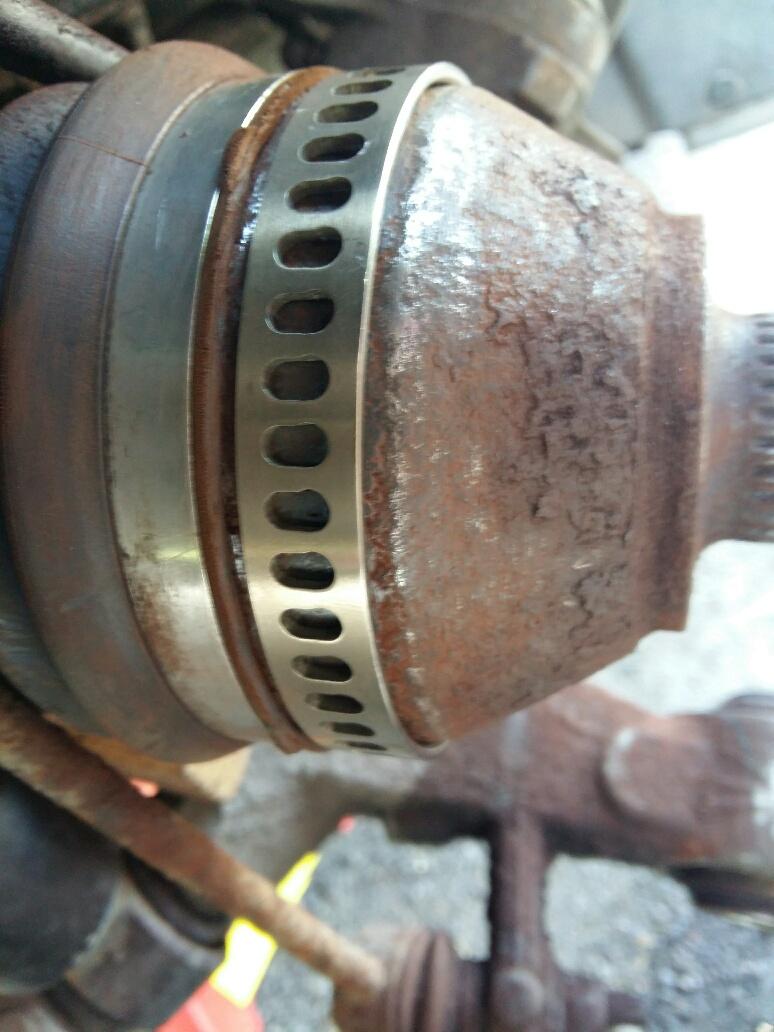
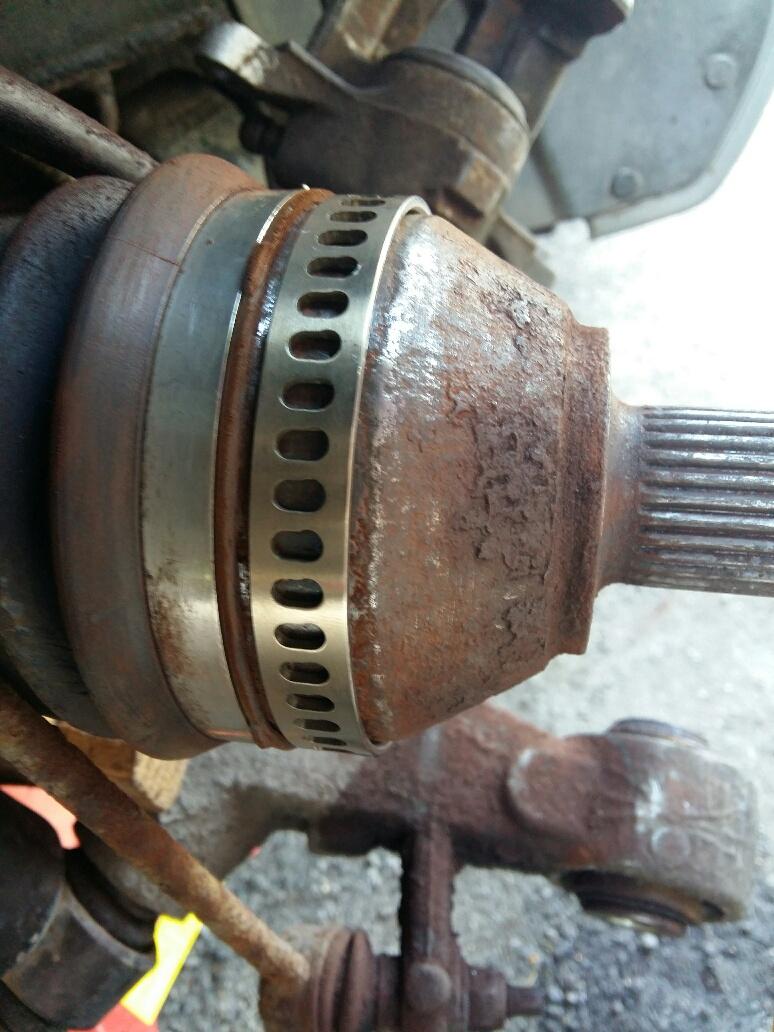
This is the window type. Quite a job getting the shaft out of the hub but once there and cv joint cleaned up the ring just needed heating up in the oven and with a slight tap it slipped on very nicely. Used a feeler guage just to make sure it lined up same as the old one bit it did also have a slight edge on the cv joint so it lined up perfectly. Upgraded ring so will resist stretching much better.
-
Changing relector rings (window type) at home
piria33 replied to piria33's topic in Jaguar S-Type Club
hmm the shifting had been a bit off again this week. Last week after changing one side there was a nice improvement in smoothness, Its been fading this week as if something is off again. A gradual change which is strange as if the adaptions are a bit squiffy and wondering. I wonder if its because I haven't changed the other side yet and the 2 rings are quite different designs. Rule of thumb - change everything in pairs! bit frustrating. Checked the newly installed ring last night and all looked perfect. (note I do have cheap sensors in right now - not sure what difference there is between expensive ones and cheap ones). Once the other side is done I might take it in for an fluid level check and adaptions reset also to rule out anything (could be a leak but seen nothing on the drive - had real seal replaced to propshaft a few months ago) . Not sure where yet. -
Make sure you have 21 new bolts also. You may well find it very hard to remove the old ones and may round off. New ones have a larger torx head also making it easier to remove in the future.
-
Changing relector rings (window type) at home
piria33 replied to piria33's topic in Jaguar S-Type Club
Thanks. Yes few bother to take on these tricky jobs. Well worth it imo. The ZF boxes rely on all of these inputs to work well. 4th day driving and it feels great. I feel the box is more precise and smoother. I'm sure once the other side is done also I'll see a further improvement. It has been reiterated that the air gap is critical. If the air gap is varying as it rotates due to a ring that has warped how is the ecu/tcm going to read this? Does it take an average or does the voltage strength vary? If the metal of the ring is in bad shape surely the signal will be weak also. The new ring is much stronger than the old one as you can see. The metal is better quality and of a harder material also. The guys at reluctorrings know what they are doing. Not 9.99 ones off ebay probably made of tin metal. -
Changing relector rings (window type) at home
piria33 replied to piria33's topic in Jaguar S-Type Club
Thanks Steve. Yes wasn't easy. I didn't really want another used one with the same soft old rusty rings. I didn't think of the position relative to the axle to be honest. Seemed to be fine. Same would happen if the shaft was removed and re-installed. But position relative to the sensor (if I understood your question correctly) - I measured the distance between the inner edge of the old ring and the edge of the CV boot with a feeler guage. Tapped the new one up to the same position very carefully. You could aslo create a spacer. I assume the position relative to the axle is self-calibrating. As long as the sensor is reading the windows correctly and creates a good strong voltage. Thanks -
Changing relector rings (window type) at home
piria33 replied to piria33's topic in Jaguar S-Type Club
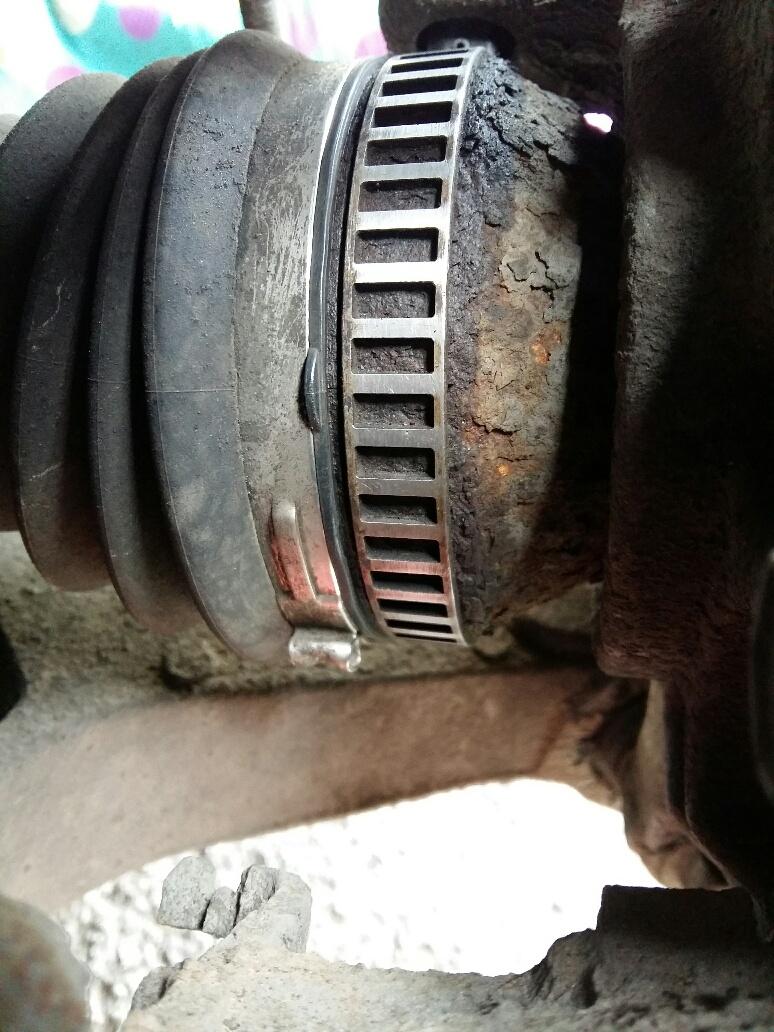
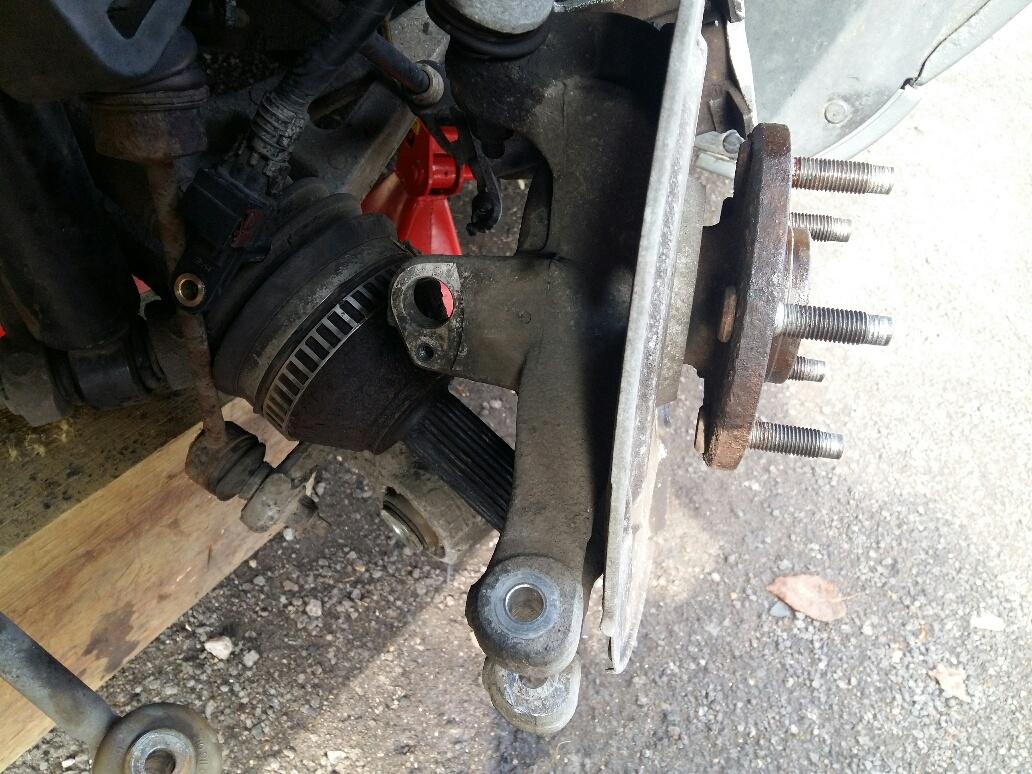
SUCCESS!!! Finallly this Satruday morning a helpful mechanic from Rugely came out and did struggle initially. His 10 ton puller did nothing. His standard copper hammer did nothing. So he brought out the big guns. The giant copper hammer with a 6 ft handle and 5kg head! About half a dozen whacks with this it started moving bit by bit. Once it had gone in about an inch he pulled it back with the hub nut and then out again. Risk of damaging the bearing we took but turned out ok. Bearing felt fine afterwards. Then I spent half the day cleaning up the CV joint. Wow what a rusty mess. Took a while to get it to just the right size so I heated up the ring in the oven and just tapped it on. Added a bit of epoxy on the edges as added security. Sensor back on and a perfect air gap all round. Then assembled the shaft/hub etc. Sunday test drive and what a difference. The gearbox has rewarded me!! It is crisper, smoother and more precise. Now I need to get the other side done! All I can say is don't overlook these reluctor rings. View the air gap while you spin the hub round. It only takes a small variation in air gap to affect the ecu/tcm. Gavin from Reluctor rings said they don't need any treatment due to the quality and design.
-
Changing relector rings (window type) at home
piria33 replied to piria33's topic in Jaguar S-Type Club
Hi R2e. The reluctor rings aren't the issue. Unless you mean cut the old one off. Cut the new one and squeeze it on. This will deform the new one and it will never be completely cylindrical again. -
Changing relector rings (window type) at home
piria33 replied to piria33's topic in Jaguar S-Type Club
A mechanic from Rugely should be able to pop over saturday morning with various hub pullers to try. If he can't remove it he won't charge anything. If that fails my boss knows someone who has a big 30 ton press being assembled. Would have to take in the whole shaft and hub assembly then they'll pop it out in a second probably. Hope the mobile guy can release the rust bind. -
As some of you may know I've been having issues with my abs system due to rusted and warped reluctor rings on the rear. They do affect the tranny as they send the speed outputs to the TCM. When the nearside sensor failed the tranny was surging and hard shifting randomly. Once the sensor was changed all returned to normal. then the offside went and again but not as severe the tranny started acting differently. Just a few mildly rough shifts. Nothing to make you jolt but not a smooth. This time I saw the ring was warped. Had 2 high spots and a lot of corrosion underneath. We had a hard winter with lots of snow/sluch/salt. After contacting a few garages with no luck my local garage just put a shim under the sensor saying the ring was fine!! No not for a ZF tranny. the air gap needs to be consistent and not vary due to high spots! I know my tranny and its feel changes when you vary that critical air gap. I tested it! Getting fed up with mechanics not wanting to take on a more challenging job I've decided to tackle it myself. Gavin Moss from reluctorrings.com said the window type will not need heating up to get on. There isn't enough parent material so will slide on and stick on with a good adhesive. So should be possible to do at home. Friday night all ready to start. Nope wrong I thought I had a 36mm socket. 8.10pm and Halfords closed. Saturday picked up a 36mm impact socket. Couple of shots with the impact gun the nut started to move. Breaker bar to remove the nut. Jacked up and acces to hub. Hours trying to loosen the shaft spline from the hub!!! Wouldn't budge. So back to shopping - online bought a fairly heafty hub puller (18 thread that bolts onto the hub bolts and not the usual feeble 3 leg pullers). https://www.amazon.co.uk/gp/product/B004FDMWE0/ref=oh_aui_detailpage_o01_s00?ie=UTF8&psc=1 4lb sledge hammer on order for today also. So a good pressure with the hub puller and blows with the sledge I hope it will budge. Its been soaking in wd40 also. Well I put the hub nut back on last night to use the car to get to work. Fingers crossed for the second attempt this week. At least we have nice weather (although wife/son want me out more to play games after work so its always a struggle).
-
What is your VIN? We can have a look on the JPEC.
-
If they do it properly they need to be testing it out on the road under different conditions. Can the iCarsoft 930 do this?
-
Maybe there is some movement with the CV joint and half shaft while under load. It's been dry since so I don't expect any rust increase under the ring. If the abs clearance is tight while jacked up it might vary slightly while under load and acceleration so needs some headroom. They are moving parts.
-
Well after a few days the box just didn't feel right. The garage said they checked all abs sides! BS! They said all outputs matched I checked the nearside and it was scraping also!!! I put a very thin shim in and instant improvement. I can push hard through all gears in D or manual and it feels tight. Damn these boxes are senstive to all the inputs. Can't anyone do a proper job anymore?? oh yes they also bent the edge on my sill skirt/rail!! Had to reshape it and paint it again. I have my MOT with them next week so don't want to !Removed! them off until that is done as they've always been good on the MOT work.
-
I think the box is adapting again to the new variables. 1st day out was a bit strange. After 2 days much better! I wish it would act instantly. Anything that upsets the box takes time to settle down. Its like upsetting their feelings and being in the doghouse for a few days!! Like I have 2 wives!!
-
Did mine a week ago. I couldn't remove the key on my 2004 3.0l so just left it in with the park brake off. 15mm main caliper bolts were a pig to get off - covered in loctite. every 1/4 turn a struggle. Had a seized slider pin which delayed me. Took 3 times longer than expected and was knackered afterwards
-
Now my Jag stops properly!! Had a seized slider unknown to me
piria33 replied to piria33's topic in Jaguar S-Type Club
Not as far as I know. Both brakes are working well now but still the nearside gets a bit hotter than the offside. Maybe I need to strip it again and make sure all the moving parts are super clean and free of rust. The contact surfaces for the brake pads on the caliper surfaces for example. Once you have wound out the piston and replaced everything they are self adjusting aren't they? I mean if I have wound out 1 piston more than the other both will push back in until they have full contact? I did recalibrate the electronic hand brake just in case. -
Just got car back. They didn't replace any rings! The offside sensor was damaged. They used their diagnostics machine to match the output of each sensor and some shims to get them at the right height. Every sensor now matches exactly. Impossible to do at home properly. without the equipment
-
I always thought my brakes on my newishly acquired 3.0l 2004 were a bit poor. Thought it was just a heavy car or had poor pads on. MOT time this month so I'd thought it was a good idea to replace the rear discs at least. 7pm Friday night I'll pop out have have the rear offside done in a couple of hours max. oh boy was I wrong!! Firstly I almost broke my back trying to remove the main 15mm caliper bolts!! OMG how much blue loctite did the previous garage put on (medium strength but had copious amounts on)??? Every 1/4 turn was a workout using a fairly long breaker bar, one I could just fit in. Literally had to lie down after I finished each one. Then after clenaing up the caliper I saw that one of the sliders looked a bit rusty. It was completely seized, caked in thick rust. Took me about 30 minutes of hammering just to break the rust seal. no wonder the pads weren't clamping properly. The piston was just pushing against a seized slider!! I managed to release it and clean it up nicely, new grease and slides perfectly now. Under floodlight I finished about 10.15pm. Saturday morning I tackled the nearside (with bad knees , cuts and bruises). Again a good hour at least getting off the 2 15mm bolts. They certainly didn't want anyone to remove these!! Well after a good bleed on both sides, new disks and pads braking was a brease coming to work this morning. Fronts do need chaning but enough pads and disc material to get through the MOT this month. Think I need a month to recover before hitting the fronts!!! Looked like about 2 years of rust on the slider. How that accumulated since the last MOT puzzles me!!!
-
S type 2006 2.7 v6 diesel Auto Gearbox fault amber light
piria33 replied to Jonny5's topic in Jaguar S-Type Club
It may be possible to change them yourself after reading their notes: -
S type 2006 2.7 v6 diesel Auto Gearbox fault amber light
piria33 replied to Jonny5's topic in Jaguar S-Type Club
Does look like it fits right on the edge. Also the distance from the CV joint is probably used as a ref. if they get it wrong the first time I assume they have to remove the CV joint then to heat it up again to move it!
-
S type 2006 2.7 v6 diesel Auto Gearbox fault amber light
piria33 replied to Jonny5's topic in Jaguar S-Type Club
Each!! I know I searched high and low but nobody else sold the window type. Only the toothed type for cheaper. They do have to be made very accurately though. Eventually got my credit card out as its spoiling the enjoyment of the Jag ride. Yes I did wonder about the exact fitment. Maybe they'll mark the old spot otherwise the sensor won't line up. I'll ask next Tuesday. reluctorrings.com do have a fitting service if you want that. But means sending in your shaft or CV joint. Mine is a daily drive so need it done in the day.