

JustBadly
Established Member
-
Joined
-
Last visited
Everything posted by JustBadly
-
 Pull the ddr module and resolder the chips. With the vibration of driving and door function it can cause pin solder cracks. My car was not responding to the key fob. I bought another ddr module but reworked the original. Now I have 2 working ddr modules. This is the first thing I will do with electrical faults.
 -
Here I am changing the hood release cable from a two piece to single cable. I have a 3.6m brake cable and pinch bolts, these are bicycle parts. I remove the pear nipple and retain the barrel nipple. I am going to secure the cable with two pinch bolts, they will exchange with the standard cable attachments. After cutting the cable attachment the 1st release cable can be pulled thru the cable outer from the driver compartment. Then the second cable release is cut and removed. Although the replacement cable is thicker (1.5mm) it still fits thru the original cable outer. Here I have passed it into the engine compartment. The pinch bolt must be placed on the cable before passing thru the second cable outer. Then it is a simple case of securing the second pinch bolt and the hood catch mechanism. I have had the standard hood release cable break and after some thought this is my solution, it is quite secure and durable, low cost and took about 1.5hrs labour - negating the need to replace the entire cable assembly -which is no small job. Quite within the capability of an independent garage or competent mechanic.

-
The windscreen drain can block 'inside' the vehicle since this can happen frequently it is your responsibility to check this.The rear of the Chassis - forward of the back wheel has cutouts for jig alignment. Due to modern tire width water is not only splashed outward but forward. Meaning water is able to enter the cutouts causing inevitable internal corrosion. I made simple oversized bungs from packing foam and gorilla tape to fill these holes.


-
The driver floor pan deteriorates if the windscreen drain is blocked. It overflows below the wiper drain and reaches the floor pan. The rear arches go due to water splash from the rear wheels entering the chassis from the cut-aways forward of the rear wheel. I made removable bungs to fill these.
-
Plenty of S Type parts here Berkshire Jag
-
Tell the people who said they will refurb the unit that, if they can't do anything with the unit they MUST return it to you. Then send it to me, I will give it some PCB rework and we'll see if that does it. Don't worry, I work for an electronics firm and there isn't much we can't do. PM me if ok.
-
Try Auto Reserve Jaguar, they recover parts from running cars and the parts are guaranteed. I made an override kit for my S Type. https://www.jaguarownersclub.com/forums/topic/26212-parkbrake-override-kit
-
There is a second electronic device within the key fob! This is 'powered' by the car when the key is inserted. The original key must be completely dismantled to get at this, it is shaped like a pill. I hope you haven't disposed of the original key yet.
-
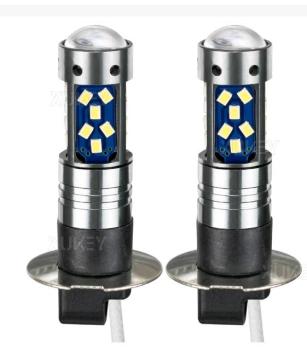
Lumen output was calibrated using wiki figures and configuring app. Don't believe 1600 lumens for a fog light, the brightest torches are 1800 and they can light up forest. The brake and indicator are canbus but the rest is not monitored on my 2004. I have bought several 'brighter' T10s only they are never that good, so I decided to repurpose the H3 but it still only draws 4.5 watts and won't blow a fuse. I've got led all round but had to rewire the tail lights since jaguar have the negative swapped to positive. Same with the indicators.
-
The standard side light on our Jag is a feeble effort given todays vehicles so I decided to increase the Lux by 'swapping' the 5 watt filament bulb with an H3 led. What is good about the H3 is that it is the same width as the filament bulb and will fit thru the mounting hole into the reflector. The H3 was pulled apart and the driver removed with a copper strip board soldered in place. This allows the H3 to plug in to the standard bulb holder. The driver was soldered in line and connected to the loom with crimp connectors. It fills the reflector with light now but is not so bright to dazzle. The original bulb is approx 8 lumens, the H3, 20 lumens.


-
Restricted performance is usually due to emissions/cat fault. Limp mode usually gearbox. I would restrict driving to a minimum.
-
What is the engine capacity and has the radiator been changed for an aftermarket one? The other thing that can happen is a new rad splitting - that is the channels running across the rad 'part'.
-
headlamp LH The difference between headlamp units is if it is HID or normal argon beam.
-
Fluid level is low. Mine had a crack in the oil filter/pan only about 1.5ltr in it. Warning light would go on every day and usually when selecting reverse. Used a pump and forced 7 litres into the sump - has been great ever since. Don't know about this 'dribble' business that's how to seize the trans pump - an auto is a wet clutch gearbox and needs a large reservoir.
-
Had the minor news that the steering tie rods were playing. Garage said it was about 1 hours work and (god forbid) they would also realign the steering. Took it upon myself to replace both sides and honestly it was not that bad. Essential to have the tools so I purchased a universal tie rod wrench for the inners. Jaguar use the ear-type band for the CV boot anyway and they are cheap enough. Tightened the inner tie rods to 100Nm with loctite thread lock and checked wheel alignment with a laser. Super.


-
The driver door module is at fault here. What you need do is remove the DDR and take out the PCB. Then resolder the chips on the board. The soldered legs on the biggest chip have failed due to heat and vibration. You can tell this because the fault is intermittent, not a failure. By a coincidence I have worked on a DDR this week, picture below. It has 60 pins and a fine solder tip is needed. Do this and it will work again.

-
Here is my mini override kit for the Jag parkbrake. It connects between the two supply wires for the parkbrake into a junction box. When switched to 'CAR' the parkbrake operates normally, when switched to 'OVER' the parkbrake motor is isolated from the vehicle electrics, the leads are then connected to the battery and the silver button is pressed. This only releases the parkbrake. It is simple to manually override the parkbrake but I figured on installing this box, since if I ever needed to release the parkbrake due to a fault I wouldn't want to spend 45 minutes taking the car apart. But having a little box in the boot makes it a 30 second job. It's one of those things I thought either I fit it now or I never will and it's just proof of concept at the moment.


-
You should buy a code reader. The codes will tell us the nature of the fault.
-
I don't think the oil filter has been turned tight enough during the last oil/filter change. Use a claw wrench to undo the filter and a strap wrench to tighten it. Natch - since it is a canister any effort to mechanically tighten might dent or otherwise damage the filter, but the strap wrench turns the filter without even marking it. Mfrs often state 'hand tight' for these filters but you will see the strap wrench will provide plenty of extra rotation. https://www.machinemart.co.uk/p/clarke-cht720-oil-filter-claw-wrench/ https://www.machinemart.co.uk/p/cht245-double-drive-oil-filter-wrench/
-
That's really good. The black fluid (it isn't oil) mixed with petrol and burnt, lowers the octane rating with its associated problems. I used a vapour condenser can and set it up on the right side so's to enable easy disposal of the waste fluid.
-
Pull the 6cd changer and disassemble it. Then resolder the chips on the PCB, 8 I think. Works like a charm - of course you'll need a workshop to do this.
-
1. Air intake has engine breather tube. 2. Gases from engine contain vapours from combustion. 3. This condenses inside the inlet manifold creating an oily liquid, over time it accumulates enough to pass the gasket. Place your hand underneath the back of the inlet manifold, if it's wet with 'oil' there's the problem. Ideally set up a catch tank to contain this before it enters the inlet manifold, they are cheap enough. This is mine on the 2.5v6 (which is easier to do).

-
Those are the ones! Breather oil pools inside the inlet manifold and drops onto the top of the valve cover and then onto the exhaust manifold. The valve cover is not leaking.
-
The intake manifold flap gaskets are shot. This drops breather oil onto the (R) exhaust manifold. Replace the 2 gaskets or better still, fit an oil catch tank to the engine breather line.
-
This gives a better idea of the cooling conversion. Simply put, the thermostatic valve is placed after the cylinder head and before the radiator. This is typical for a race installation, it is not typical for street use. This is the heart of the conversion, without this there was no point me being there. The standard setup sees the thermostat valve 'after' the radiator and because of this the engine temperature has to be higher to open the valve. Not only that, the thermostatic valve has a sprung plate on the back of it that will open given enough water pressure. So if the engine is revved the plate will allow water thru and this goes back to the pump/head, bypassing the radiator. This is what I mean when I say the standard V6 is biased to run hot. The V8 is built right with the thermostatic housing part of the cylinder head, don't compare the two they are totally different. The back pipes are less restrictive preventing knock. If an exhaust is excessively restrictive burnt gases buildup in the downpipes, the exhaust stroke does not fully evacuate and exhaust gas can re-enter the cylinder. If exhaust gases flow back into the inlet port during valve overlap this can cause pre-detonation, potentially holing a piston. So if a standard V6 is run around a racetrack there is a high chance of engine failure. There is no need to route cool air into the air intake since it isn't turbo'd and the inlet manifold casting is hot when running. Searching for that perfect air intake isn't worthwhile, we are not doing 300mph


