Russ68
Established Member
-
Joined
-
Last visited
Everything posted by Russ68
-
 Great picture Chris, you're a lucky guy! I too am planning on upgrading to the V8, but I'm aiming to keep my V6 S-Type and get an X150 XKR
 -
Wow! That's some decent engineering there on the centre caps, expensive?
-
Nice! I went for some blue ones but I'm going to fit them after I've refurbed the wheels...
-
I paid c£60 at my local Chant place for a key cut including the transponder. I have the separate fob which was eBay for £15 and we gave a local independent £20 to program the fob and check a fault code. So c£95 all in which was a bit cheaper than the c£150 the independent wanted to order and program us a new one. Well worth having though, we'd have been stuck without the spare key on a couple of occasions. Can't comment on your cunning plan, it could work or you could just shop around a bit more
-
I'm considering changing the head unit for something with digital line ins, but I have a pre facelift 2001 X200 which still has a tape deck (and CDC). This seemed cheaper and more appropriate for my model than the ACM...
-
Not experienced or heard of this, sorry...
-
Hi Mike, Good to see that the issues you've found haven't put you off, people give up on cars for less! If, like me you see the S-Type as a long term project and a 'keeper', it's well worth making these repairs and keeping her on the road. I do most of my own 'spannering', and did change my drop links, which was a doddle and inexpensive parts too. But mine failed MOT on a wishbone last year and my MOT mechanic offered to change both sides for £100, including swapping some tyres around, so I went for that rather than DIY. Slightly p****d off I did as they overtightened the wheel nuts when replacing the rear wheels and I still have a broken wheelnut I need to remove. At a guess, a couple of hours a side for a DIY'er? I can recommend using Berkshire Jag Spares for parts, knowledgeable and good quality. I paid £136+VAT per side for the wishbones with OEM bushes, the droplink was about £15 I recall. Not sure if yours is the same set up as my X200 (2001), but hope this helps anyway. Good luck, Russ
-
Thanks Joe, FYI the 1st Toyota lot seemed to come through at £25 and the 2nd at £29.99. I'm not overly bothered by 21mm not 19mm, although my locking nuts are 19mm. I think I have both sockets on the new wheel brace so not an issue. I'll double check with the suppliers that they are solid and not foil covered like the originals, as this is what I think they need to be. Cheers, Russ
-
Hi Allan, No comment on the HID as I don't have them, and the X200 bulbs are easy to change! But I am interested in swapping out the shoddy original nuts for a solid one piece, do you recall where you got yours Allan or does anyone else have a recommend? I've found a US outfit who offers a solid nut, but c£100 the set and nice to get them closer to home. Cheers, Russ
-
What a shame the gloss has been slightly taken off of buying and owning a supercar like the XKR, by the shoddy workmanship of the sellers! Good advice from David there, I think having it checked over by another independent sounds a good course of action, in case they've messed anything else up. Enjoy the car, you're a lucky guy
-
Good work Joe! I'll let you know if I can make one as it would be great to meet up
-
That looks a super event Joe, thanks for the heads up! It would take a bit of logistical working out for me seeing as I'm coming from the Isle of Wight. Shame it's breakfast and not a bit later in the day. But I'll see if I can combine it with another trip if I'm closer to the area. Last time I was in Gaydon was business with JLR and never been to the museum, so well worth the pilgrimage I reckon, good excuse for a road trip
-
Thanks for that Mark, I had a closer look and there is some degradation on one of the inner lights, nothing that couldn't be taken out with a cutting compound, and not bad for over a year since they were restored. But I think I may take your advice and top coat them with a clear lacquer. I use this at work, so next time I have a job with it, I'll prep the lights and let the forum know how I got on
-
Haha, very good Andy!
-
Hi Mark / everybody, My car is kept outside, all weathers and does a few miles as well, and I've not noted an appreciable deterioration in condition in the year or so since I did them. But as mentioned, if I just need some clear coat lacquer for a permanent solution, I'd be happy to go for that. I'm planning on doing a bit on the body work in the spring, including the front bumper lower piece. Perhaps I'll combine this with lacquering the lenses as well. Mark, do I understand you lacquered yours on top of an 800 grit finish, not the 3000 with cutting compound you get with get with the kits? Cheers, Russ
-
-
Interesting what Mark says re the coatings, I used the 3M kit well over a year ago and they're still looking good. If it was just a matter of lacquering them for a more permanent solution, I'd certainly consider it, but I'm not entirely convinced
-
I had a look at the parcel shelf in the X200 and the speaker cut outs are different, looking more to accommodate 6x9"'s at the end than the 2x6.5" in the middle like yours Jon. So I'm considering mounting the drivers on an MDF baffle, which can't hurt acoustically in any case. I'll have a proper measure up at the weekend and see what can be done...
-
Hi guys, Glad I'm not the only one! The wheel nuts are uncharacteristically shoddy for Jaguar, but I guess mine have had c15 years of use and were mangled by the worn wheel brace, which I've now replaced, as per the previous link. I can recommend we all do this as it's a better bit of kit and fits in the original foam too. Once the decorative chrome shell peeled off the top of the nut, I managed to beat on an 18mm socket, and remove all but one of the damaged nuts this way. Important here to use a proper hex one rather than the more faceted type seen in some socket sets. Alternately, there are special sockets designed for exactly this task as per this Amazon Link, you may be able to borrow one as I did. We used one of the to snap the entire top off the recalcitrant nut, which I now need to drill out on the remaining collar part from the side and separate from the stud Good luck!
-
Absolutely Joe, my worn wheel brace was a least the partial cause of the original damage to the nut. So for those that didn't pick up on it before, I can recommend replacing the standard wrench / brace with something like this one from eBay, which I went for, it fits in the standard foam insert and is considerably better that the original...
-
Impressive Jon, some good tech there that fit's in nicely. Also, good the battery is battery is in the boot which reduces the cable run to power it all. Thanks for sharing!
-
Cool,makes sense, I saw the below and thought they were non standard

-
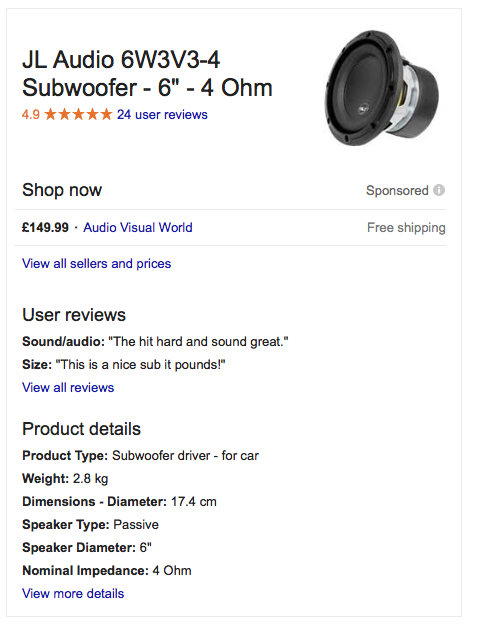
Hmmm, that really is food for thought Jon. I don't think I'm going to go down exactly the same route but I'll certainly take inspiration from what you've done. The 6W3v3 subs are listed as 17.4cm, which is a slightly unconventional size I believe. If they needed trimming, could the holes be for a more conventional 16.5cm speaker I wonder? I'll have a poke about on mine and see what I have, the 2001 X200 could be completely different, but I hope not. If there are factory holes for 6 1/2" speakers, then these are what I'll use. I'm not clear if the LC8i is a crossover, allowing me to divide the output frequencies to the most appropriate speakers. I've done this before using hifi 2 and 3 way crossovers, letting the bass units have everything under c2Khz and running the mid and high into coaxials, but this was years ago and there may be better methods now. I imagine it sounds amazing, the S-Type is an excellent platform for ICE! Cheers, Russ
-
Well done Sir! I was very much hoping to do a similar job with the rear woofers, as having these use the boot as an enclosure would seem to offer much more than the smaller drivers and plastic enclosure from the premium sound upgrade. I'd really appreciate picking your brains re sizes, specs and method used. I don't suppose those holes are factory standard, they look too clean for DIY! It looks like you've finished it beautifully, kudos to you! What's with the little DAB unit in centre console? Did you think this a better option that replacing the head unit with a newer double din one? I have an older 2001 X200, so may go down the route of head unit if I can find something suitable, as despite having the CDC in the boot, the tape deck is too retro / archaic! Amazing work on the gearbox, not many people would attempt this, but well done and why not! Good work and hope to hear more about the details soon
-
Thanks Andy, myself and 2 mechanics did eventually use the 'proper tool', which was the specialist gripping socket and a long extension. This unfortunatly snapped the top off the bolt, and I'd rather drill out the remaining piece than let them do it. They realise they overtorqued the nut and owe me big time for this, which is a favour I'll be calling on at some point!