
Budgie
-
Posts
35 -
Joined
-
Last visited
Content Type
Profiles
Forums
Events
Gallery
Store
Premium Membership Discounts
News
Videos
Everything posted by Budgie
-
Hi Steve, No problem - glad you got it sorted Cheers Brian
-
Hi Steve, Yes the stainless hex head screws and lug nuts purchased as a set on Ebay. Be aware though that the lug nuts are not stainless - so would suggest you coat in copper grease or similar when fitting. By the way you can remove the fog lights by un-clipping the grey plastic fog light surrounds. This gives access to the three mounting screws. They are I believe Torx T20 and they screw into a plastic nut so you shouldn't have a problem with seized screws. Hope this helps
-
Hi Joe, Be really interested to see your rear LED conversion - do you have pics ready for posting yet?
-
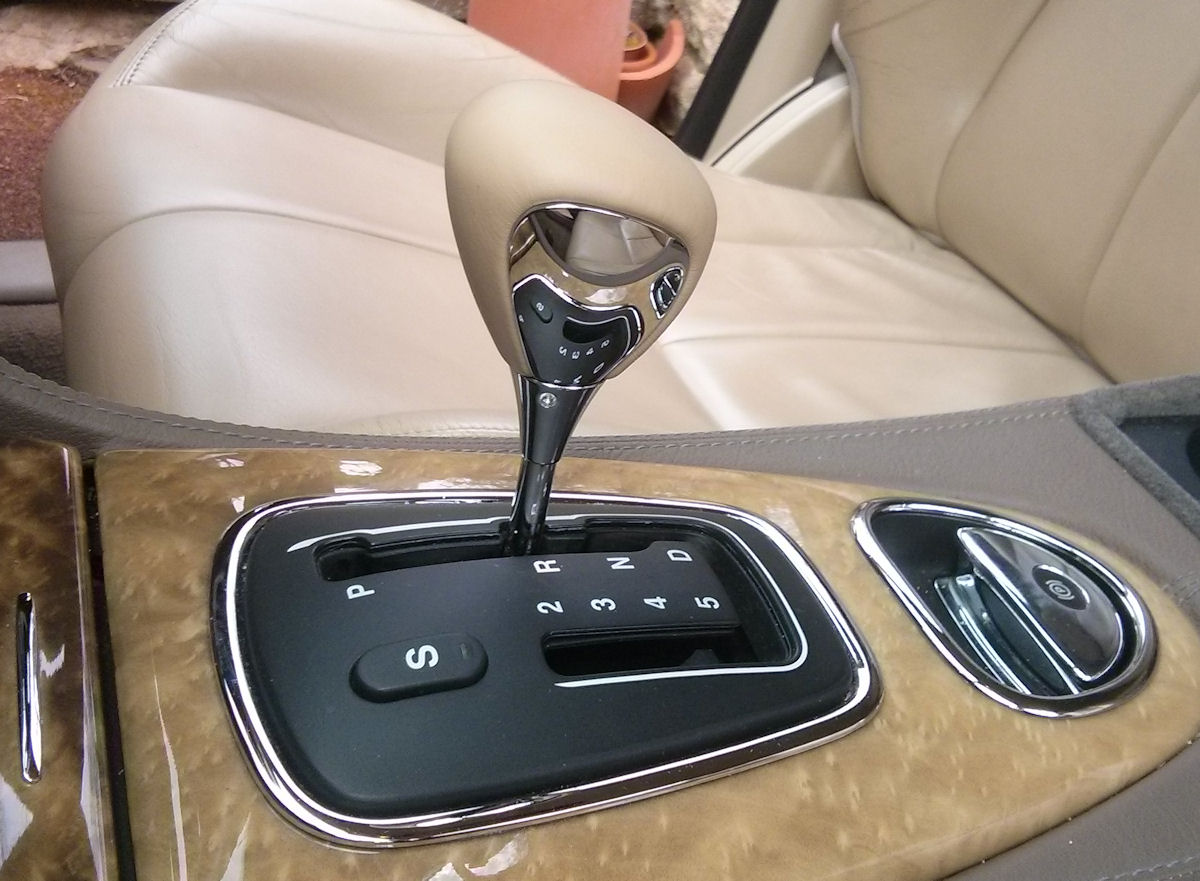
As owners of S Types may be aware. The Sport Mode Button Lamp is woefully inadequate when activated. The button and lamp are slightly inclined towards the dash and in daylight is virtually impossible to see. On other cars I have owned a very bright orange light on the dash would be illuminated to remind you that Sport Mode is enabled. My question is - has anyone been able to extend the lamp elsewhere in order to see it better?

-
Thanks Joe. Cheers Brian
-
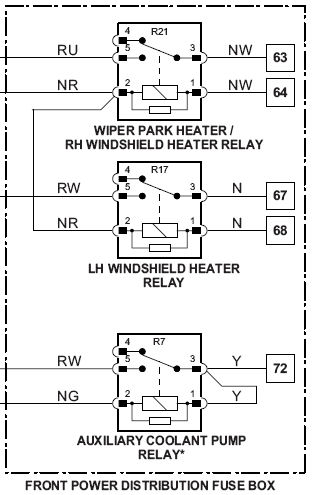
Thanks for the info Joe. Just checked with the S Type 2005MY Electrical Manual and it would appear that Jaguar use resistors across the coil (see image). Also the "Yellow" 5 pin Jaguar relay appears to be of the Changeover type which I guess can be used as either a NO or NC relay. Which Jag relays did you use? Look forward to seeing your rear light LED conversion pics.
-
Joe - I'm just in the process of acquiring all the components for the the DRL LED conversion and was wondering - Did you use diodes across the 12vdc relay coils in the circuit for the front DRL switchback lamps? I've read that when the relay coils de-energise, large low current voltages can exist and potentially damage conected electronic circuits. Are you aware of this being an issue especially with Jaguar REMs and FEMs that provide the switched ground for the relays?
-
Thank you Paul - now where's that bin
-
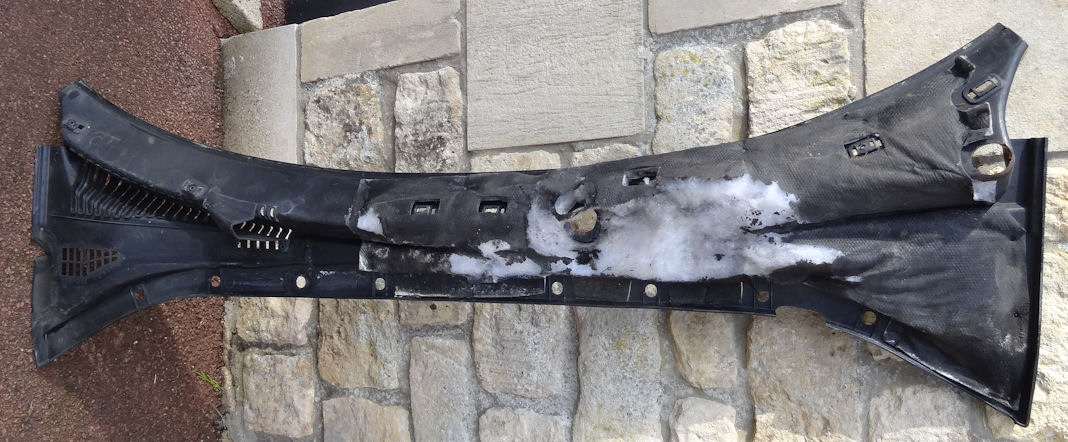
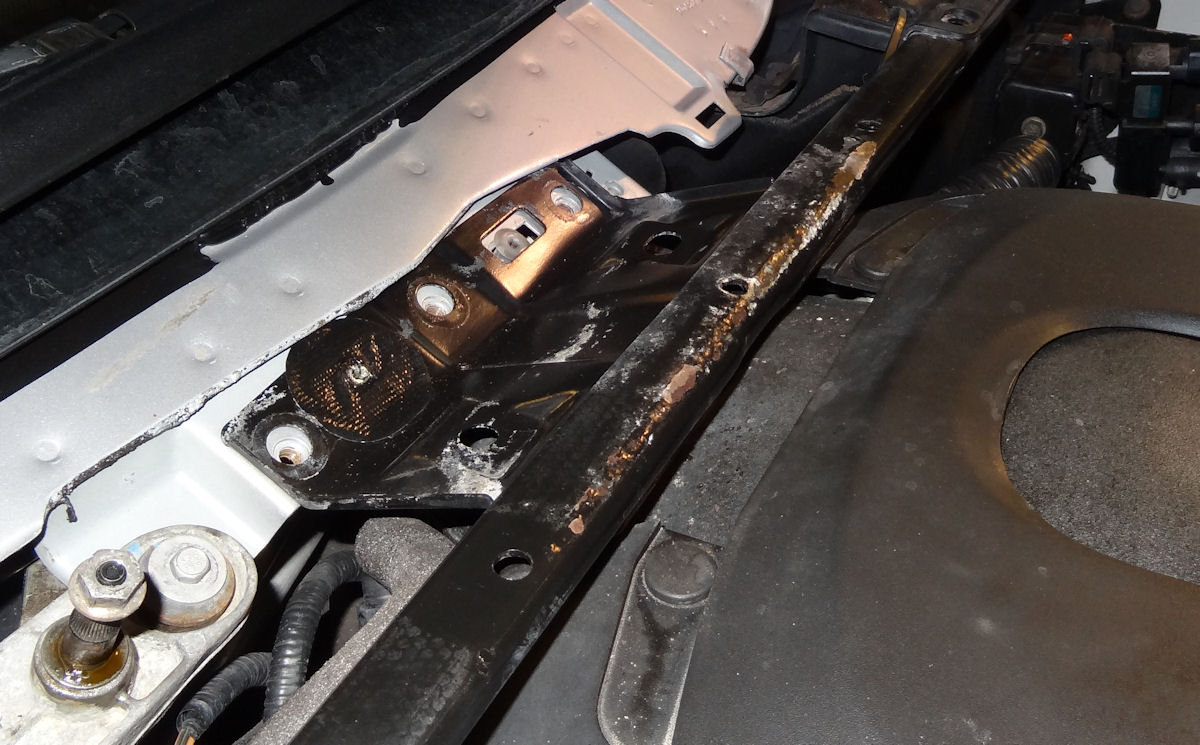
I'm in the process of replacing the windscreen wiper motor and linkage assy due to lots of wear in the right side spindle (RH/D Car). However upon removal of the plastic Lower Windscreen Finisher (or scuttle) I could see that what appears to be "padding" on the underside that has broken up and retained a lot of water which in turn rusts and corrodes everything below it. This water/moisture also messes with electrics and a sensor (on the STR) which reside at the rear of the engine bay. My question is can the damaged "padding" just be discarded before re-fitting the finisher or does it have some really important function that I am missing. Would appreciate any advice from those that might have encountered the same issue.
-
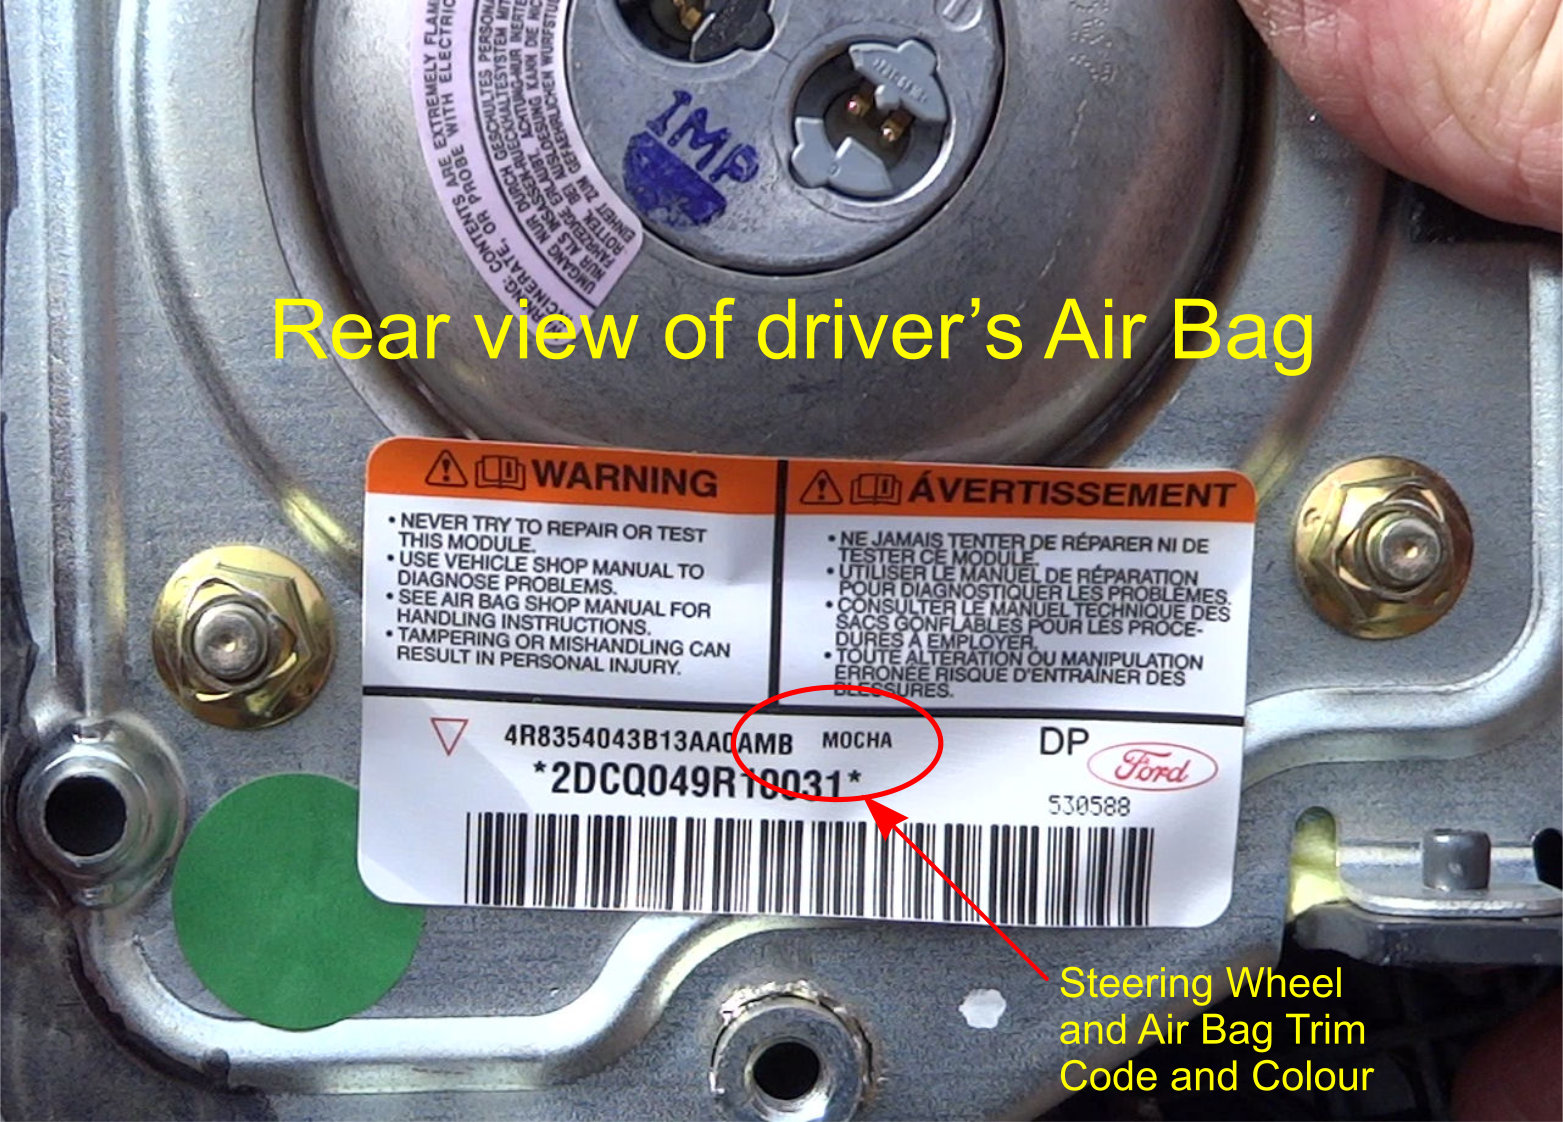
Hi, The colour code for the dash, steering wheel and door trims etc can normally be found on the rear of the steering wheel airbag. The attached image example is from a 2005MY S Type steering wheel airbag unit and shows AMB (Mocha) as the trim code.
-
Hi Andy, I take your point but looks like someone has already gone to press on this issue.
-
I was asked recently on another Jaguar site that in the event of a bonnet release cable failure how would the two spring loaded securing catches be released. The chap who asked had this failure and was beside himself with horror as he couldn't see anyway to gain access to the catches without potentially destroying some panels/grille etc.. to do so. I did some research as it was not an issue I had ever encountered on an S Type. So looking at my S Type (R/H Drive) I realised that the main release cable is connected between the release lever in the cabin and the R/H bonnet release catch (situated between O/S H/Lamps and Radiator). The main cable terminates at this point and a secondary "slave" cable is then connected to the L/H bonnet release catch (situated between N/S H/Lamps and Radiator). From what I can see there are two main failure scenarios:- (apart from mechanisms seizing up through rust etc....etc..) A) Secondary Slave cable fails and only the O/S release catch operates leaving the N/S catch locked. B) Main cable fails and neither release catches are operated leaving both sides locked. If failure occurs as in "A" then the N/S release catch can be manually operated by gaining access through the opening just below the front number plate by removing plastic trim parts and reaching up in front of the radiator and behind the front grille. or Remove lower splash panel and go in that way. However if failure occurs as in "B" then things get decidedly tricky as the O/S release catch has an "anti-tamper" shield/box bolted to it with two low profile Pan Head Torx screws. This inhibits access to the release catch and for quite understandable reasons. There was one account account of a guy who had a main cable failure and spent several hours removing rusted fixings on the lower splash guard panels and with a pair of grips painfully and slowly removing the two Anti-Tamper Torx screws before finally being able to release the catch manually. So with my ever pessimistic and preventive hat on I decided to remove my Anti-Tamper box. Just a thought
-
This was a really interesting read of which the outcome could be of use to most enthusiastic Jag owners - so did this issue get resolved with Gordon Lamb and if so what was the outcome. Bit of a "cliffhanger" would love to hear the ending - a happy one I hope.
-
Hi Paul, I do like a happy ending (and of course compliant brakes) I bet you're relieved Cheers Brian
-
Ray This has just appeared on Ebay if you are still after one. http://www.ebay.co.uk/itm/JAGUAR-S-TYPE-Car-Badge-Unused-/182250536272?hash=item2a6efa7d50:g:5VEAAOSw9NdXuG~U
-
Lol! Roy - like your style. I'll certainly post it when it's done - but don't hold your breath as it probably won't be any time soon. Cheers Brian
-
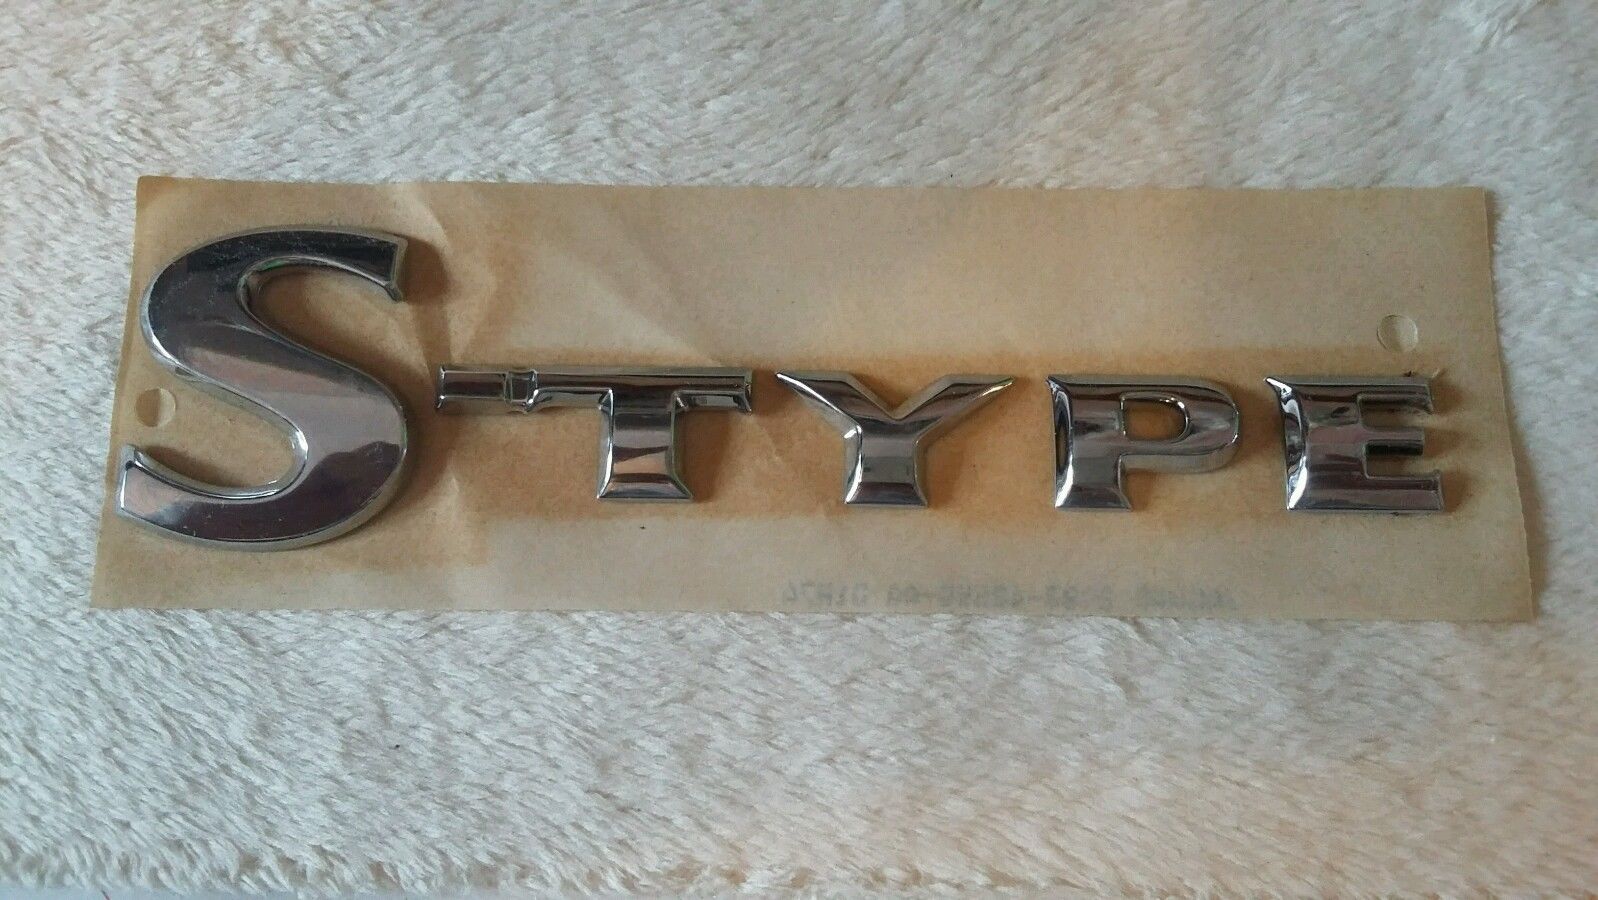
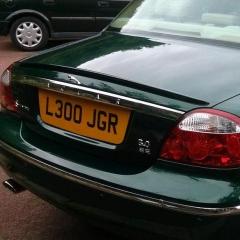
Hi Ray, Not seen one of those before. Yes the genuine S-Type boot lid badge should be chrome plastic and supplied as shown in image below. Where did you get the grey plastic one? Cheers Brian
-
Hi All, Does anyone own, have experience with or can recommend a cost effective endoscopic vehicle inspection camera. I have seen several on Ebay selling at upwards of £9. I quite like the look of this one as if it's any good then great. If it's not so good then I haven't wasted very much money. http://www.ebay.co.uk/itm/152157001477?_trksid=p2055119.m1438.l2649&ssPageName=STRK%3AMEBIDX%3AIT Cheers Brian
-
Hello Paul, Rather odd symptoms you appear to have and no immediate cause comes to mind I have to say. Were the donor parts used or new? Although you probably have this I've included the Braking Fault diagnosis section of the Workshop Manual for your perusal. Hope it's of help. Braking.pdf
-
Hi, I have the same symptom with my 2005MY 3.0 SE. However the leak (well more of a gentle seep) has been apparent for the last two years without really impacting on oil loss. In fact I haven't noticed any difference on my dip stick level. I did at the time I first noticed the leak start to panic a bit as I had visions of a big invoice to fix it. I traced the leak to my engine oil pan gasket. However this was only possible with the plastic engine underbelly air deflector removed. Oil was evident on a number of engine components e.g. a/c pump, alternator, steering rack and gearbox bell housing. The oil was also dripping from some of the oil pan bolts. I cleaned the whole area with brake cleaner and monitored the "leaks progress". I decided the leak was so insignificant I have parked it for now. However all that said I have decided (when it's really necessary) to carry out the work myself as my motor industry experience tells me that it can be done with fairly minimal equipment. I do expect it to be a lengthy job though. The parts I bought in readiness for the inevitable job:- Genuine Jaguar sump gasket - £35 ish - engine oil and new filter of course - £65 ish and the most import part was the engine lift bar - between £39 and £90 although I bought the cheaper one and I'm very impressed. A pair of ramps, trolley jack and a pair of axle stands are also a prerequisite. Have a look at the link below and you will see that it's not such a difficult job (depending on the confidence level) and can save a lot of money. http://www.jaguarforums.com/forum/s-type-s-type-r-supercharged-v8-x200-15/3-0-oil-pan-removal-w-pics-faq-52987/
-
Full Size Spare Wheel S-type STR tool kit foam
Budgie replied to JOE-DOT-COM's topic in Jaguar S-Type Club
I know that feeling. JEPC can be a "canny beastie" with its rather generic and often misleading sections -
Hi, I retro-fitted a pair of LED lamps from Ebay circa £29/pair to replace the standard fogs. These were Plug & Play - i.e. fixings and connector. However I had to reverse the DC feed polarity. Images below for further info. I haven't as yet applied any electrical mods so that they operate correctly as DRL/Fogs. I just switch them on as fogs when I need them. Access to the lamps is as Joe says via the radiator splash panel, which when removing for the first time can be challenging. Jaguar factory fit plated carbon steel M6 screws (usually Torx) and lug nuts to this access panel (also on all other under body panels) and of course rust - making them difficult to remove. Patience and Plus Gas can help. Avoid of course "the old blow lamp removal technique" as plastic panels turn to liquid. A method I have used to remove the little buxxers is with a Dremel fitted with a small diamond cutting disc. However be careful as this can also cause a build up of heat in the screws. Just keep a water spray to hand for cooling the cutting area. When I replaced my lamps I fitted new lug nuts (available on Ebay) which were supplied with M6 Stainless Steel Button Head Socket screws and nylon washers. I applied copper grease to the fixings to ensure I will always be able to remove easily.
-
Full Size Spare Wheel S-type STR tool kit foam
Budgie replied to JOE-DOT-COM's topic in Jaguar S-Type Club
That's a really neat solution Joe. I have to admit I'm no great lover of the standard issue red alloy "razor blade" either. I pensioned off the 17" steel space saver spare in my 3.0 SE and replaced it with a very readily available full size Juno. In fact it was one of a set of five Junos fitted with Pirelli P Zero Asimetricos (7mm tread on each) from Ebay for £175. It was like all my Christmases had come at once. Hope you get your tool kit/jack stowage sorted. I've included this snapshot from JEPC which might be of use.
-
Full Size Spare Wheel S-type STR tool kit foam
Budgie replied to JOE-DOT-COM's topic in Jaguar S-Type Club
Hi Joe, Doesn't your STR have different width front and rear alloys? Just wondering which width wheel you bought as a full size spare. Cheers Brian -
Dash cam on an S Type
Budgie replied to Cardiff72's topic in Jaguar Audio / Video / Electronics / Security Systems
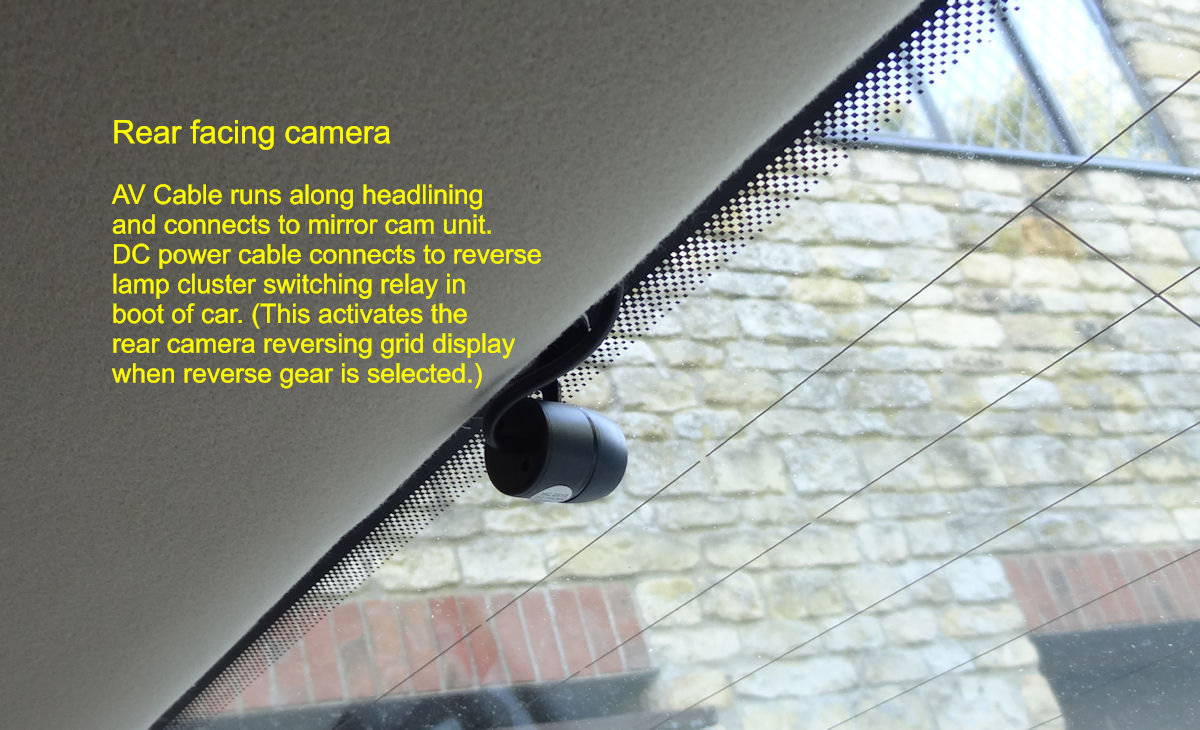
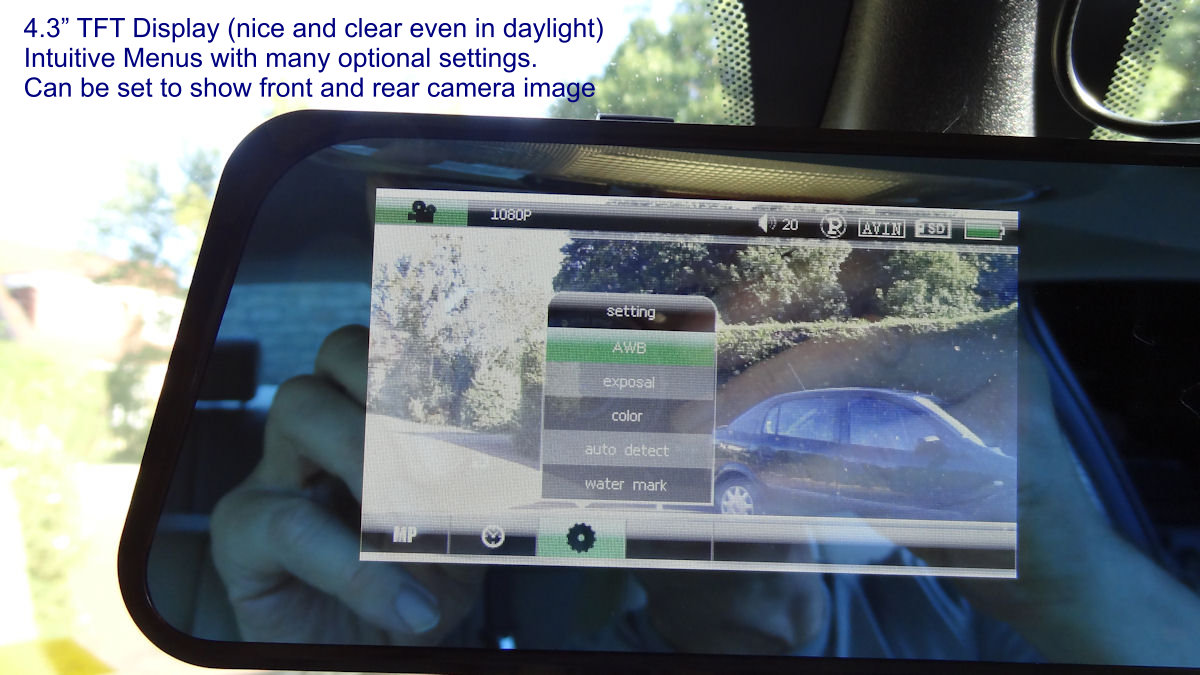
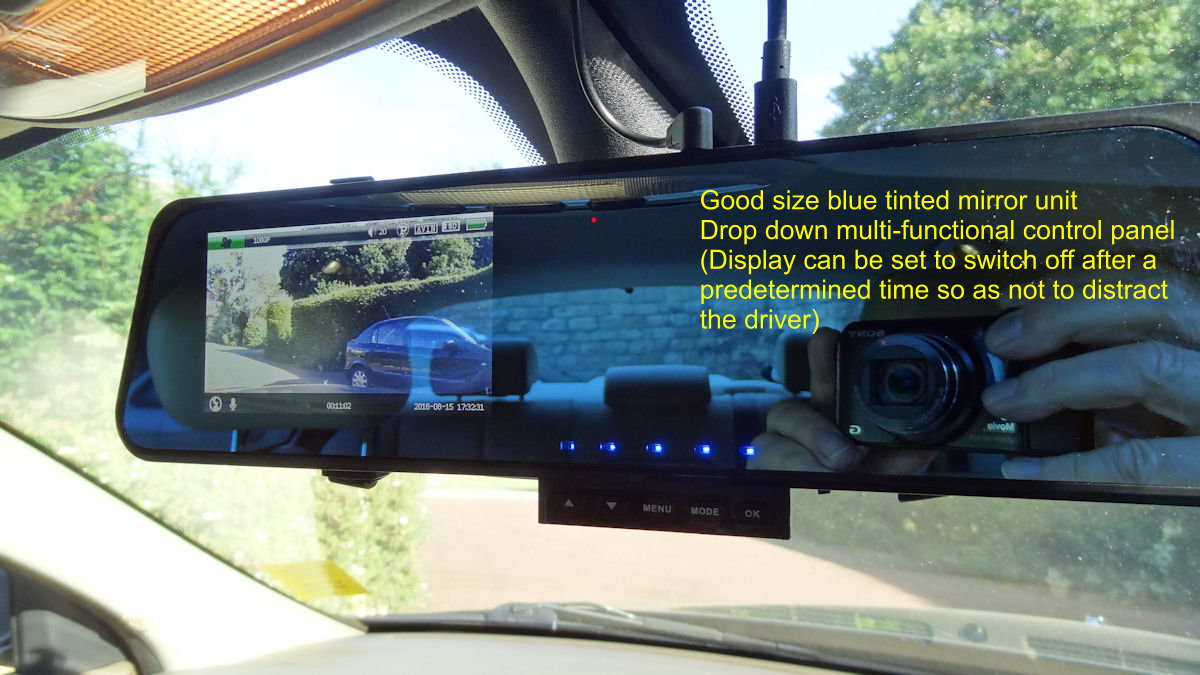
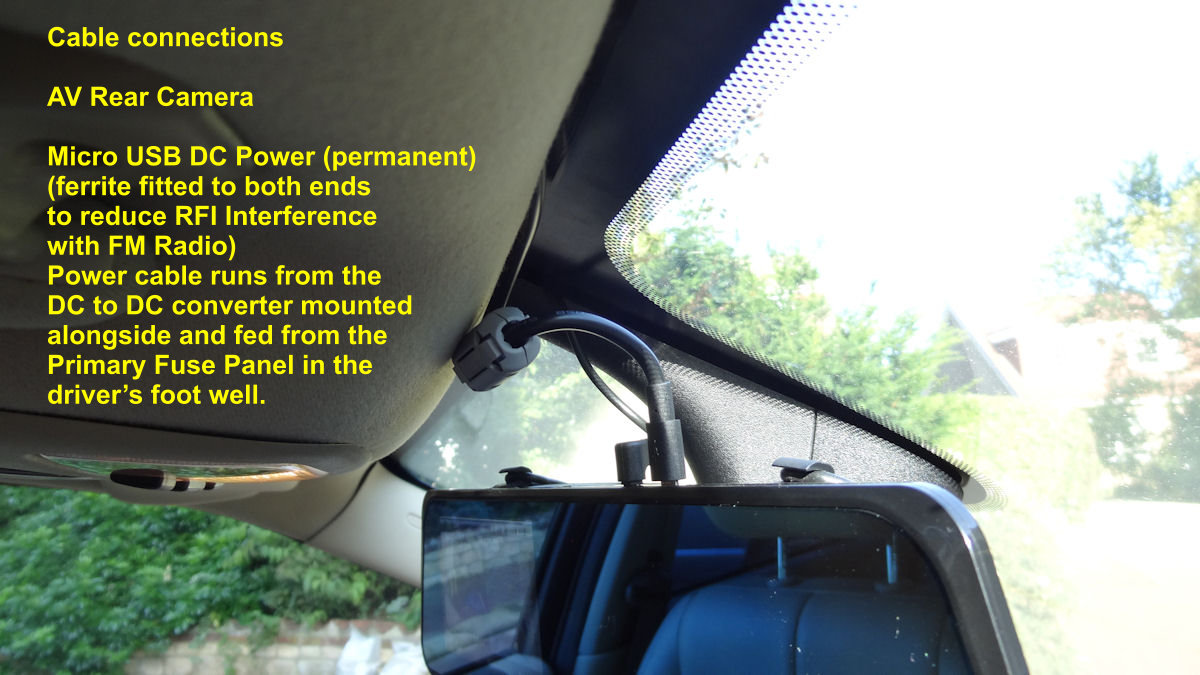
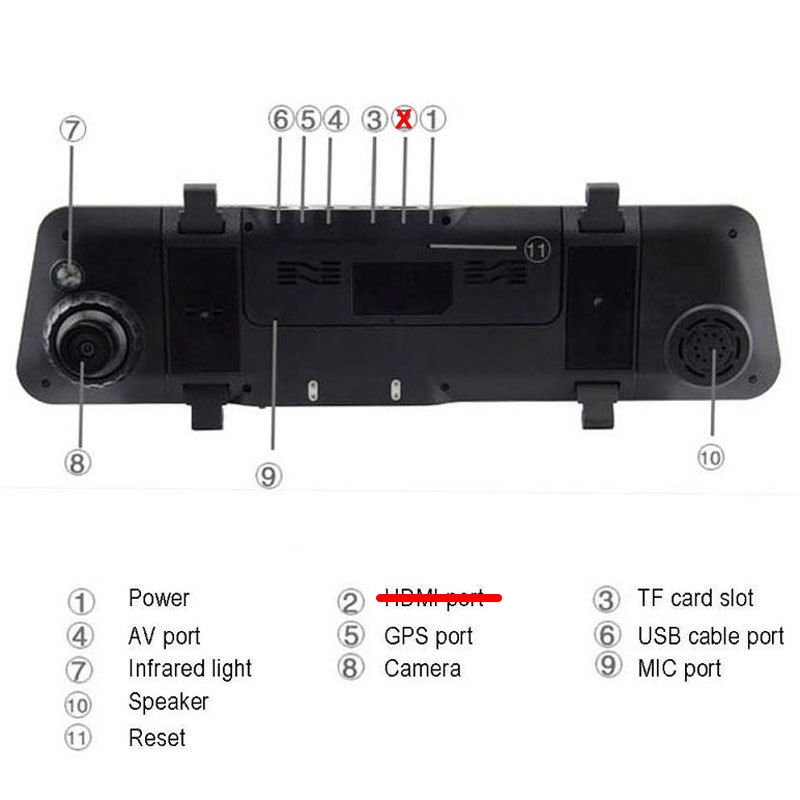
Additional imagery and detail for the Mirror Dash Cam unit I fitted. The images show some of the functionality, features and connections. I will follow up this post with similar information regarding the Dual USB DC to DC converter and the 12V switching relay that enables a switched reverse lamp feed from the rear lamp cluster. I have included in the post a more detailed You Tube video review of the Dash Cam by "Red Ferret". Although the review is essentially the same Mirror Cam unit as the one I fitted, the rear camera he was supplied is slightly different. This is not uncommon where (C)hinese (E)xports are concerned. Owing to the woefully inadequate and poorly translated user guide supplied the explanation of functions is slightly ambiguous and detail on connectivity non-existent. In the video clip Red Ferret believes that the Red/Black DC pair from the rear camera connects to the interior light. Not his fault as the user guide doesn't mention it. Actually if the DC pair were to be connected to the interior light the reversing camera positional grid would be displayed every time you opened a door. So really the DC pair should be made active/live only when reverse gear is selected. This did though present me with a bit of a challenge. Being a bit of a newbie where Jag electronics are concerned I thought I could just splice a 12v -ve and +ve feed from the reverse lamp holder. (I can hear you all chuckling to yourselves as I write this.) Needless to say I eventually had an epiphany when I realised that both sides of Jag lighting is +ve until a box of tricks (The REM) tells them otherwise and changes one of the +ve pair to a -ve. Anyway I went down the 12V normally open switching relay route in order to facilitate the desired DC feed to the rear camera - details of which I will cover in a follow up post. Pluses: - Good Quality video and TFT display, Easy to install, Excellent features, Robust - Low Purchase Price - Even next day (because of time difference) Chinglsh email support. Minuses: - SD card very fiddly to remove and refit - RFI radiation a nuisance (but can be lived with) and affects key fob operation and increases FM radio noise (reduced with ferrites on power lead). Mirror Cam blocks the light sensor on the S Type mirror - User Guide and technical connection detail is bad, very bad - no info on what happens when a GPS Antenna is connected or how to use the DC pair to the rear camera. GPS antennas with 3.5 jack plug available it would appear only from Chinese sources at circa £8. Ebay sell them but delivery from China when they don't have a UK distributor can be up to four weeks. However I still think it's a cracking little unit and would recommend it even to the most discerning of Jag owners. I hope this post has been useful and informative and if further info is required do let me know. The Red Ferret Review https://www.youtube.com/watch?v=3y6mhZCVRt8
.jpg.bb21f39db6480bab6447340787124268.jpg)