Lazlo Woodbine
Established Member
-
Joined
-
Last visited
Everything posted by Lazlo Woodbine
-
 The driver and passenger front door switch works all the locks on mine. I don't entirely trust my central locking either. I left a punk gig and went to the Jag (now that's punk) opened the boot to change some CDs, closed the lid and the alarm went off and all the doors locked. l had put the key down in the boot and forgot to pick it up again, that was a fun night.. The other week I dropped my wife off and hopped out to get her bag out the boot. Key in, engine running. She closed her door, I closed the boot and when I went to get back in I found the whole car had locked but didn't arm. The dog was in there and we were twenty miles from home. Thankfully the windows were open so I just reached in and unlocked it, it would have been smashed window time otherwise. Now I make a habit of never leaving the key in unless a window's down. I haven't been able to make it lock itself erroneously by trying, it just seems to be a rare random occurrence. None of that was any help was it!
 -
S-types have a short wire rope cable running from the boot lock mechanism to the release solenoid as do many cars. Although of course it should be hidden behind the trim panel. Does the boot work normally and what happens if you pull the cable in question? I like the idea that it's an American spec thing, Goodfellas would've turned out very differently if they had had internal boot lid releases...
-
I second Joe on the smart charger. Only once you know the battery is reliable is it worth looking elsewhere for faults. I'm sorry to hear about your experience. People can be monstrous in their cars, feeling all safe and isolated from the real world. And yet on the street many of them wouldn't dare look you in the eye, cowards. I stopped only the other week after witnessing a minor car accident. I helped the lady who's car had been hit by taking photos of the scene and making her car moveable so as to clear the road. People were swearing at us and wheel spinning around the crashed vehicles. I'm yet to see such an event bring out the best in anyone as those heart-warming stories we hear say they do.
-
Sorry, I didn't mean to appear facetious. I'd be interested to see what direction Ford Australia's model line up takes from here. I believe the decision to kill off a brand name usually has its origins in the marketing department. The Ford Escort here in Britain was replaced by the Focus. A car which underneath the radical new styling was very similar in ethos and design to the mk6 Escort. "Escort" was a household name and I can't imagine the decision to move on was taken likely. However, that was nearly twenty years ago and I don't wonder if the Falcon replacement will be a genuine departure in not only marketing, but also technical terms. In general the relatively lazy engine with the potential to cover quarter of million miles without being opened now appears to be eschewed in favour of an over-boosted, small capacity engine running close to it's limits under normal use. I don't see the dust-to-dust emissions improving, in fact I believe they will increase. I hope that this apparent trend does not continue with the Falcon's replacement. Quietly I would take an XR8 or XR6T over an S-type R, the manual transmission swings it.
-
My car has the mechanical handbrake and I don't have any direct experience of the Jaguar EPB set up so I don't know what the calibration procedure is, if indeed there is one. However I will say this; Don't wind the piston right back as it will likely cause a problem with the EPB. Just go far enough to get the pads in and no further. Some pistons can be wound back in by hand and some will be a struggle with a wind back tool and the bleed nipple undone, it seems to be a bit of a lottery. My pistons go in clockwise and I had to use a wind back tool but was able to leave the nipples alone.. This is the generic one below, I paid about £15 for mine. There are of course clockwise and anti-clockwise versions. PS. I did find that putting the plate of the tool in the caliper in the way that looks "right" actually tilts the whole tool so that the pins don't engage properly on the piston crown. I put the plate in "upside down" and it was better but not great. Thinking about it now a quick massage of the plate with an angle grinder would have been the solution.
-
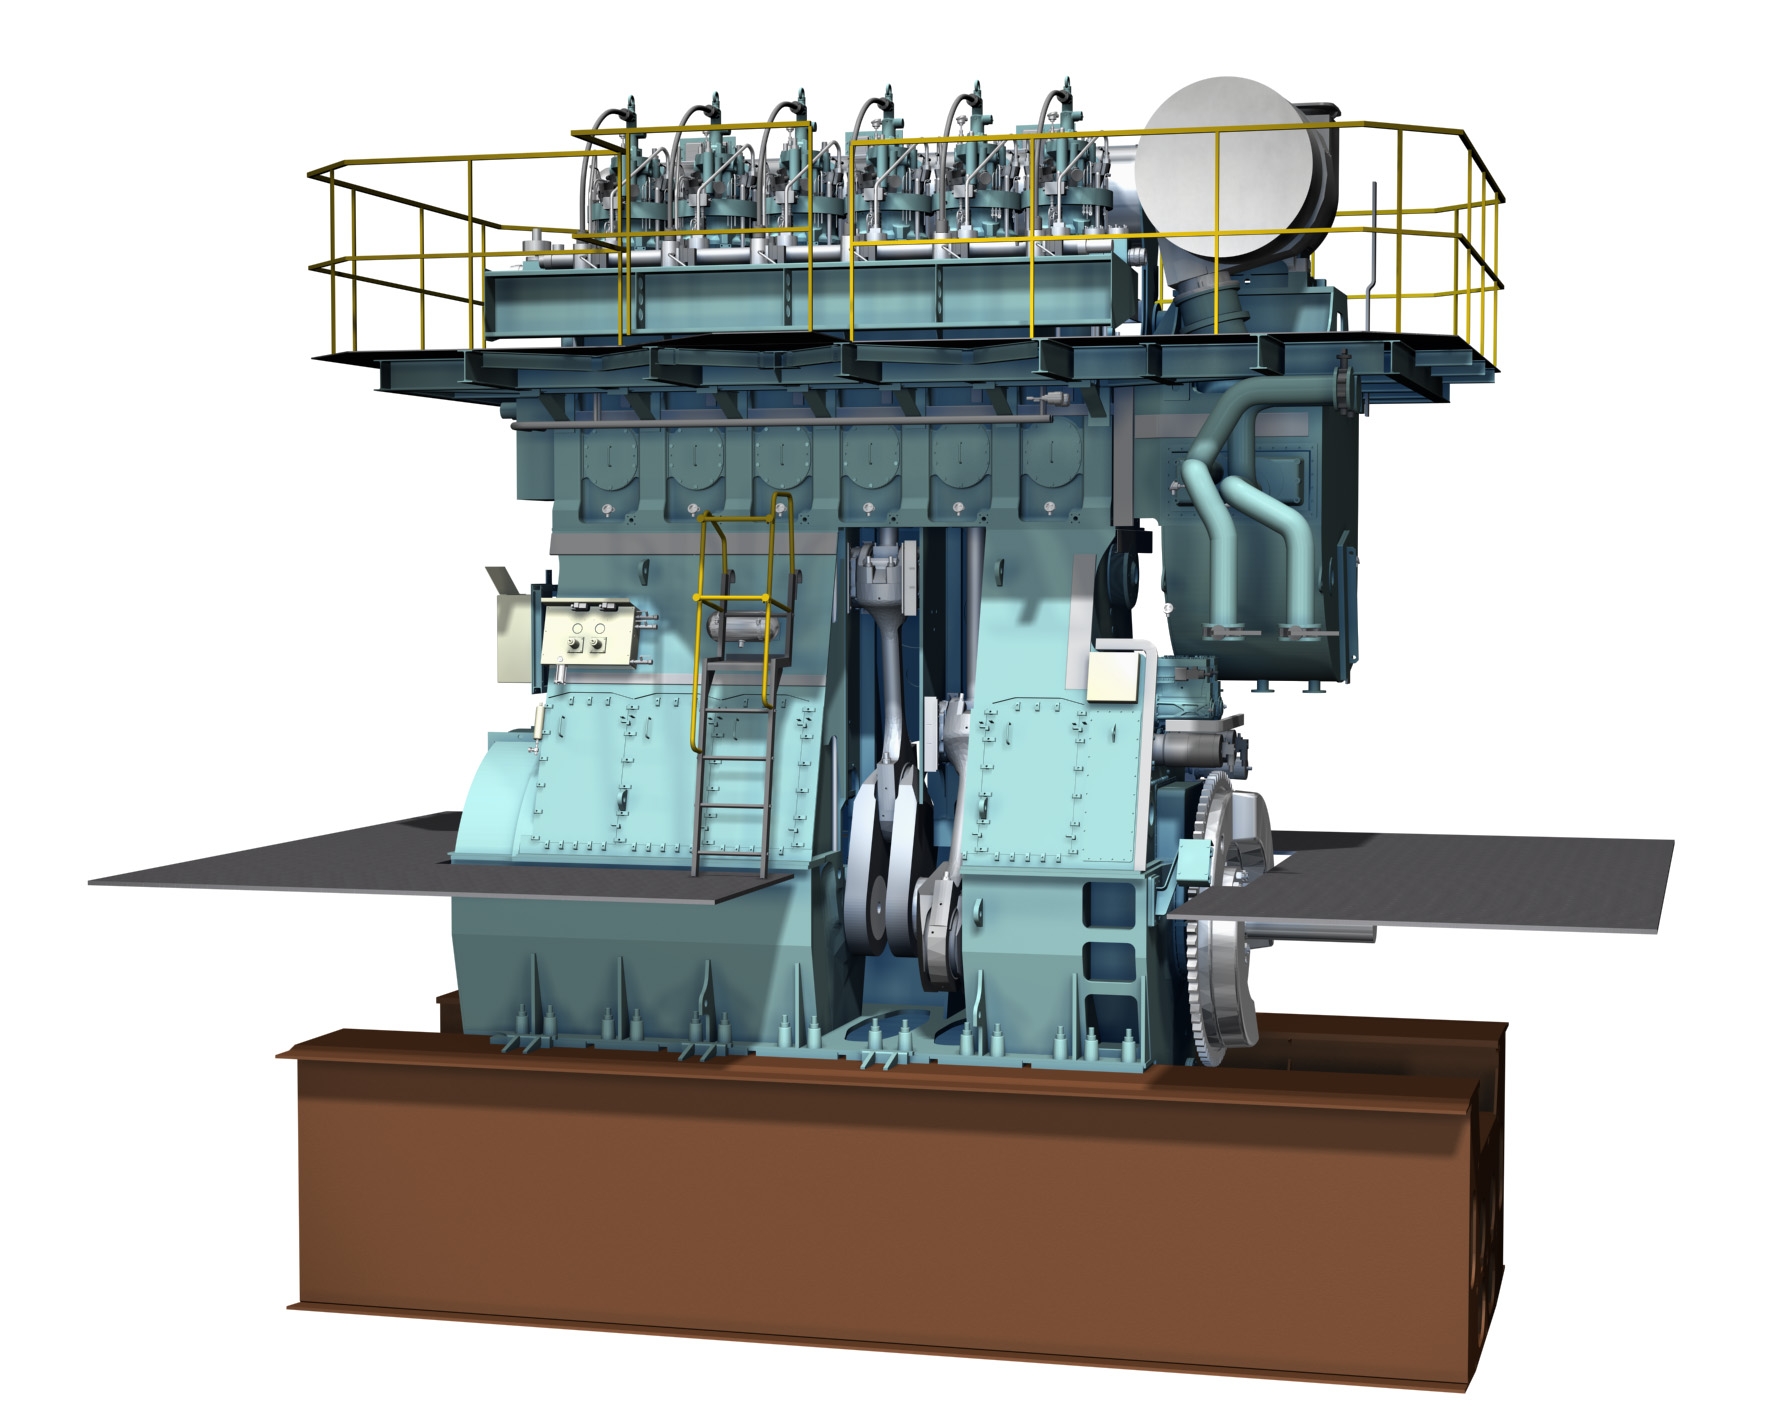
If taken as read I beg to differ; 5000 KW+ Wartsila diesel

-
Here's a link to a thread I started in the S-type section recently. Please post any questions or replies on the original thread otherwise things will get messy.
-
Here's a link to a thread I started in the S-type section recently. Please post any questions or replies on the original thread otherwise things will get messy.
-
Here's a link to a thread I started in the S-type section recently. Please post any questions or replies on the original thread otherwise things will get messy.
-
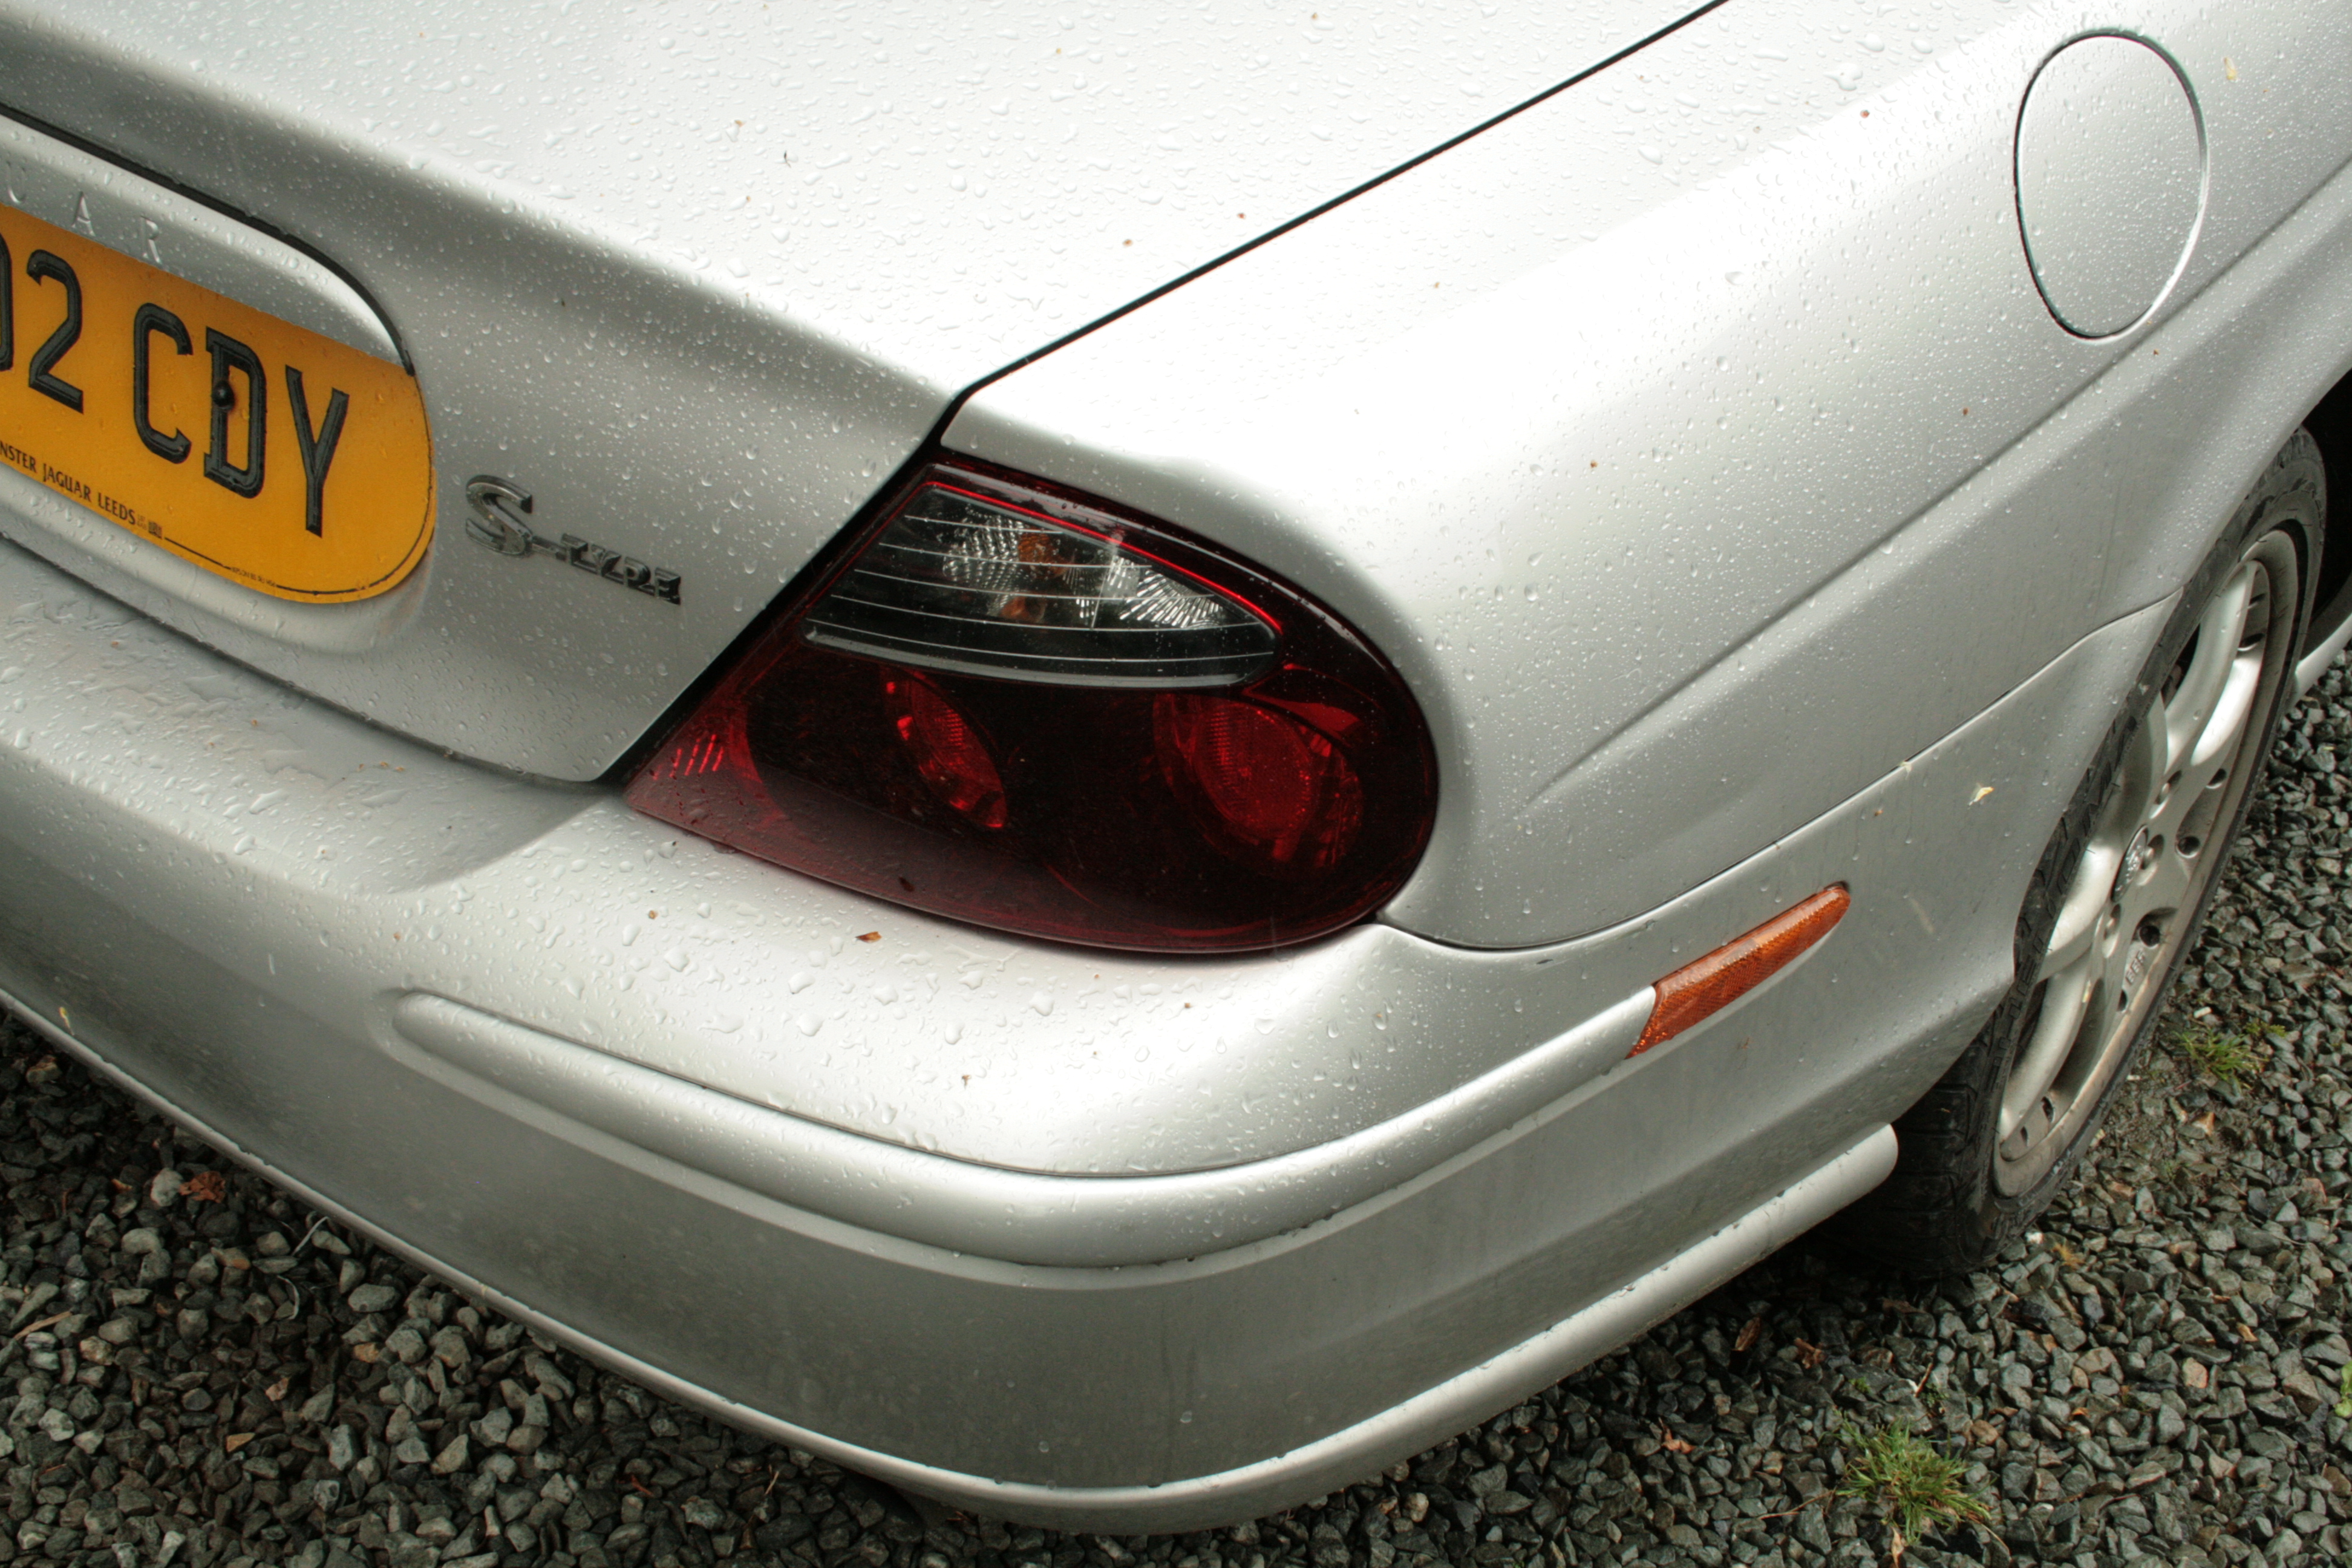
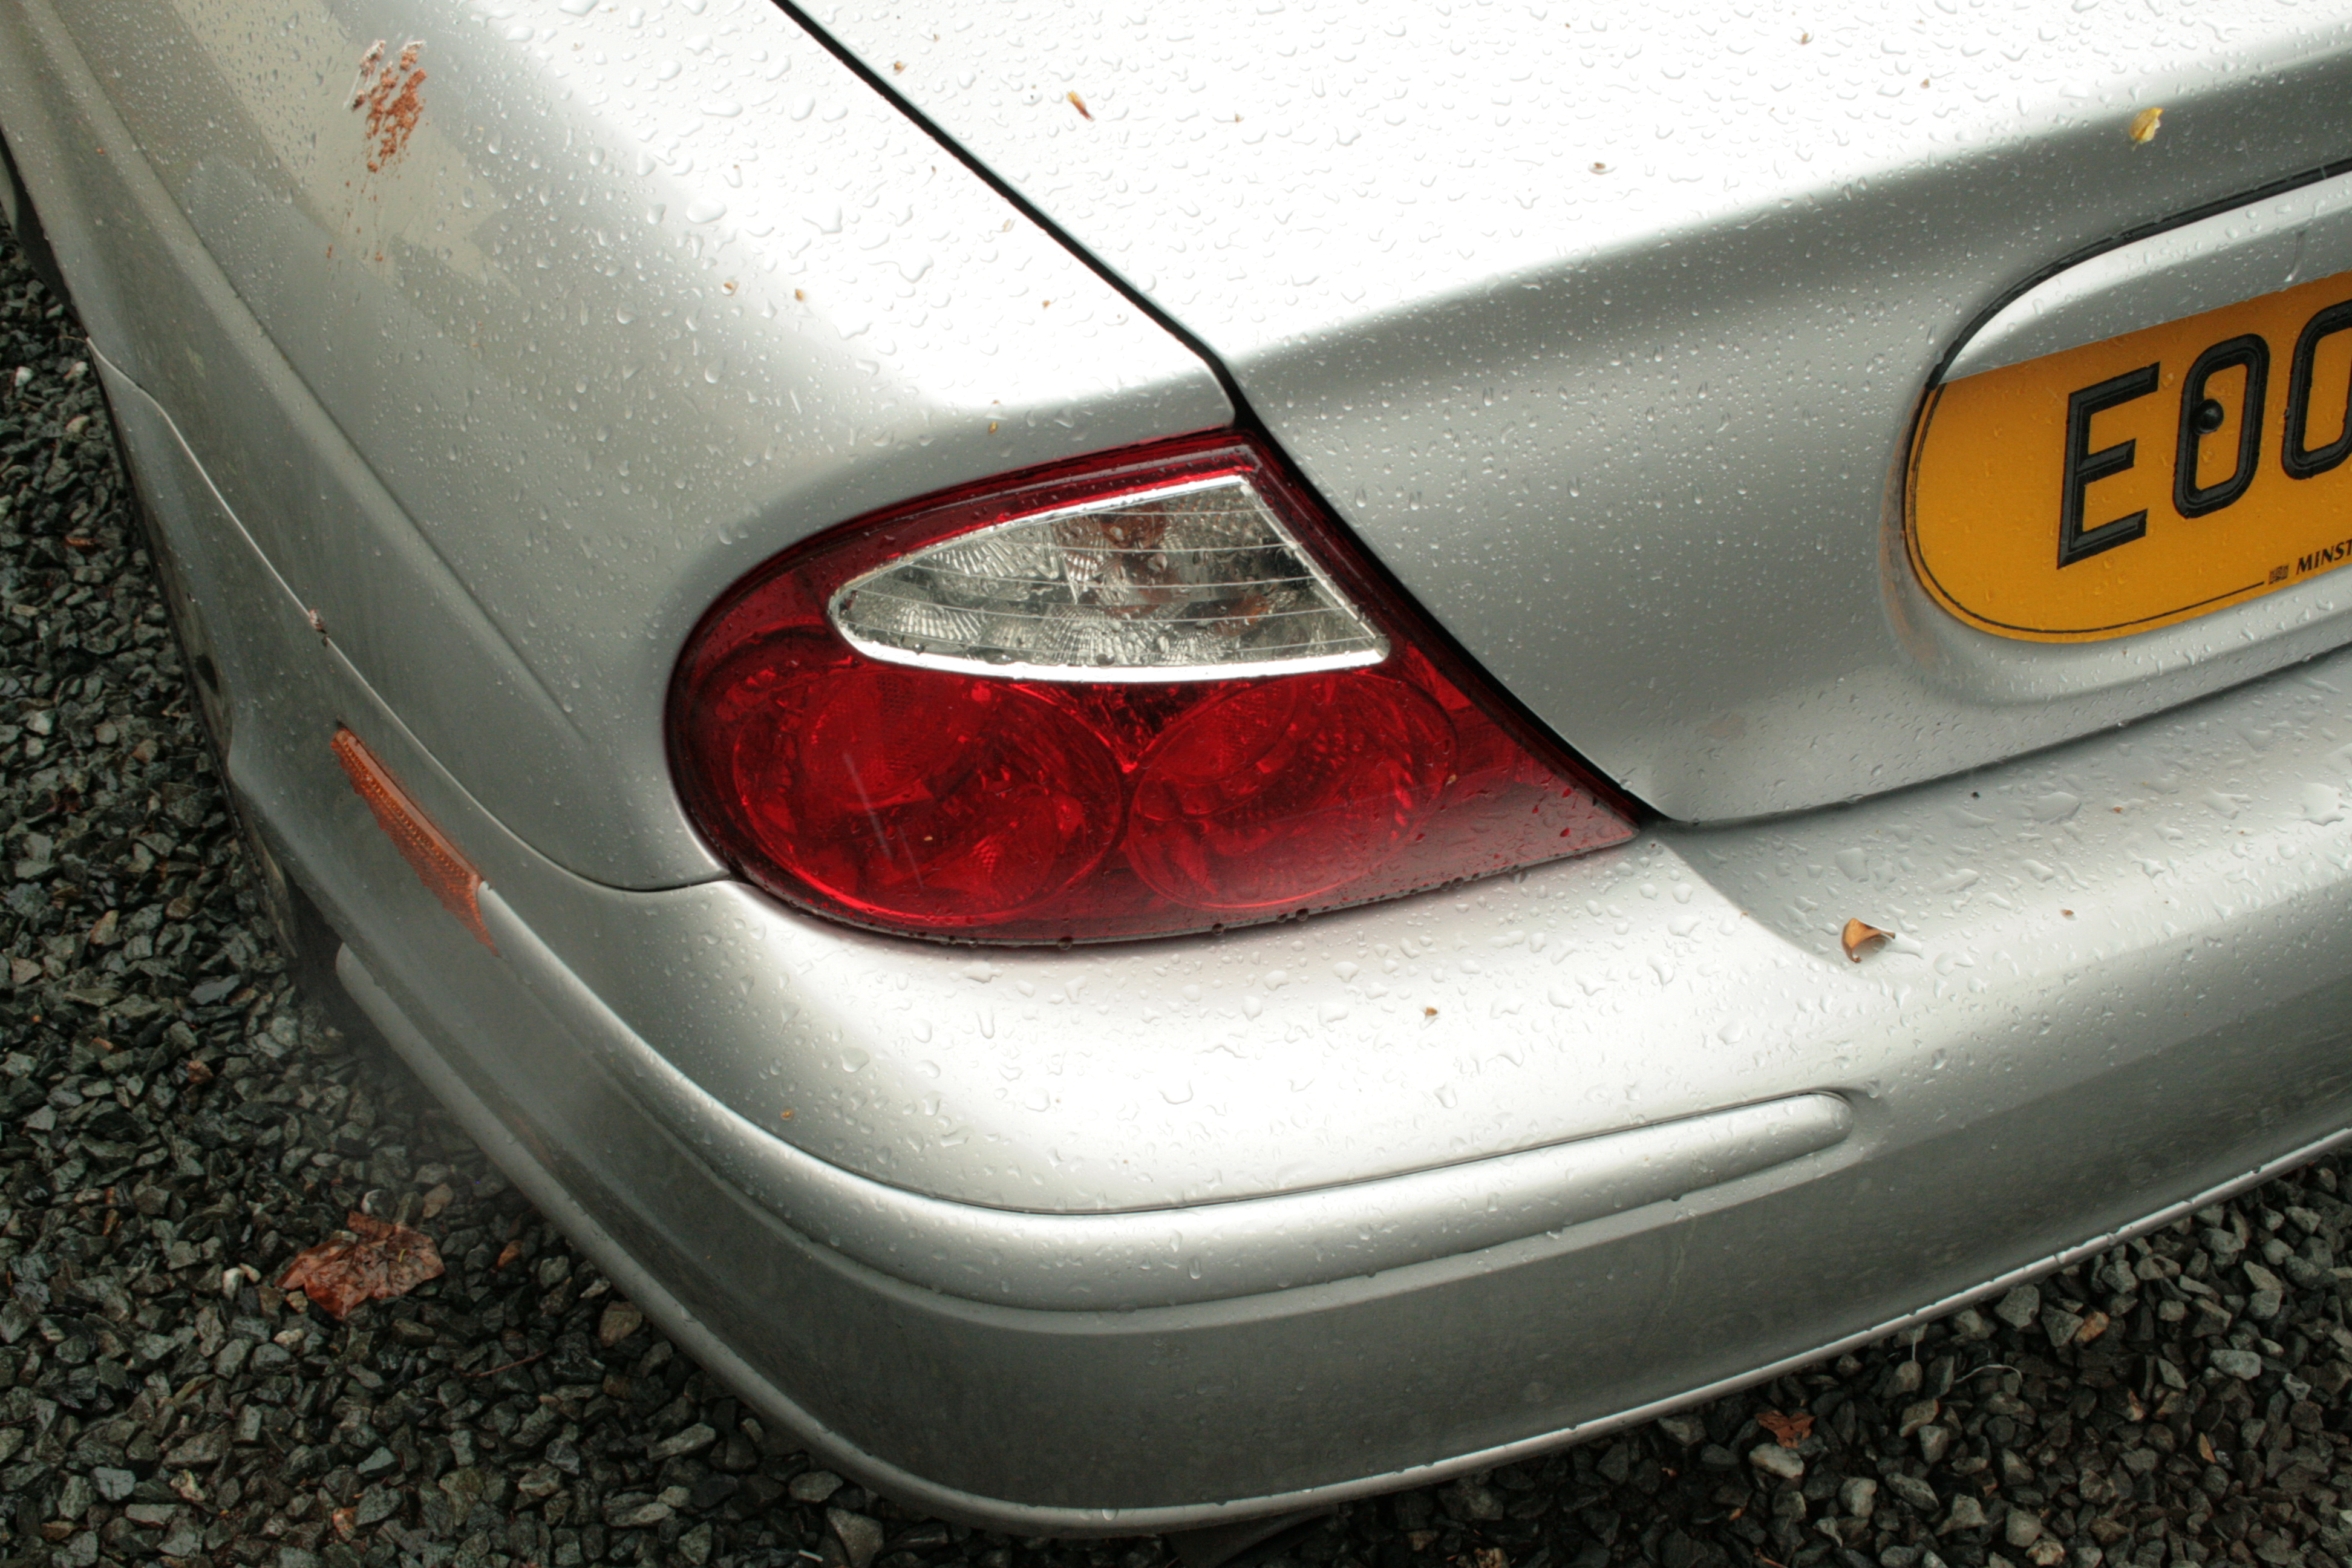
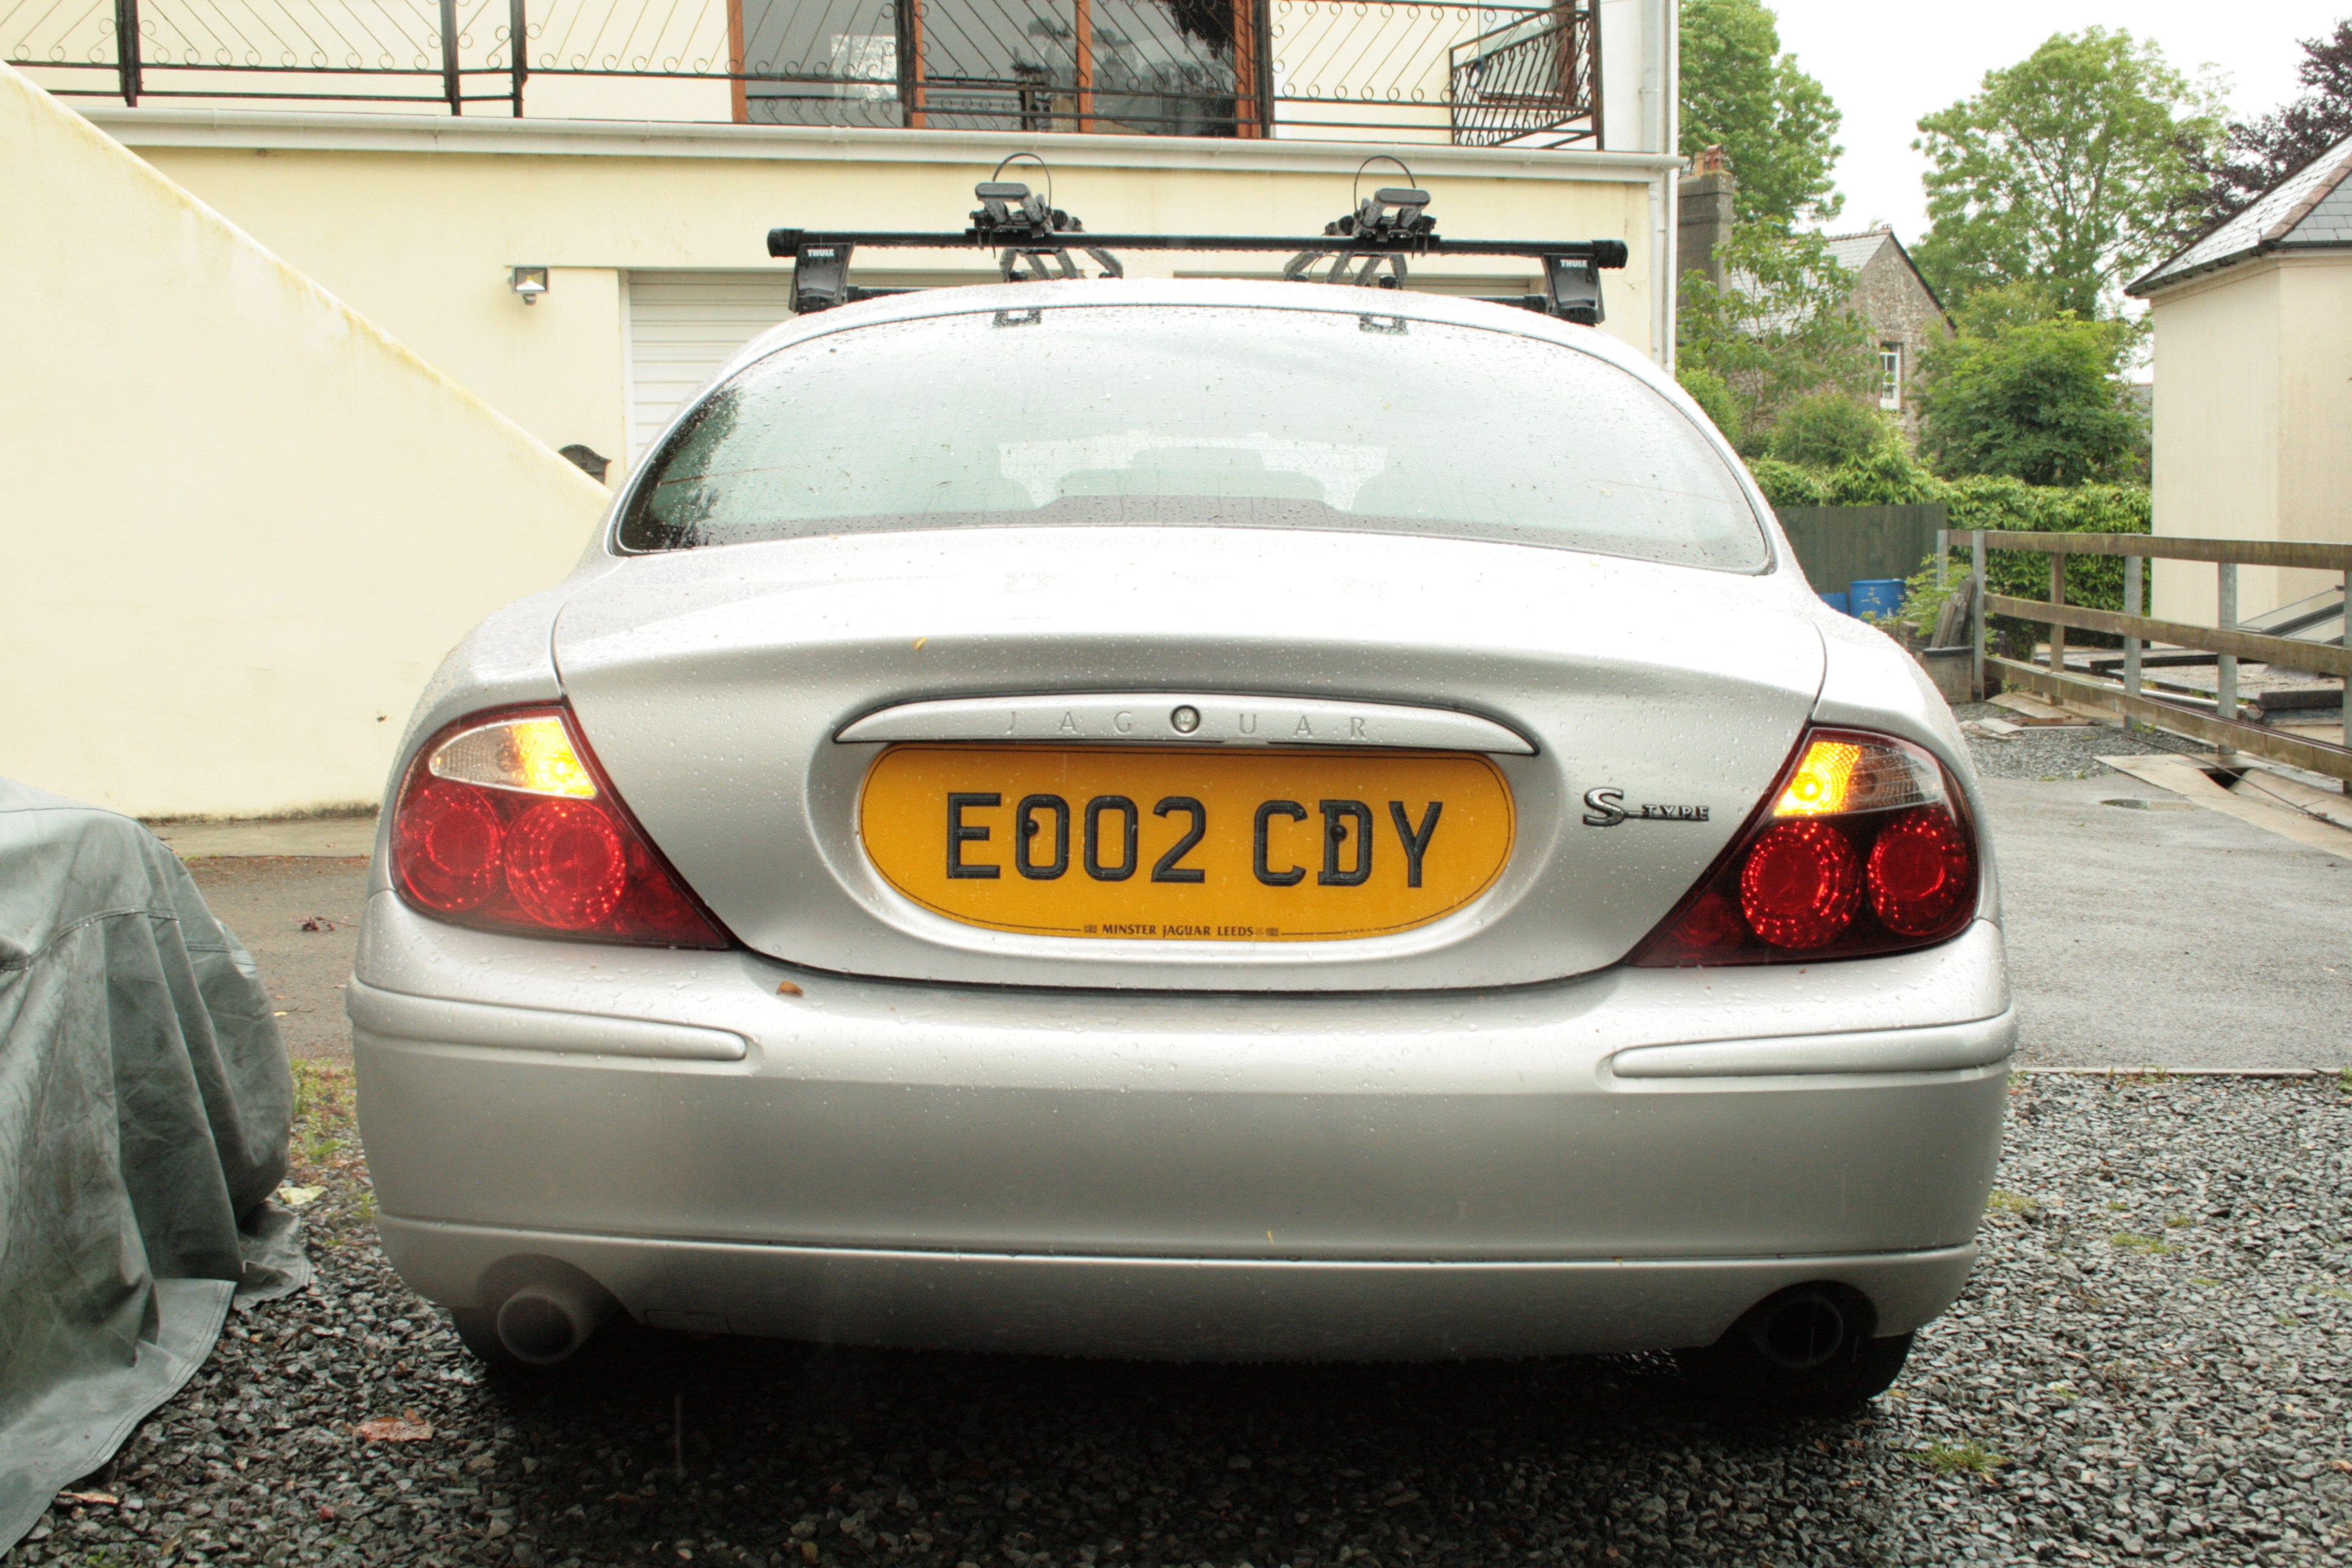
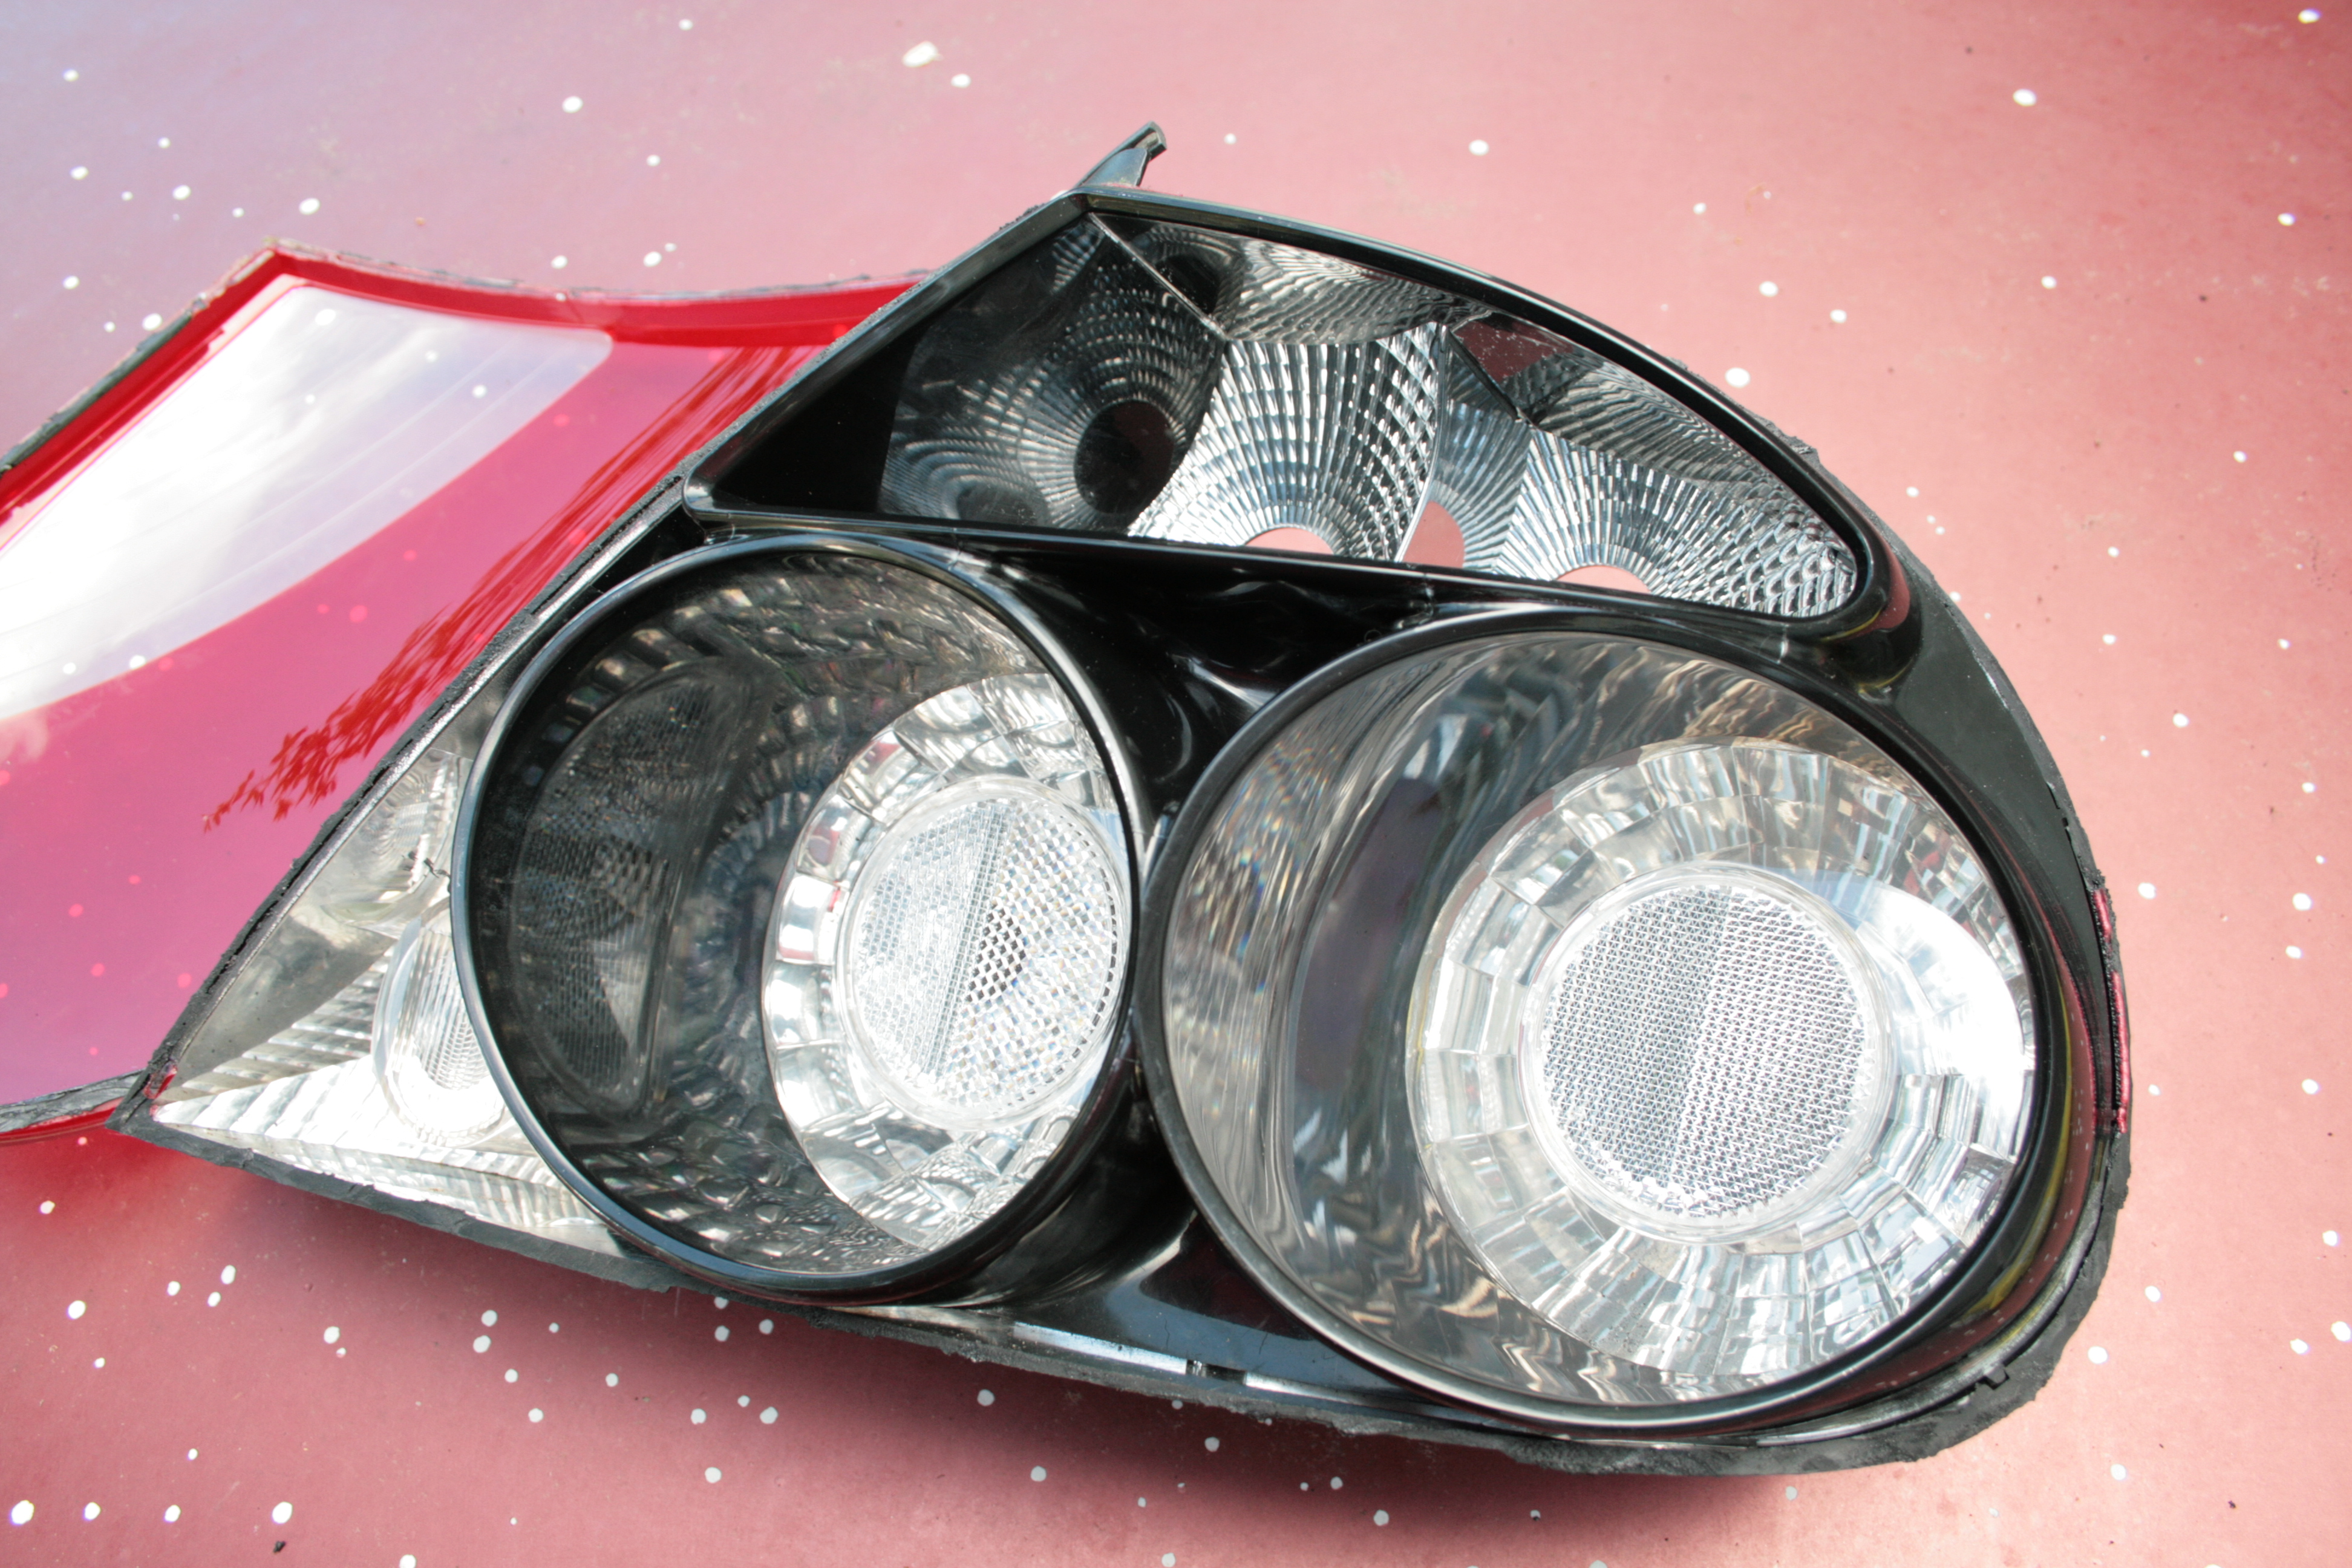
I fitted the lamps. I think they look quite good... ..compared to the standard ones. Here's a picture of the car with one of each, unfortunately there's a water droplet on the camera lens over the original lamp. I did consider leaving chrome on just the bevelled edge around the clear section of lens to give a little detail. However removing the chrome as I did made that tricky, maybe I'll try it with another pair.


-
I don't think there's a flat surface on them! My dad's got one of those electric oscillating tools, a bodgers friend as he calls it. I may well try that, my only worry is that it may shatter the plastic lens which is probably the most brittle part. You can only go in about 10mm before hitting the part that gets de-chromed (we should officially name these different parts for ease. But that said, I named the piece of water pipe from my suspension bush thread "the pusher" but my dad kept singing Steppenwolf every time I said it so I had to just call it "water pipe"). You can actually see where I caught it in one of the photos above, fortunately it's not visible when re-assembled. The standard lamps go for naff all money on ebay, my guess is they don't fail or get broken too often. There's certainly a lot of bumper sticking out past them! If a Jag breaker would do a big box of them that would probably be the way to go, certainly as far as delivery costs go. The chap I bought my grill off was very fair, he chucked in a badge that goes for a tenner or so on ebay for free just with me asking what he wanted for it. Thank you for the offer of bits but I'll pass the moment as I don't know how soon I'll be able to do another set. Mastic's a good idea, if the edges could be cut neater than I did it then a nice bead of that could probably take the place of glue on that face. It's the one that really needs sealing as the water from the boot gutter flows down that way. I suffered a broken back last year and have only just started cycling again, very gentle forest loops on the XC bike so far. I hoping to be hitting some bigger stuff by the end of the year and maybe get back to doing some DH riding. I recently got my first carbon part, some bars for my "hardcore" hardtail but I'm not entirely confident in the fancy wonder plastic yet, I think they will be going on the XC bike instead.
-
It could well be. Bare in mind that any car's charging system is simply not designed to charge a flat battery. The best thing to do is charge it properly out of the car. Preferably with a self regulating "smart" charger, that is one that automatically switches to low amperage for a really low battery. Personally I use Optimate ones but C-TEK are popular and I'm sure there are many other options. As long lived as car batteries can be, draining them and then not charging them back up properly will shorten their lives dramatically. Hooking up a seemingly healthy battery to one of these "smart" chargers once in a while is not a bad idea, especially with all the voltage sensitive modules and wotnots in modern vehicles.
-
Thanks. To be fair I have seen a similar thing done to headlamps so I can't take full credit. But I've not seen sealed units like this opened up to do it before. I'm really hoping they don't look rubbish on the car, I don't know yet because it's tipping it down here. Hopefully it either stops raining soon or I stop being a wuss and go out in it. The smell of araldite had faded just in time for me to get it out again to fill in some little holes I missed, the last thing I want is for moisture to get in there. That bike cleaner is notorious round here, well in our little mountain biking circle anyway. Just don't leave it on anything too long, I wasn't joking about the anodising. I suppose it says it all that when I want to remove any finish off anything I think of the pink terror. To re-attach the lenses I coated the cut edge of the lens with just a smear of epoxy knowing that the majority of it wouldn't touch the main part of the unit. I placed the lens face down on a rubbery mat and placed the main part on top then weighed it down with a box of cat food (it was heavy and to hand). Where there was a sizeable gap between the edges I put a wedge under the lens to exert more pressure on that spot to close it. My epoxy is the quick stuff so after half an hour it was as stuck as it would ever be. I then mixed up some more and started filling in the gaps all the way round. It's messy stuff and actually the standard rather than quick drying epoxy would be much better for this as you wouldn't have to rush to use it up before it hardens. This is probably the slowest part of the job and it stinks. Here's the seam that is visible within the boot aperture. Once the gap is filled completely I could sand off the excess glue but as these are the first attempts I will opt for reliability over looks and leave it. These spare lights weren't immaculate to begin with and I did actually manage to put a small crack in one of the lenses so, assuming they work, one day I'll do another pair and use what I've learned this time to make them neater and better. One thing I really want to improve upon is cutting them open. Melting my way though is messy and inaccurate and so if I can find a tiny hand saw that would cut this stuff I'd rather take the time doing it neatly. A miniature jigsaw might work if such a thing exists. The weather's drying up now so after lunch I'll go and fit these things.

-
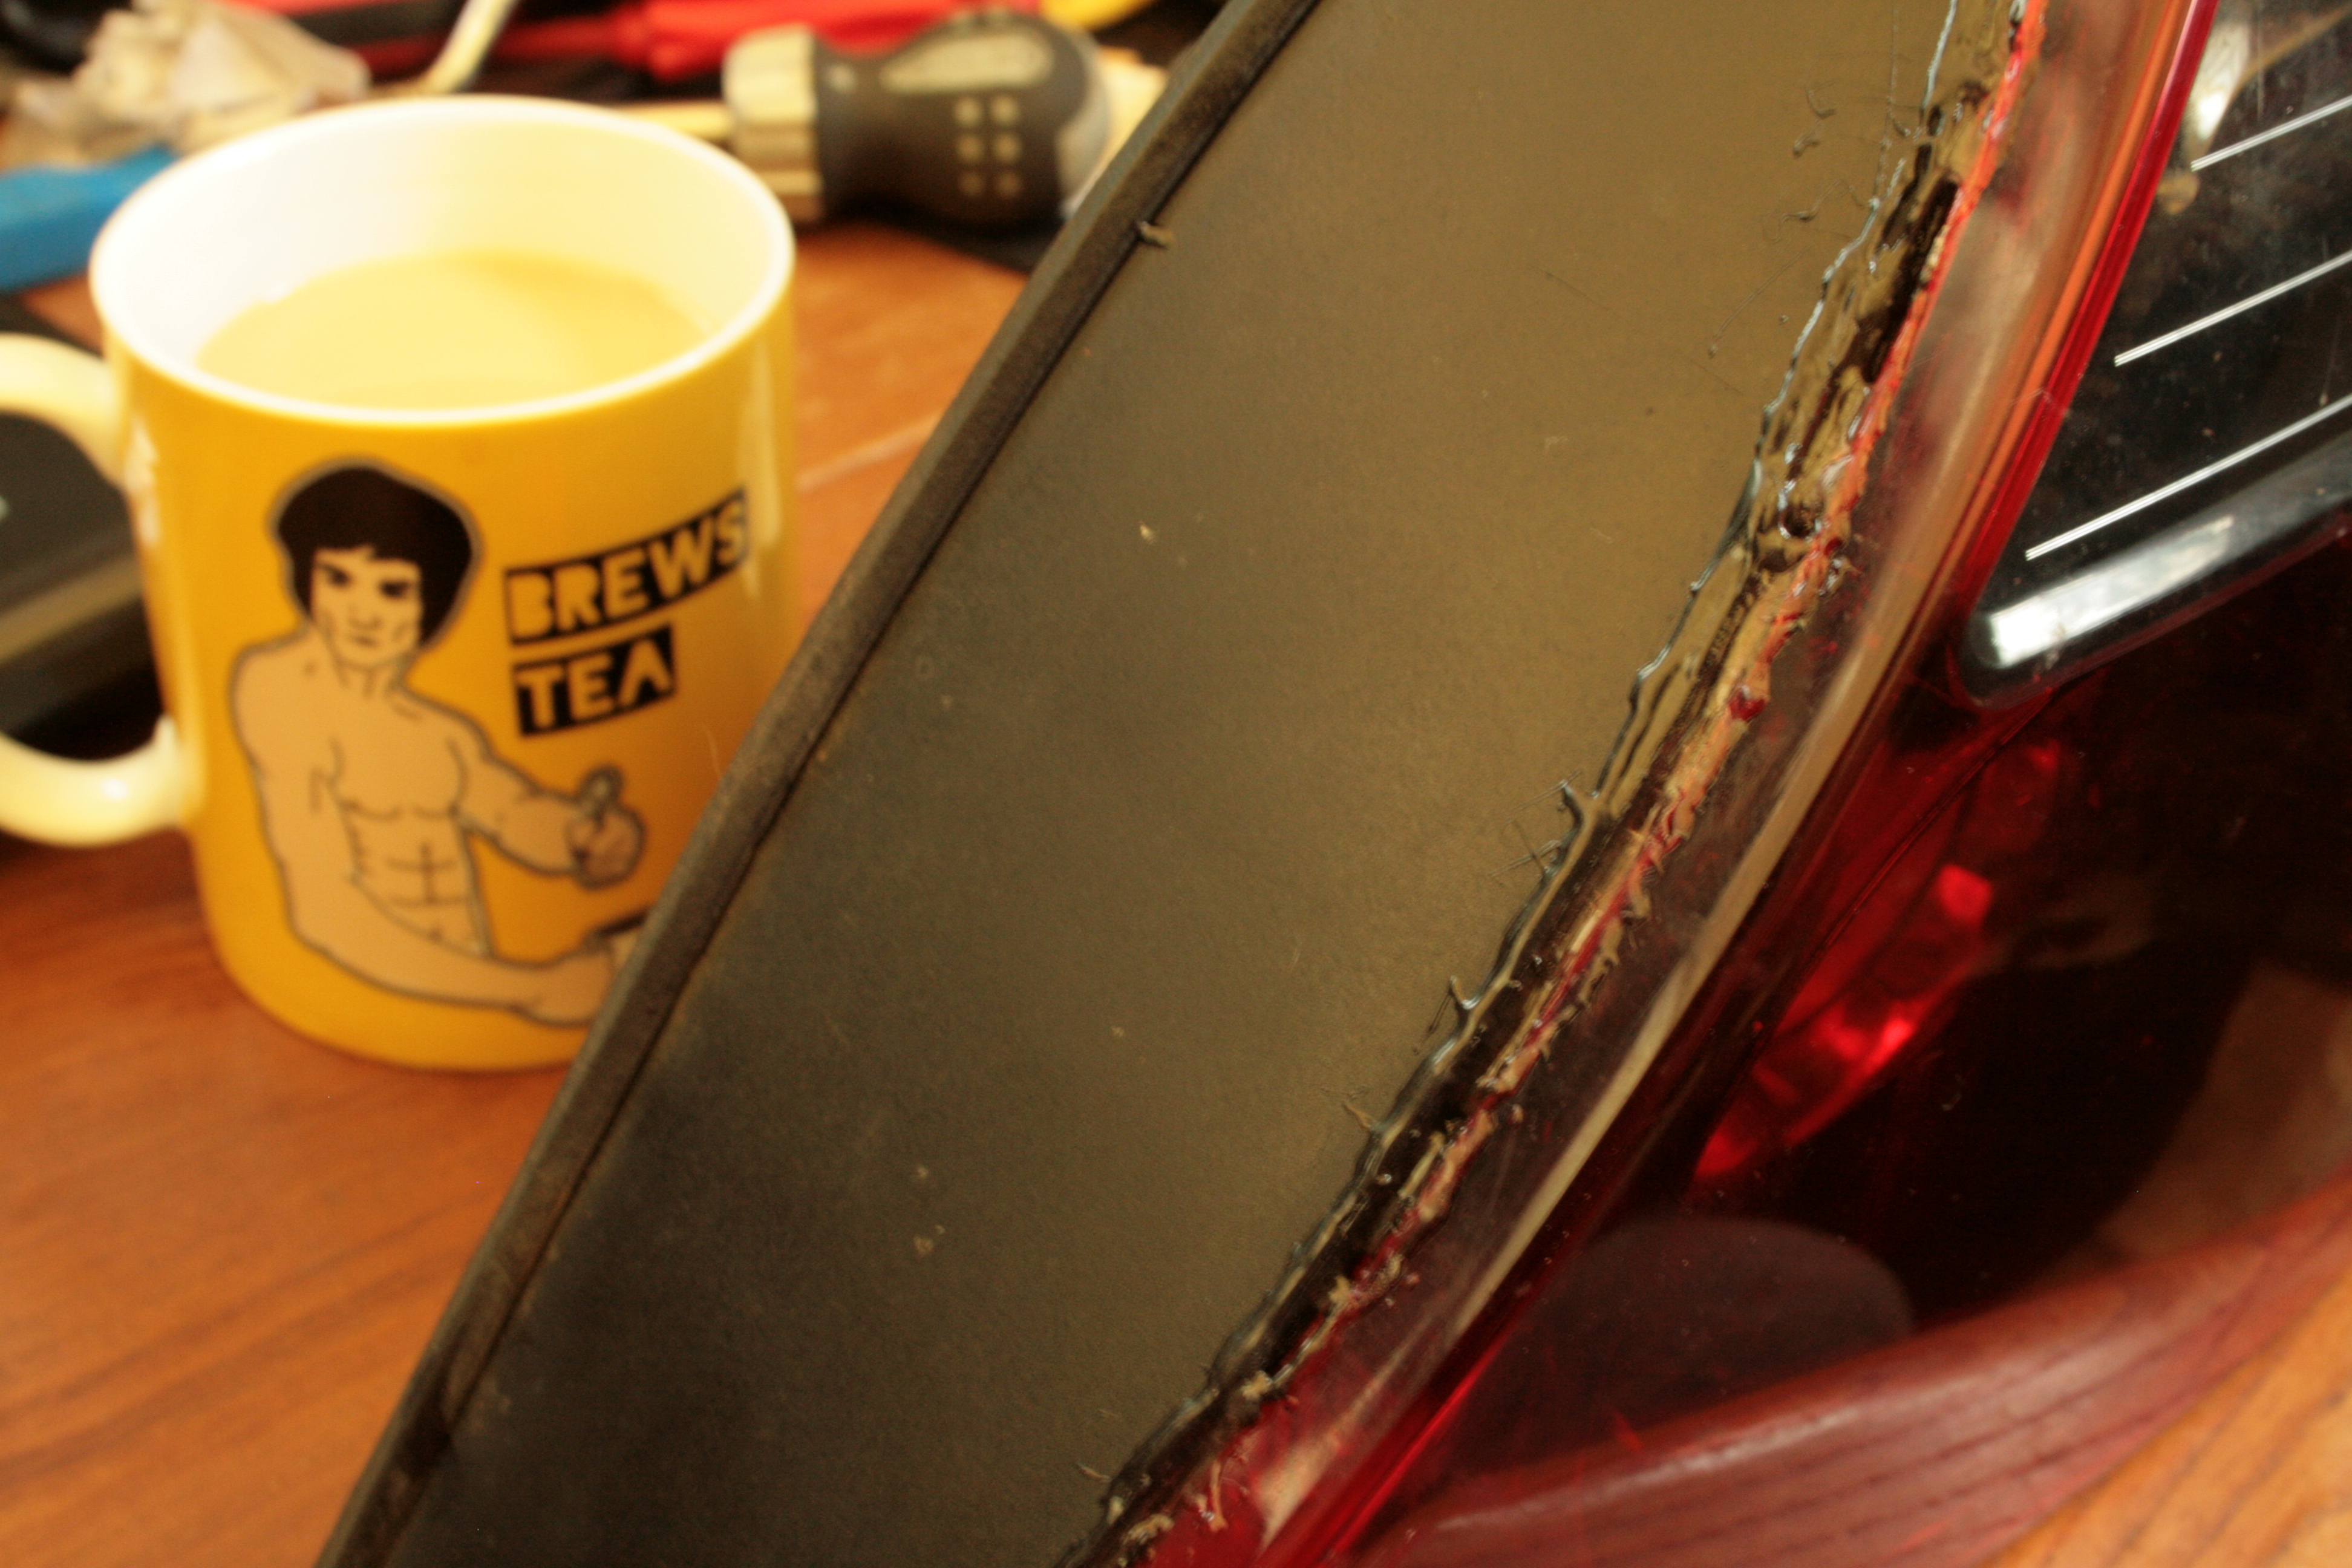
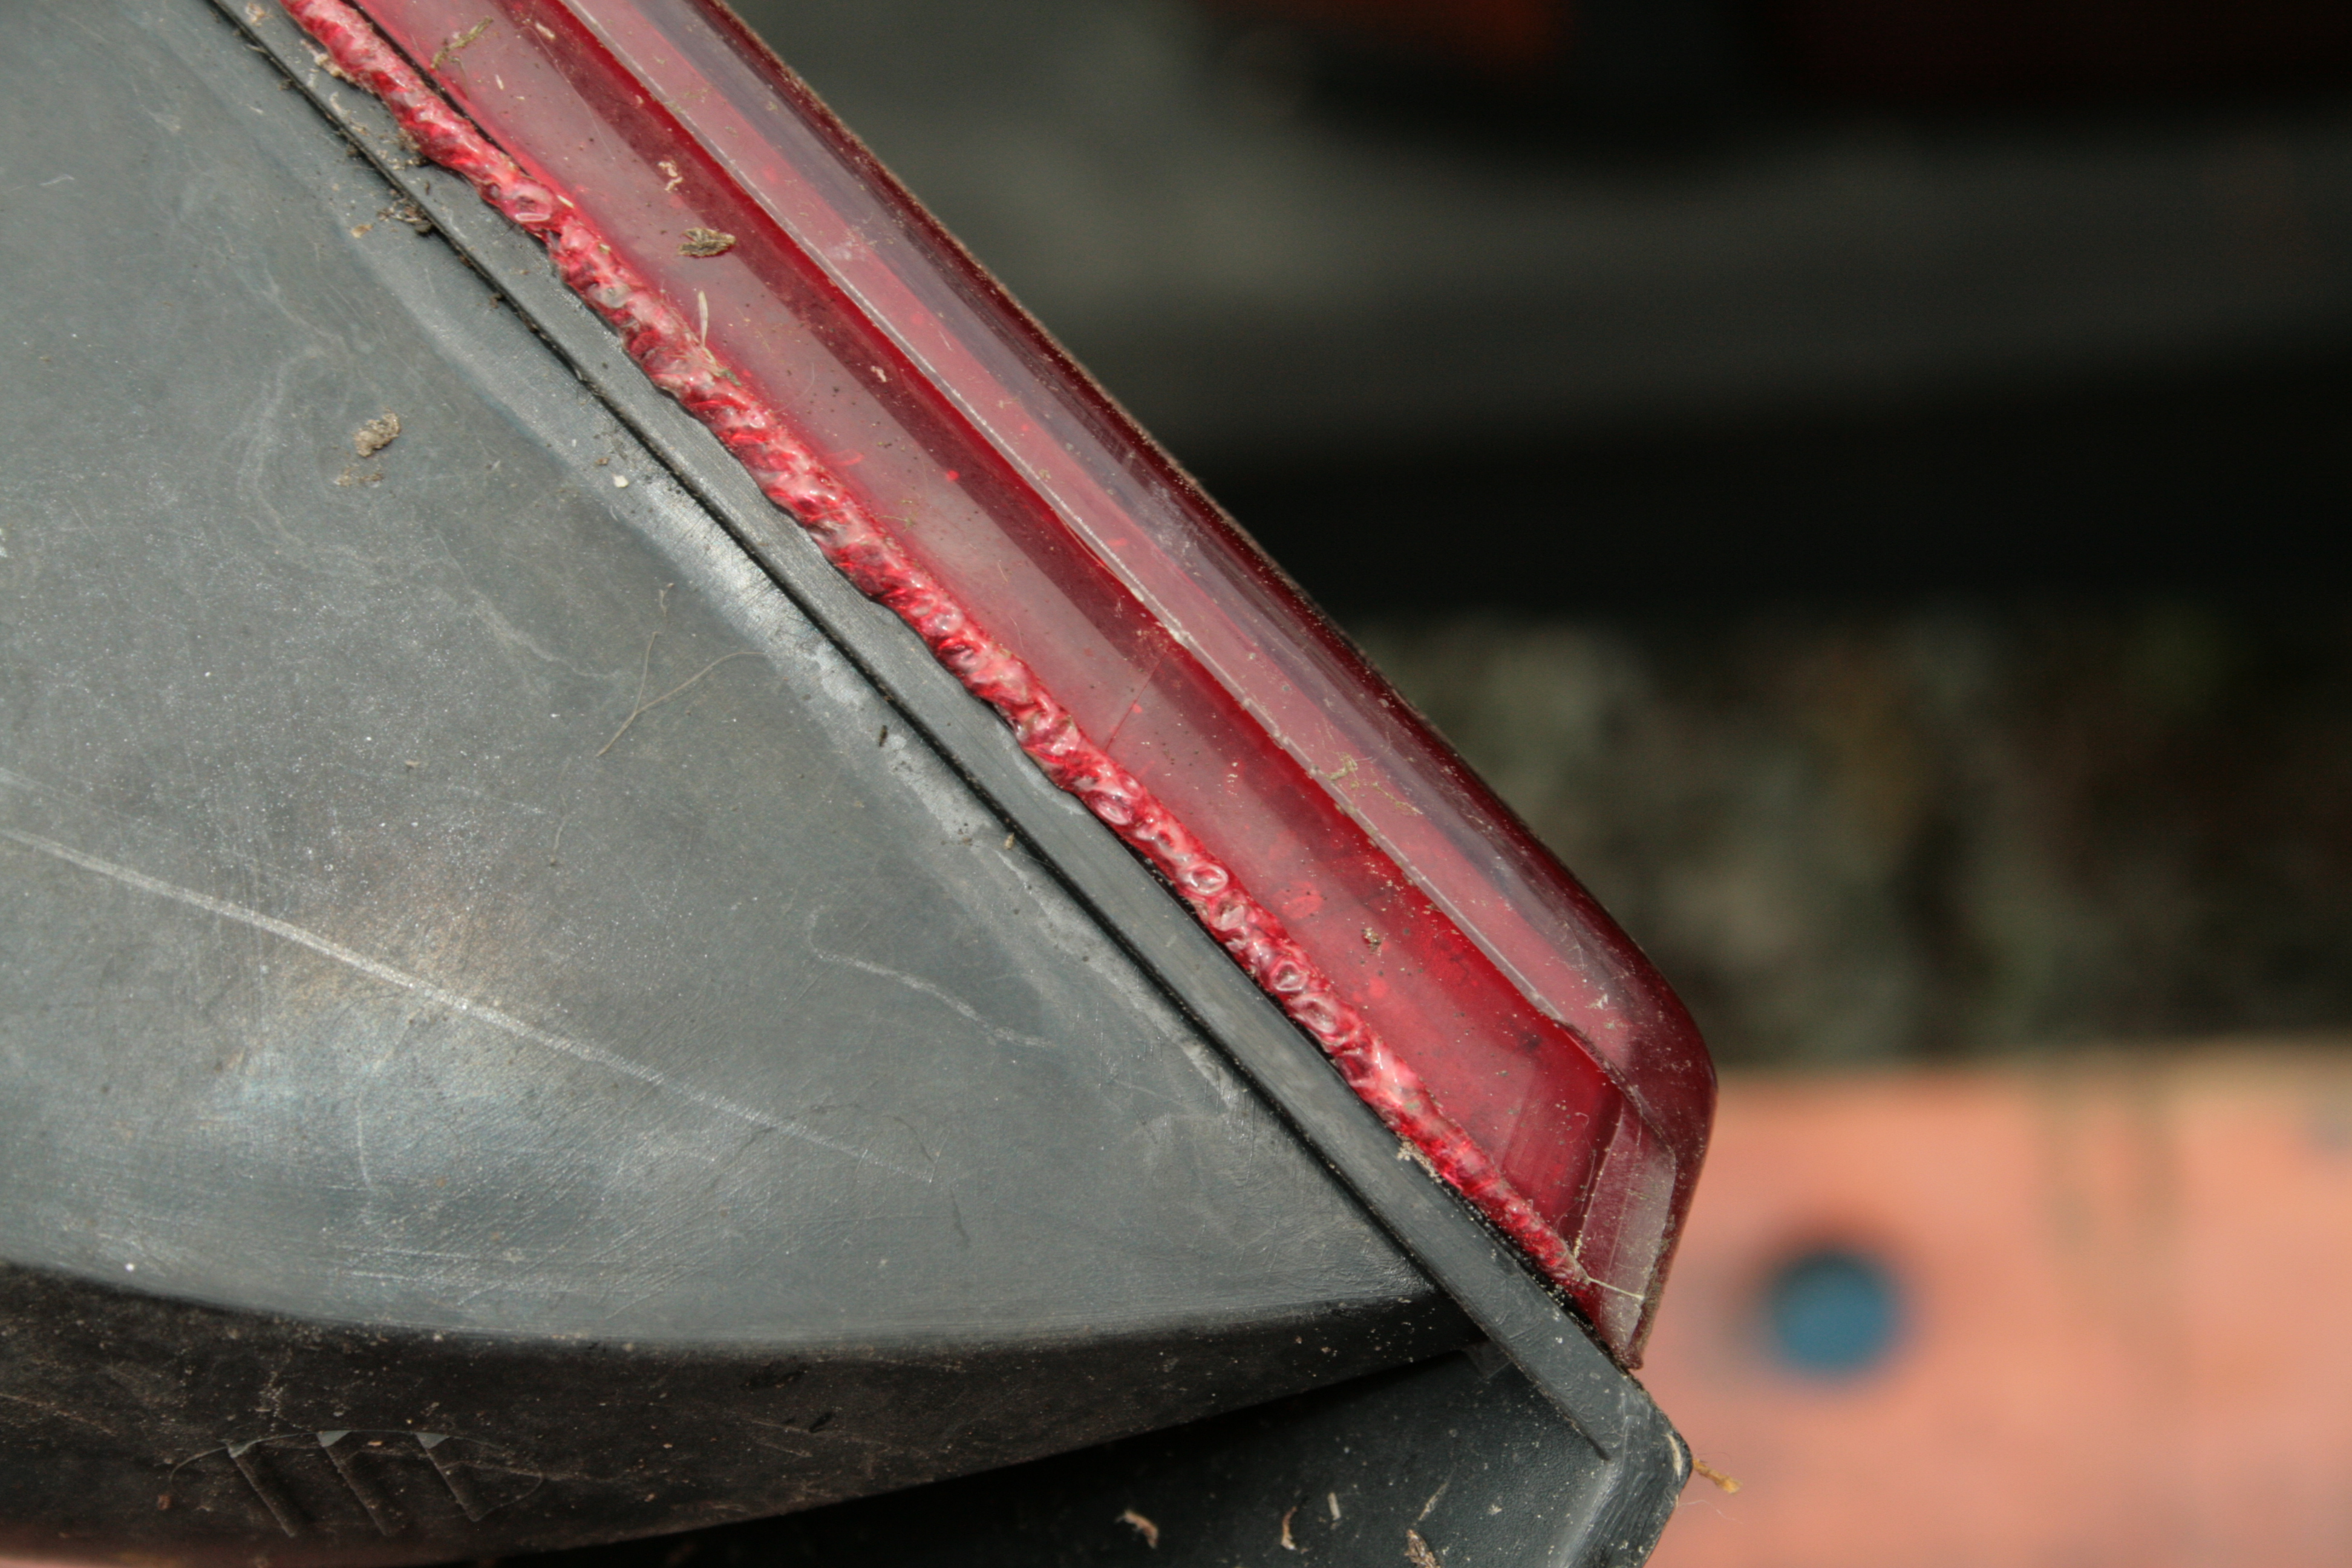
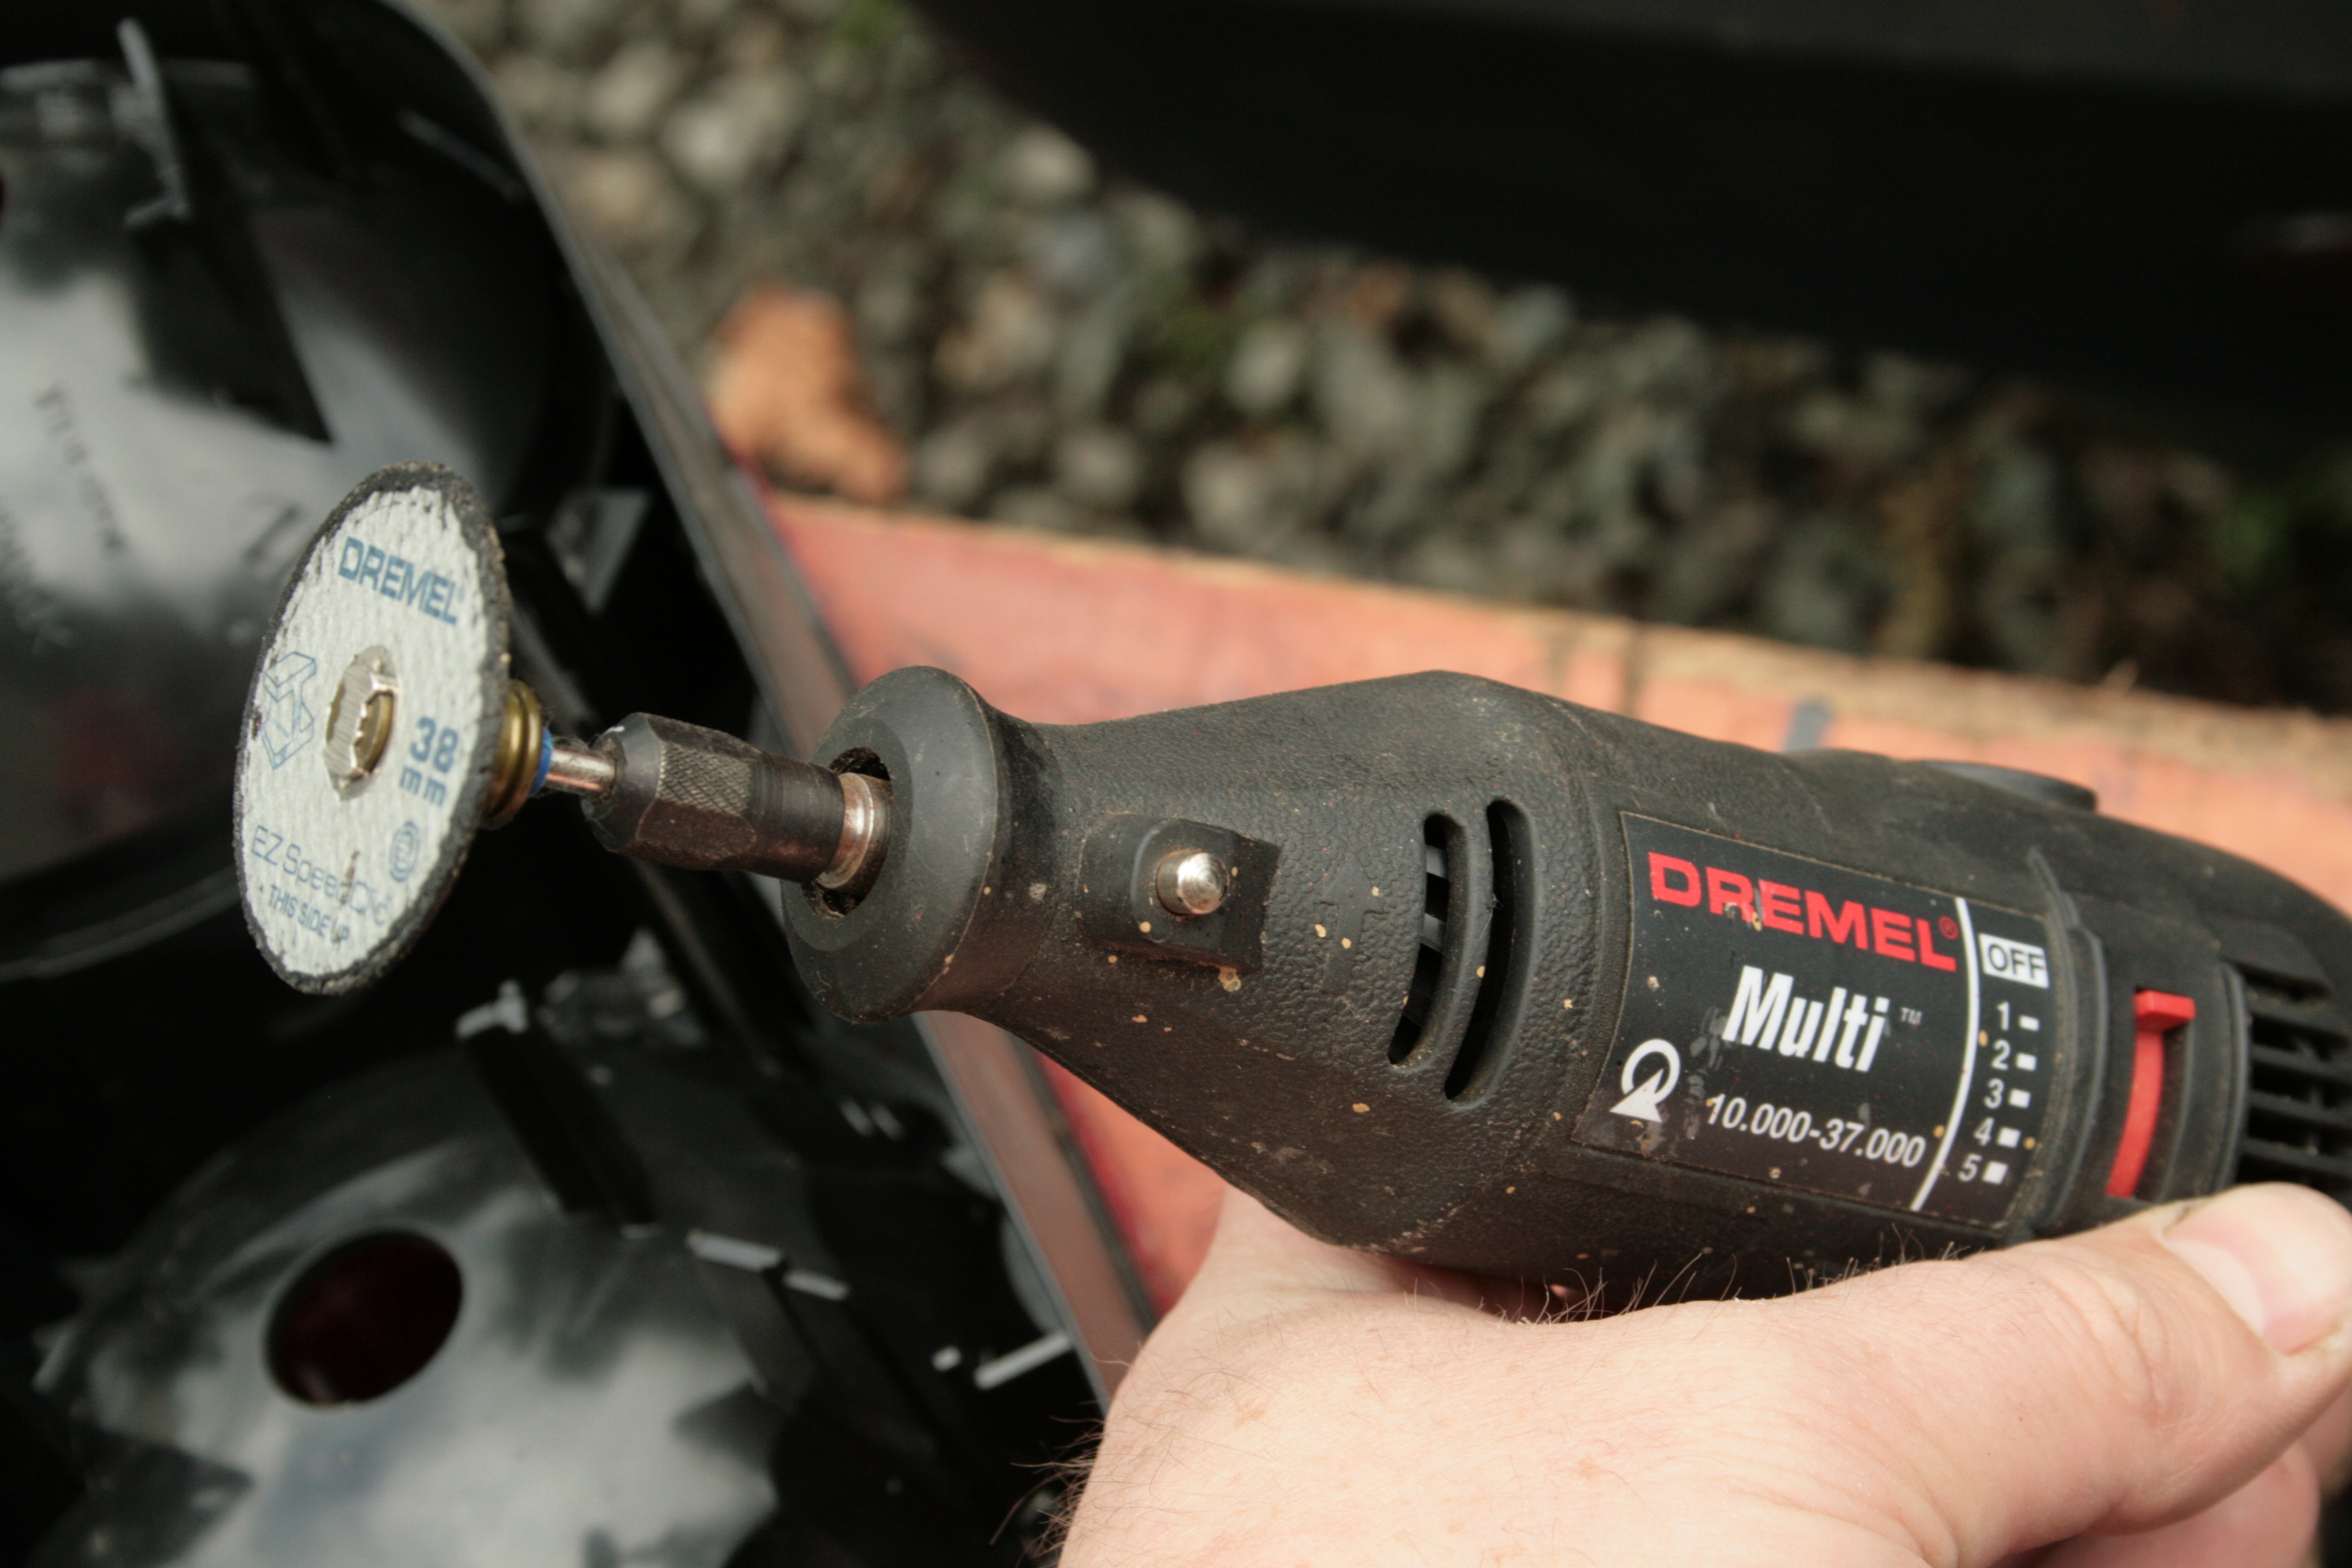
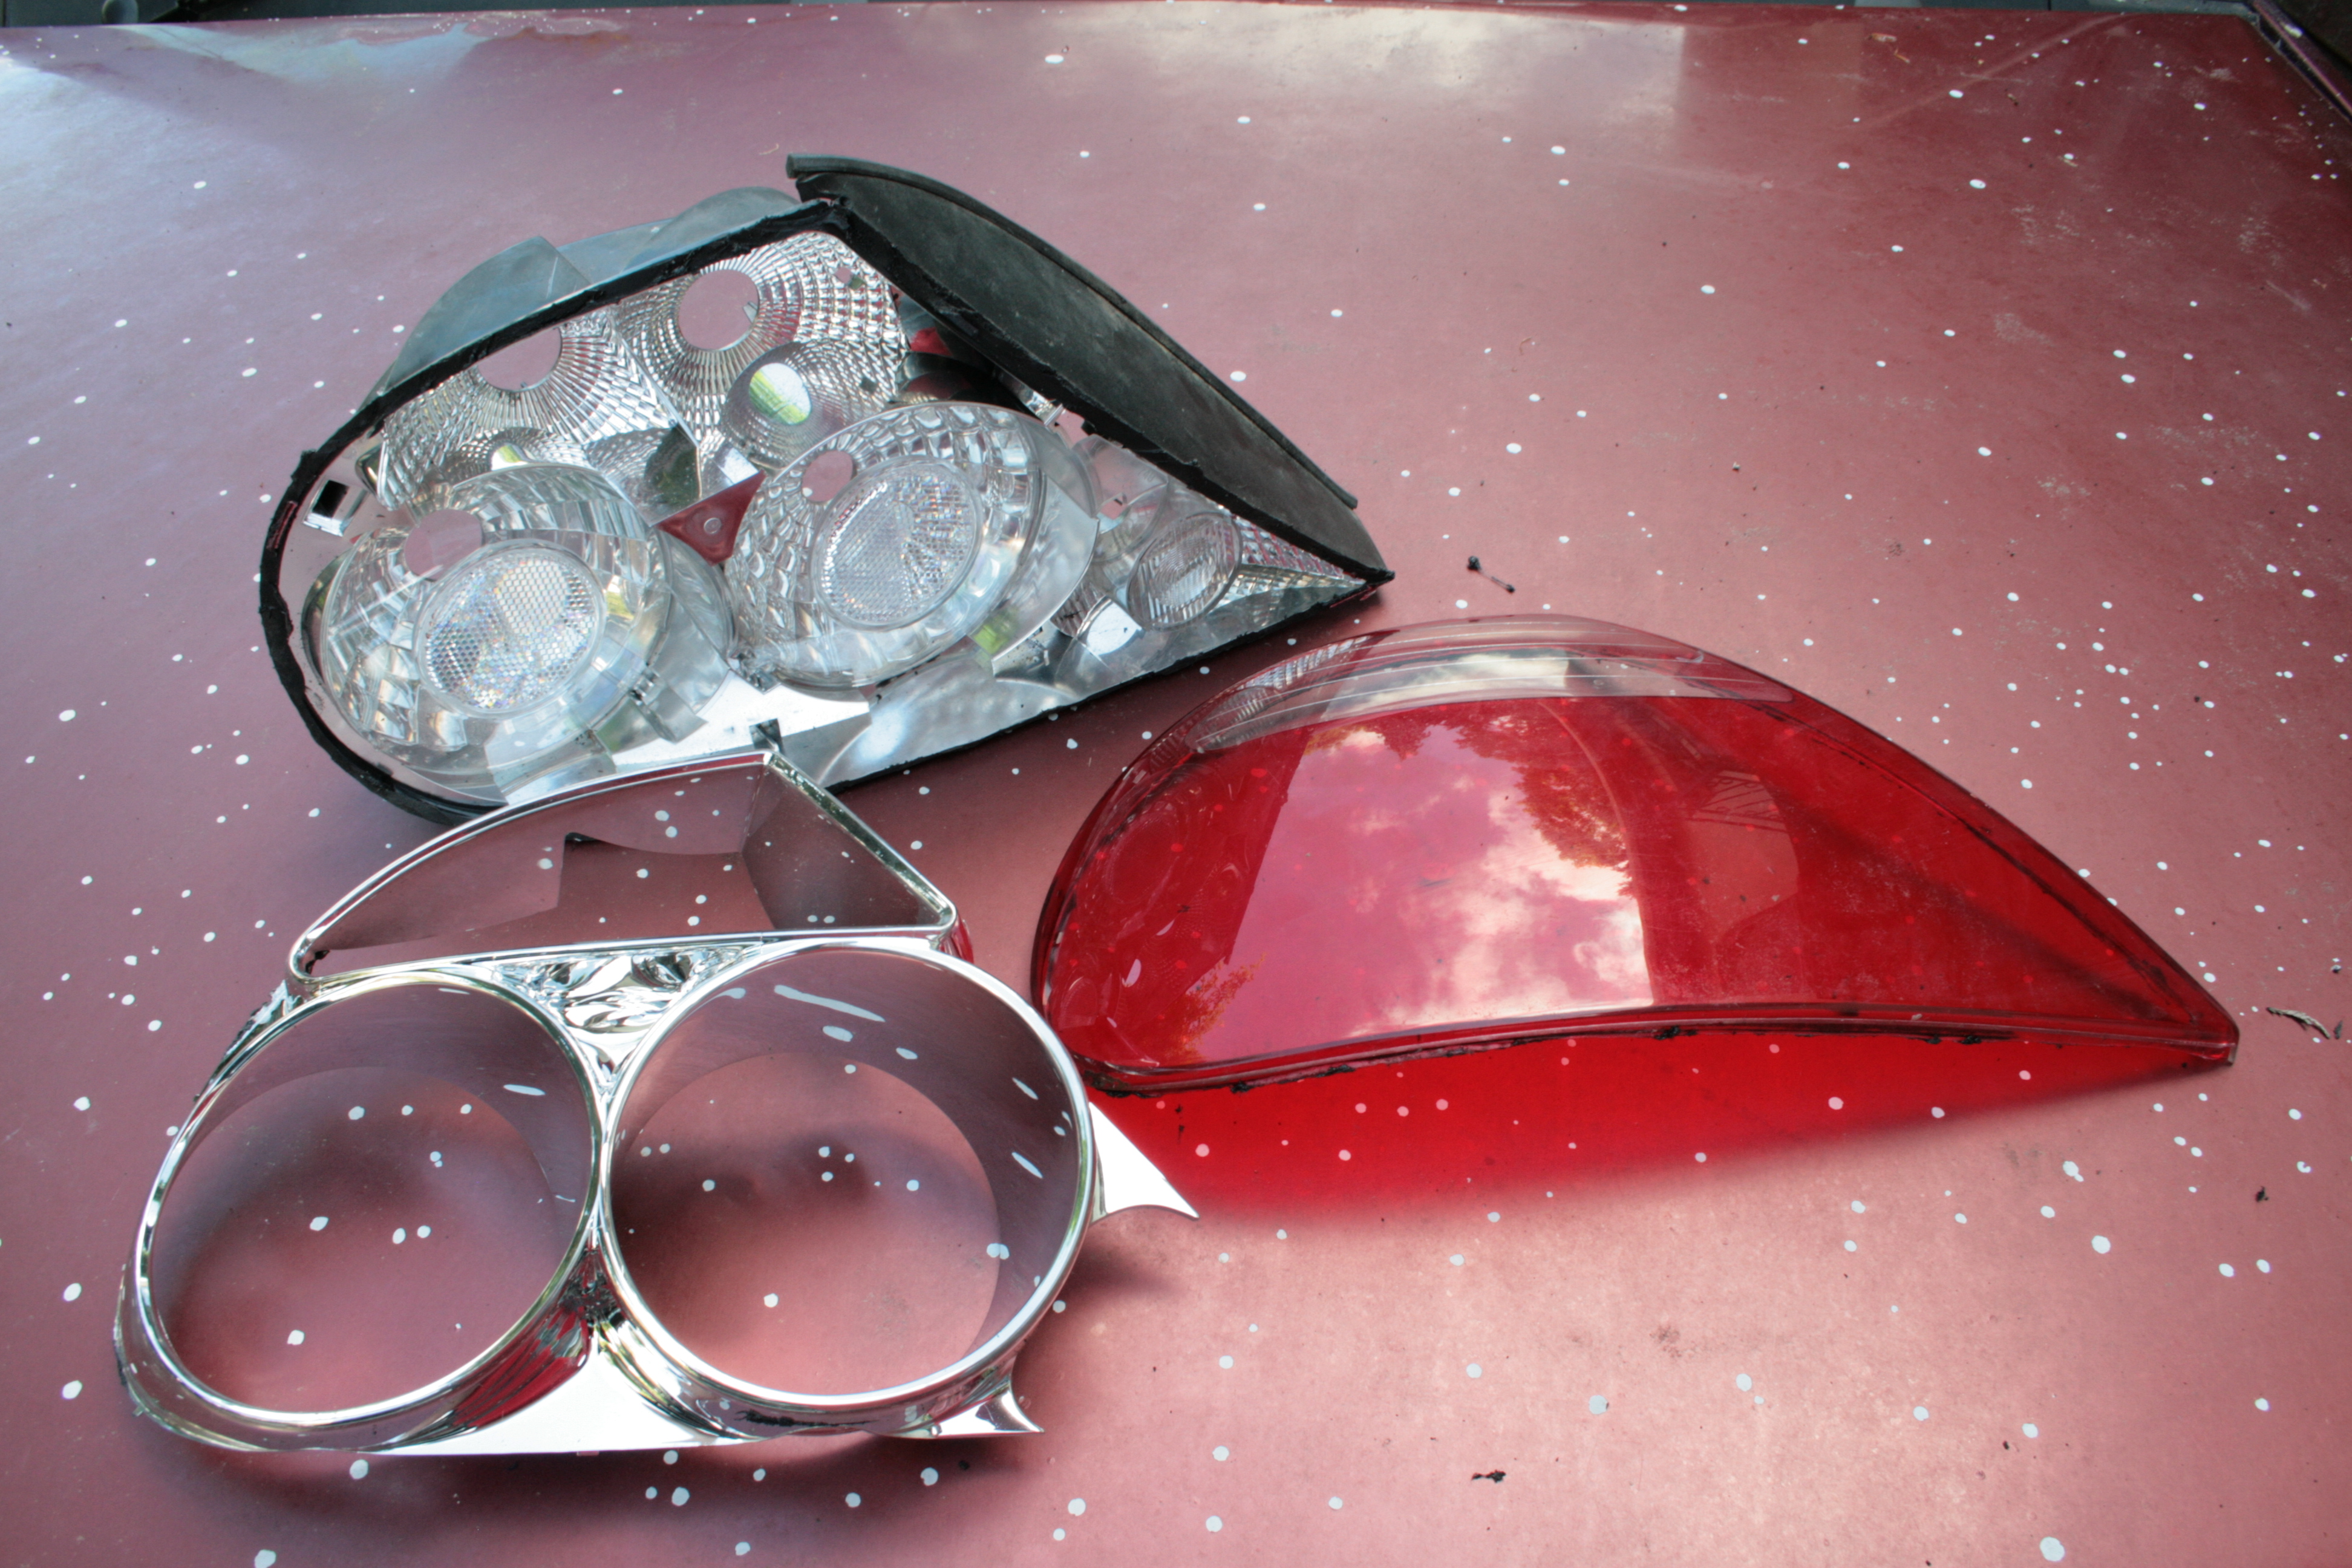
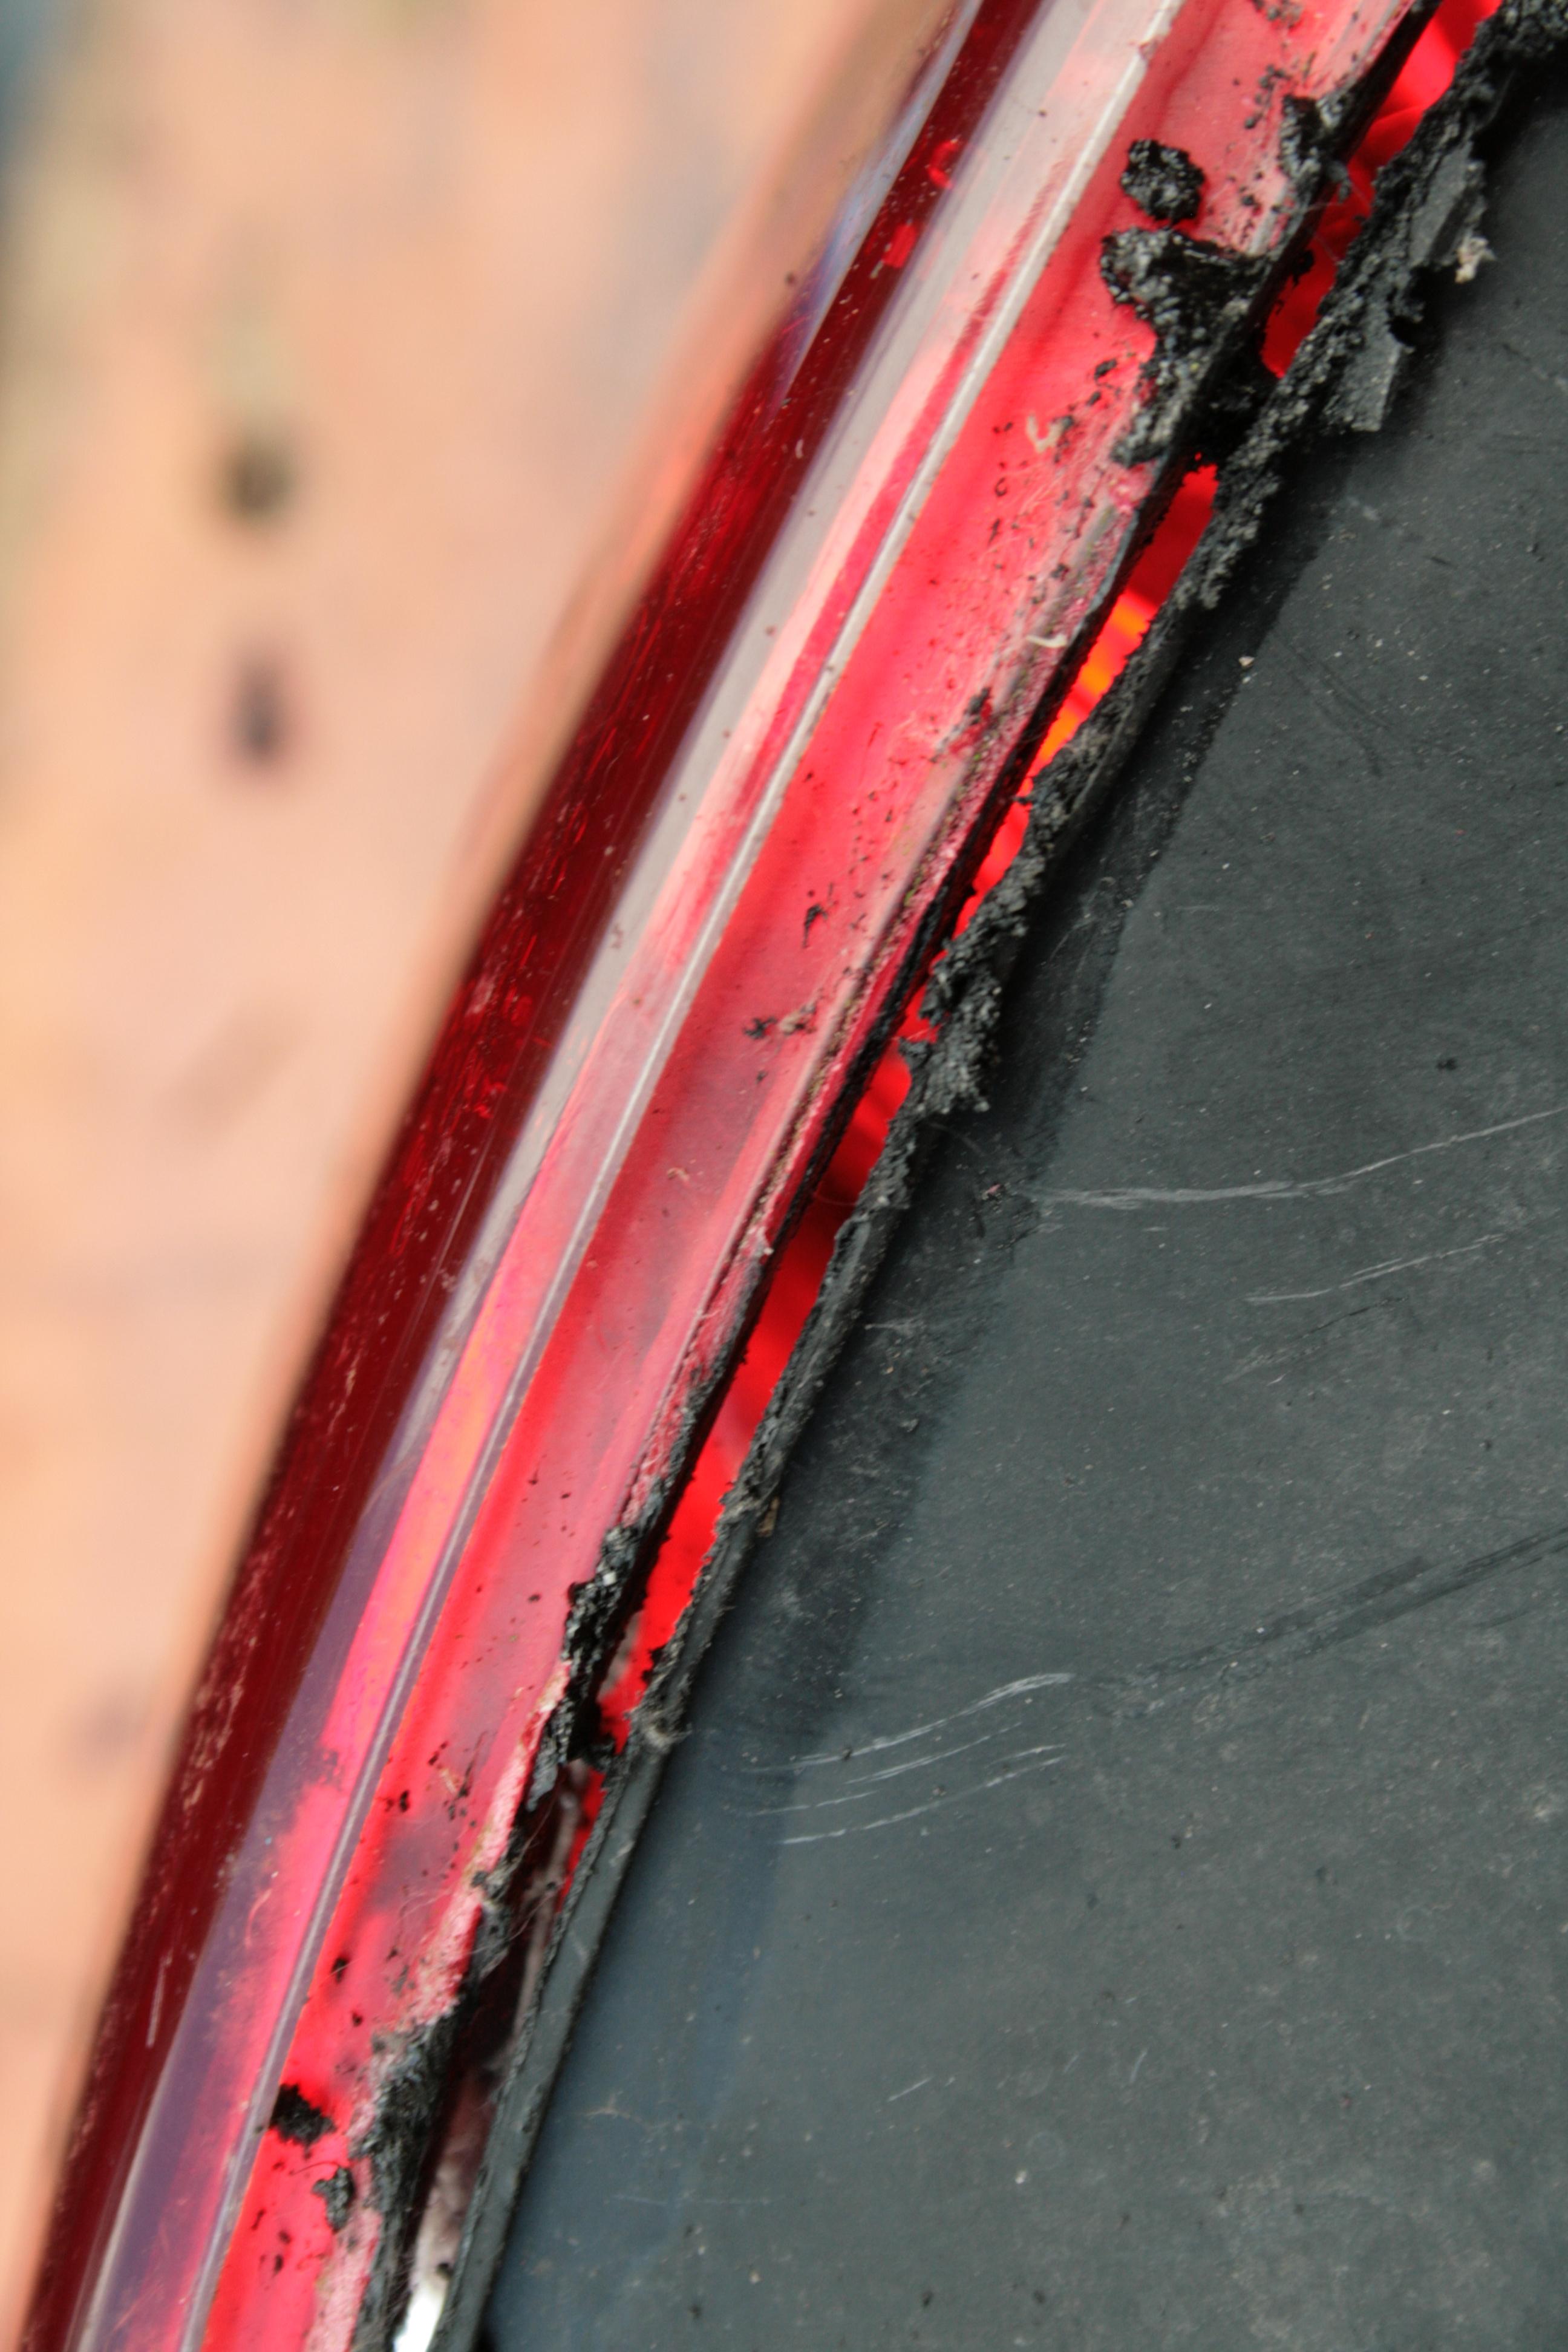
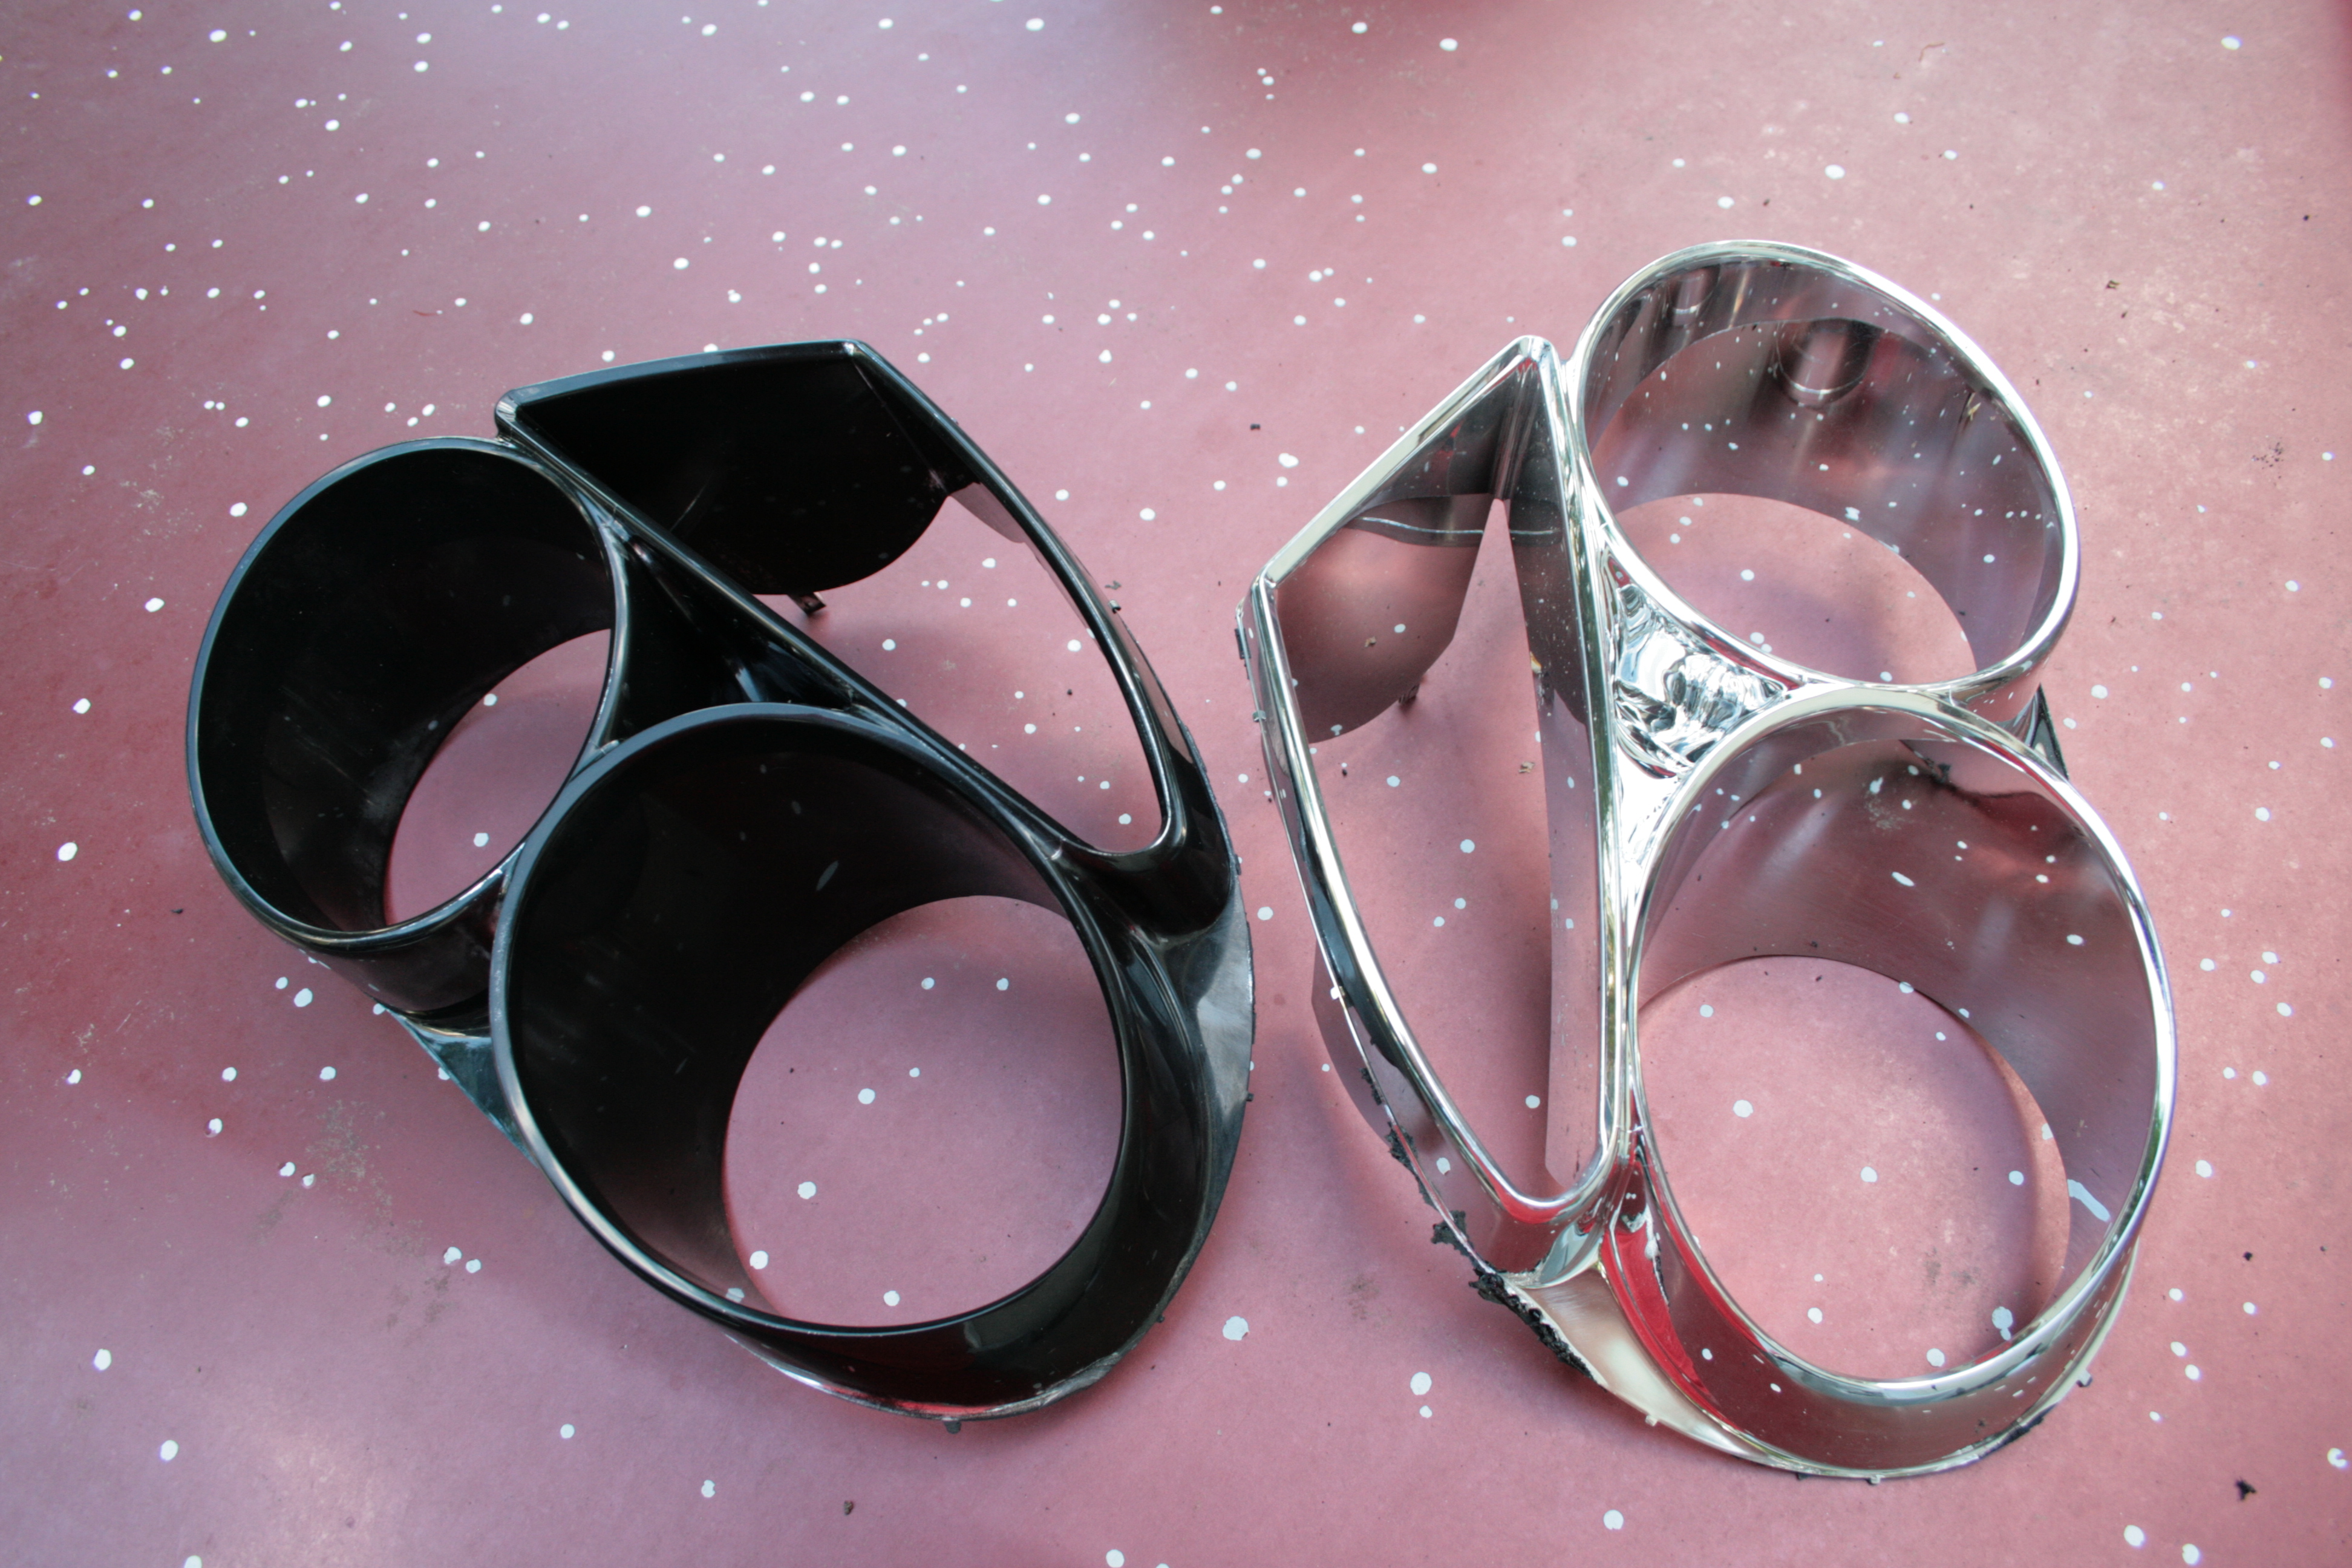
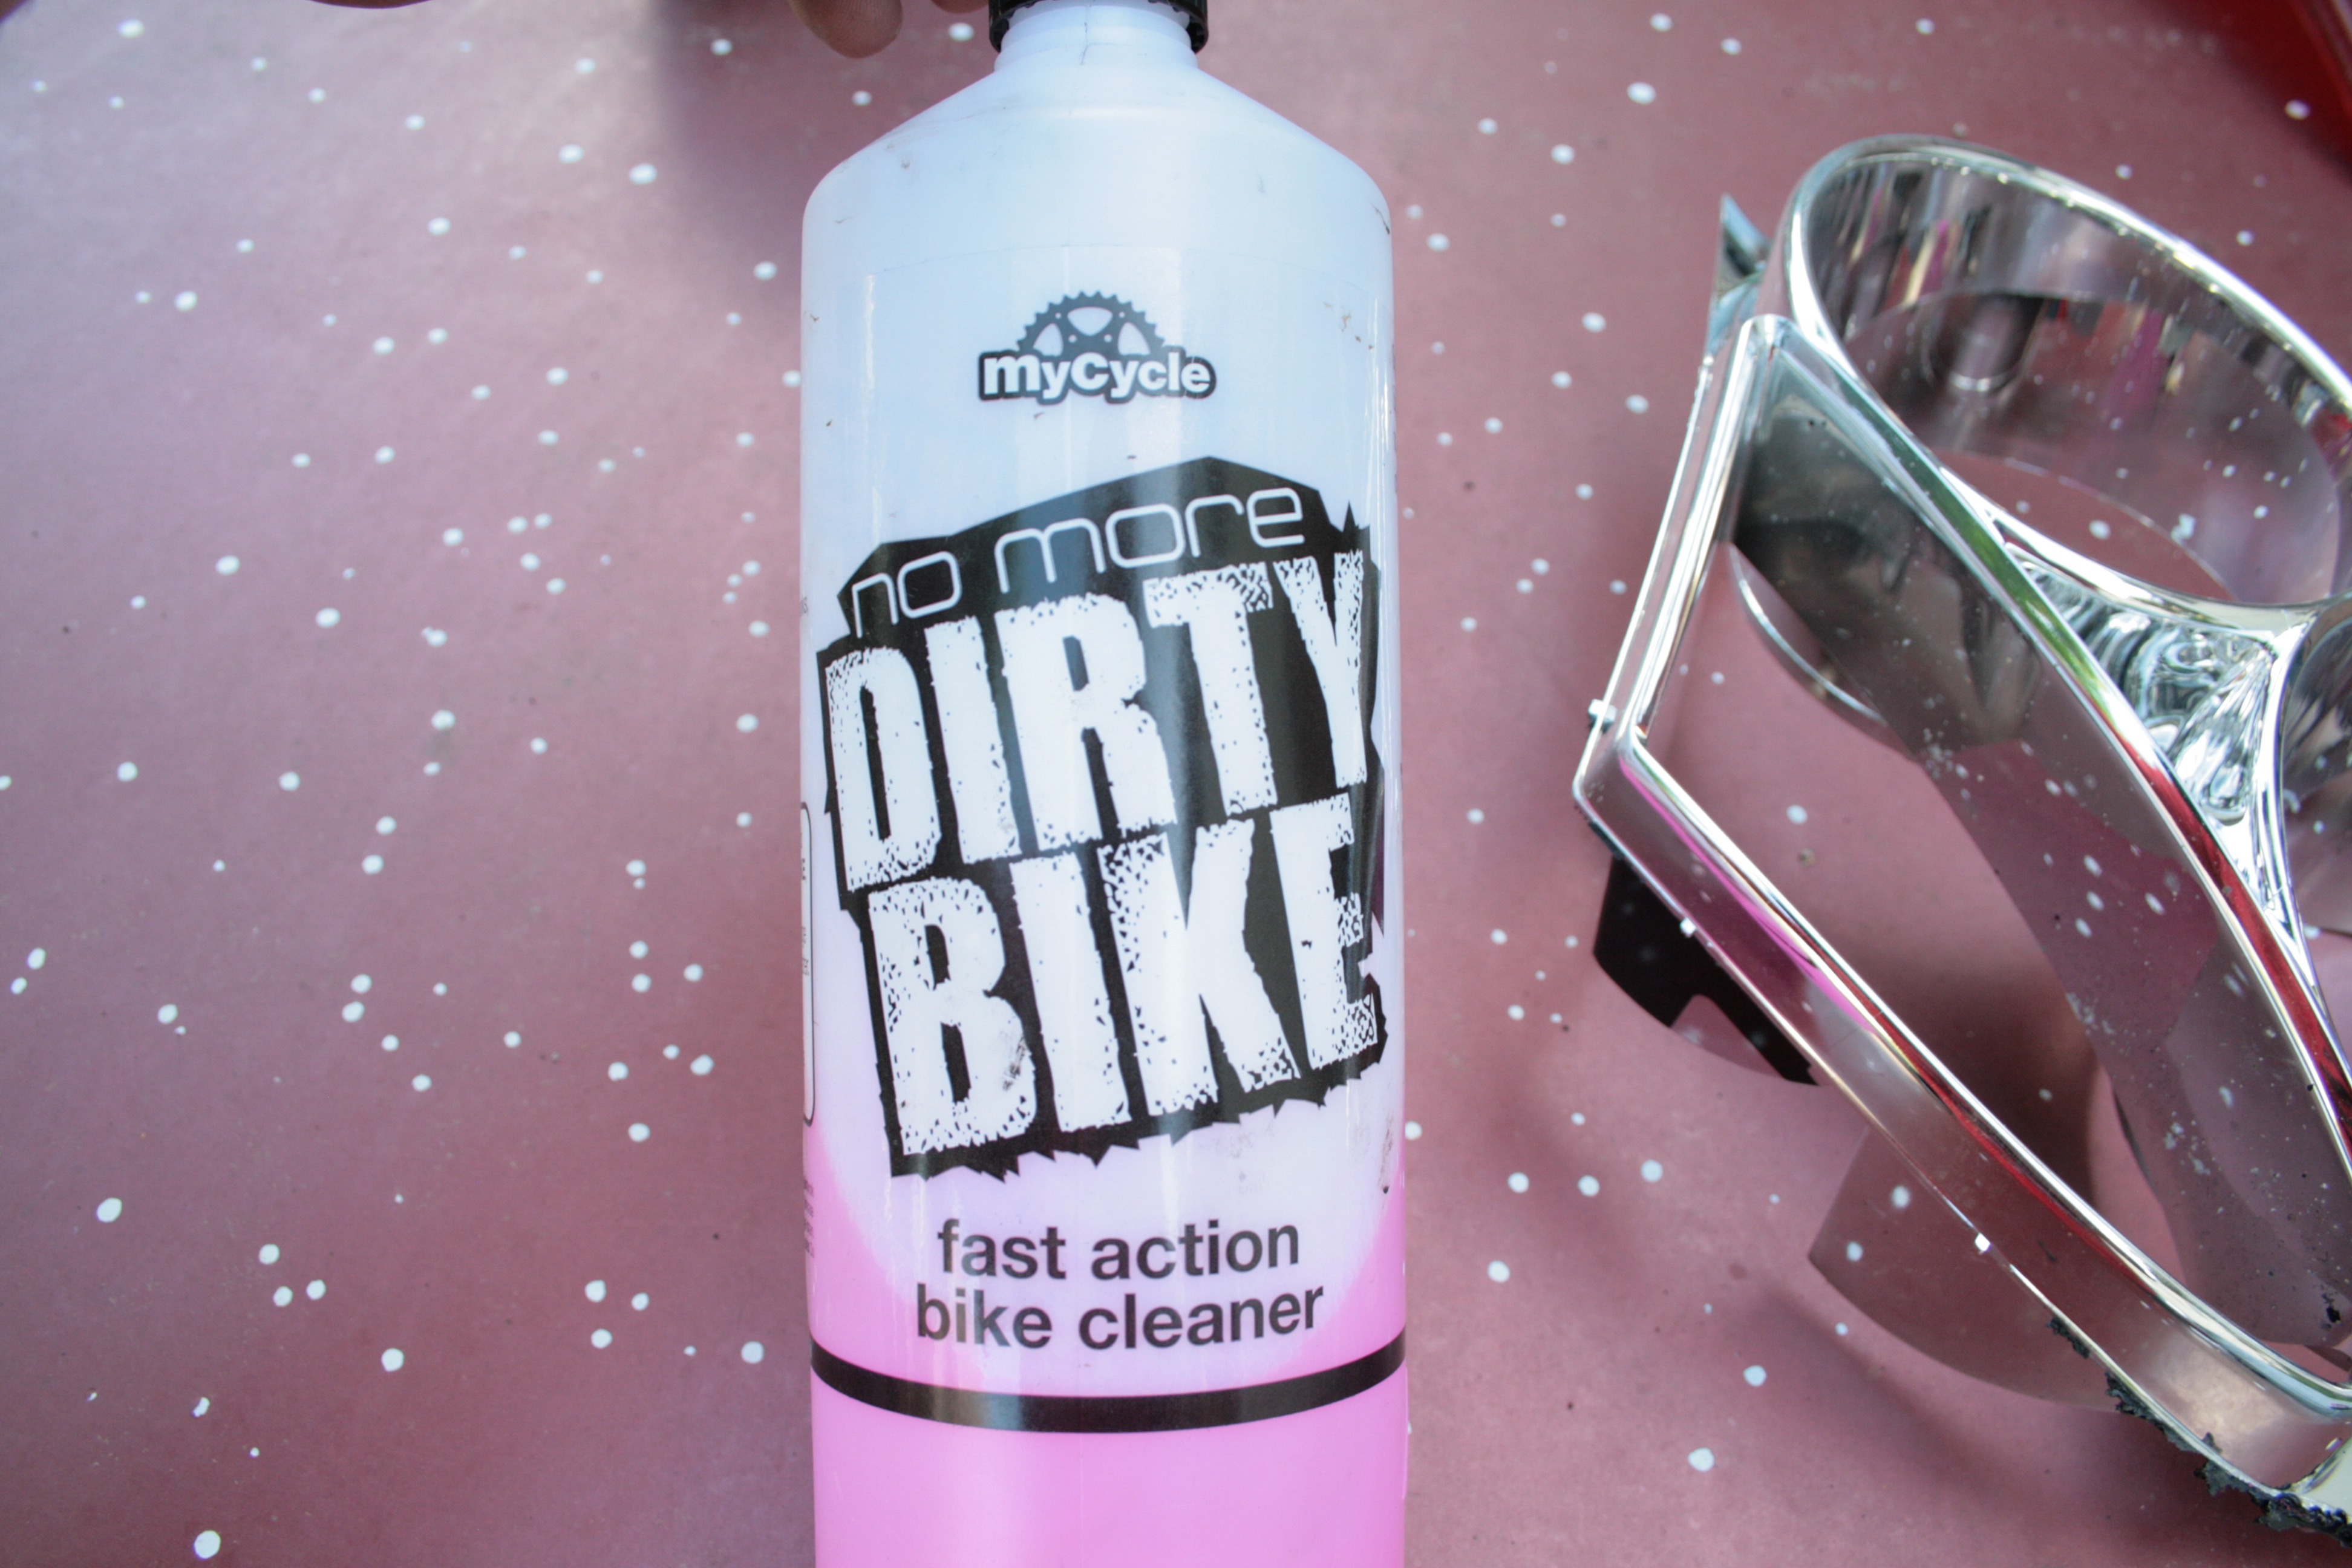
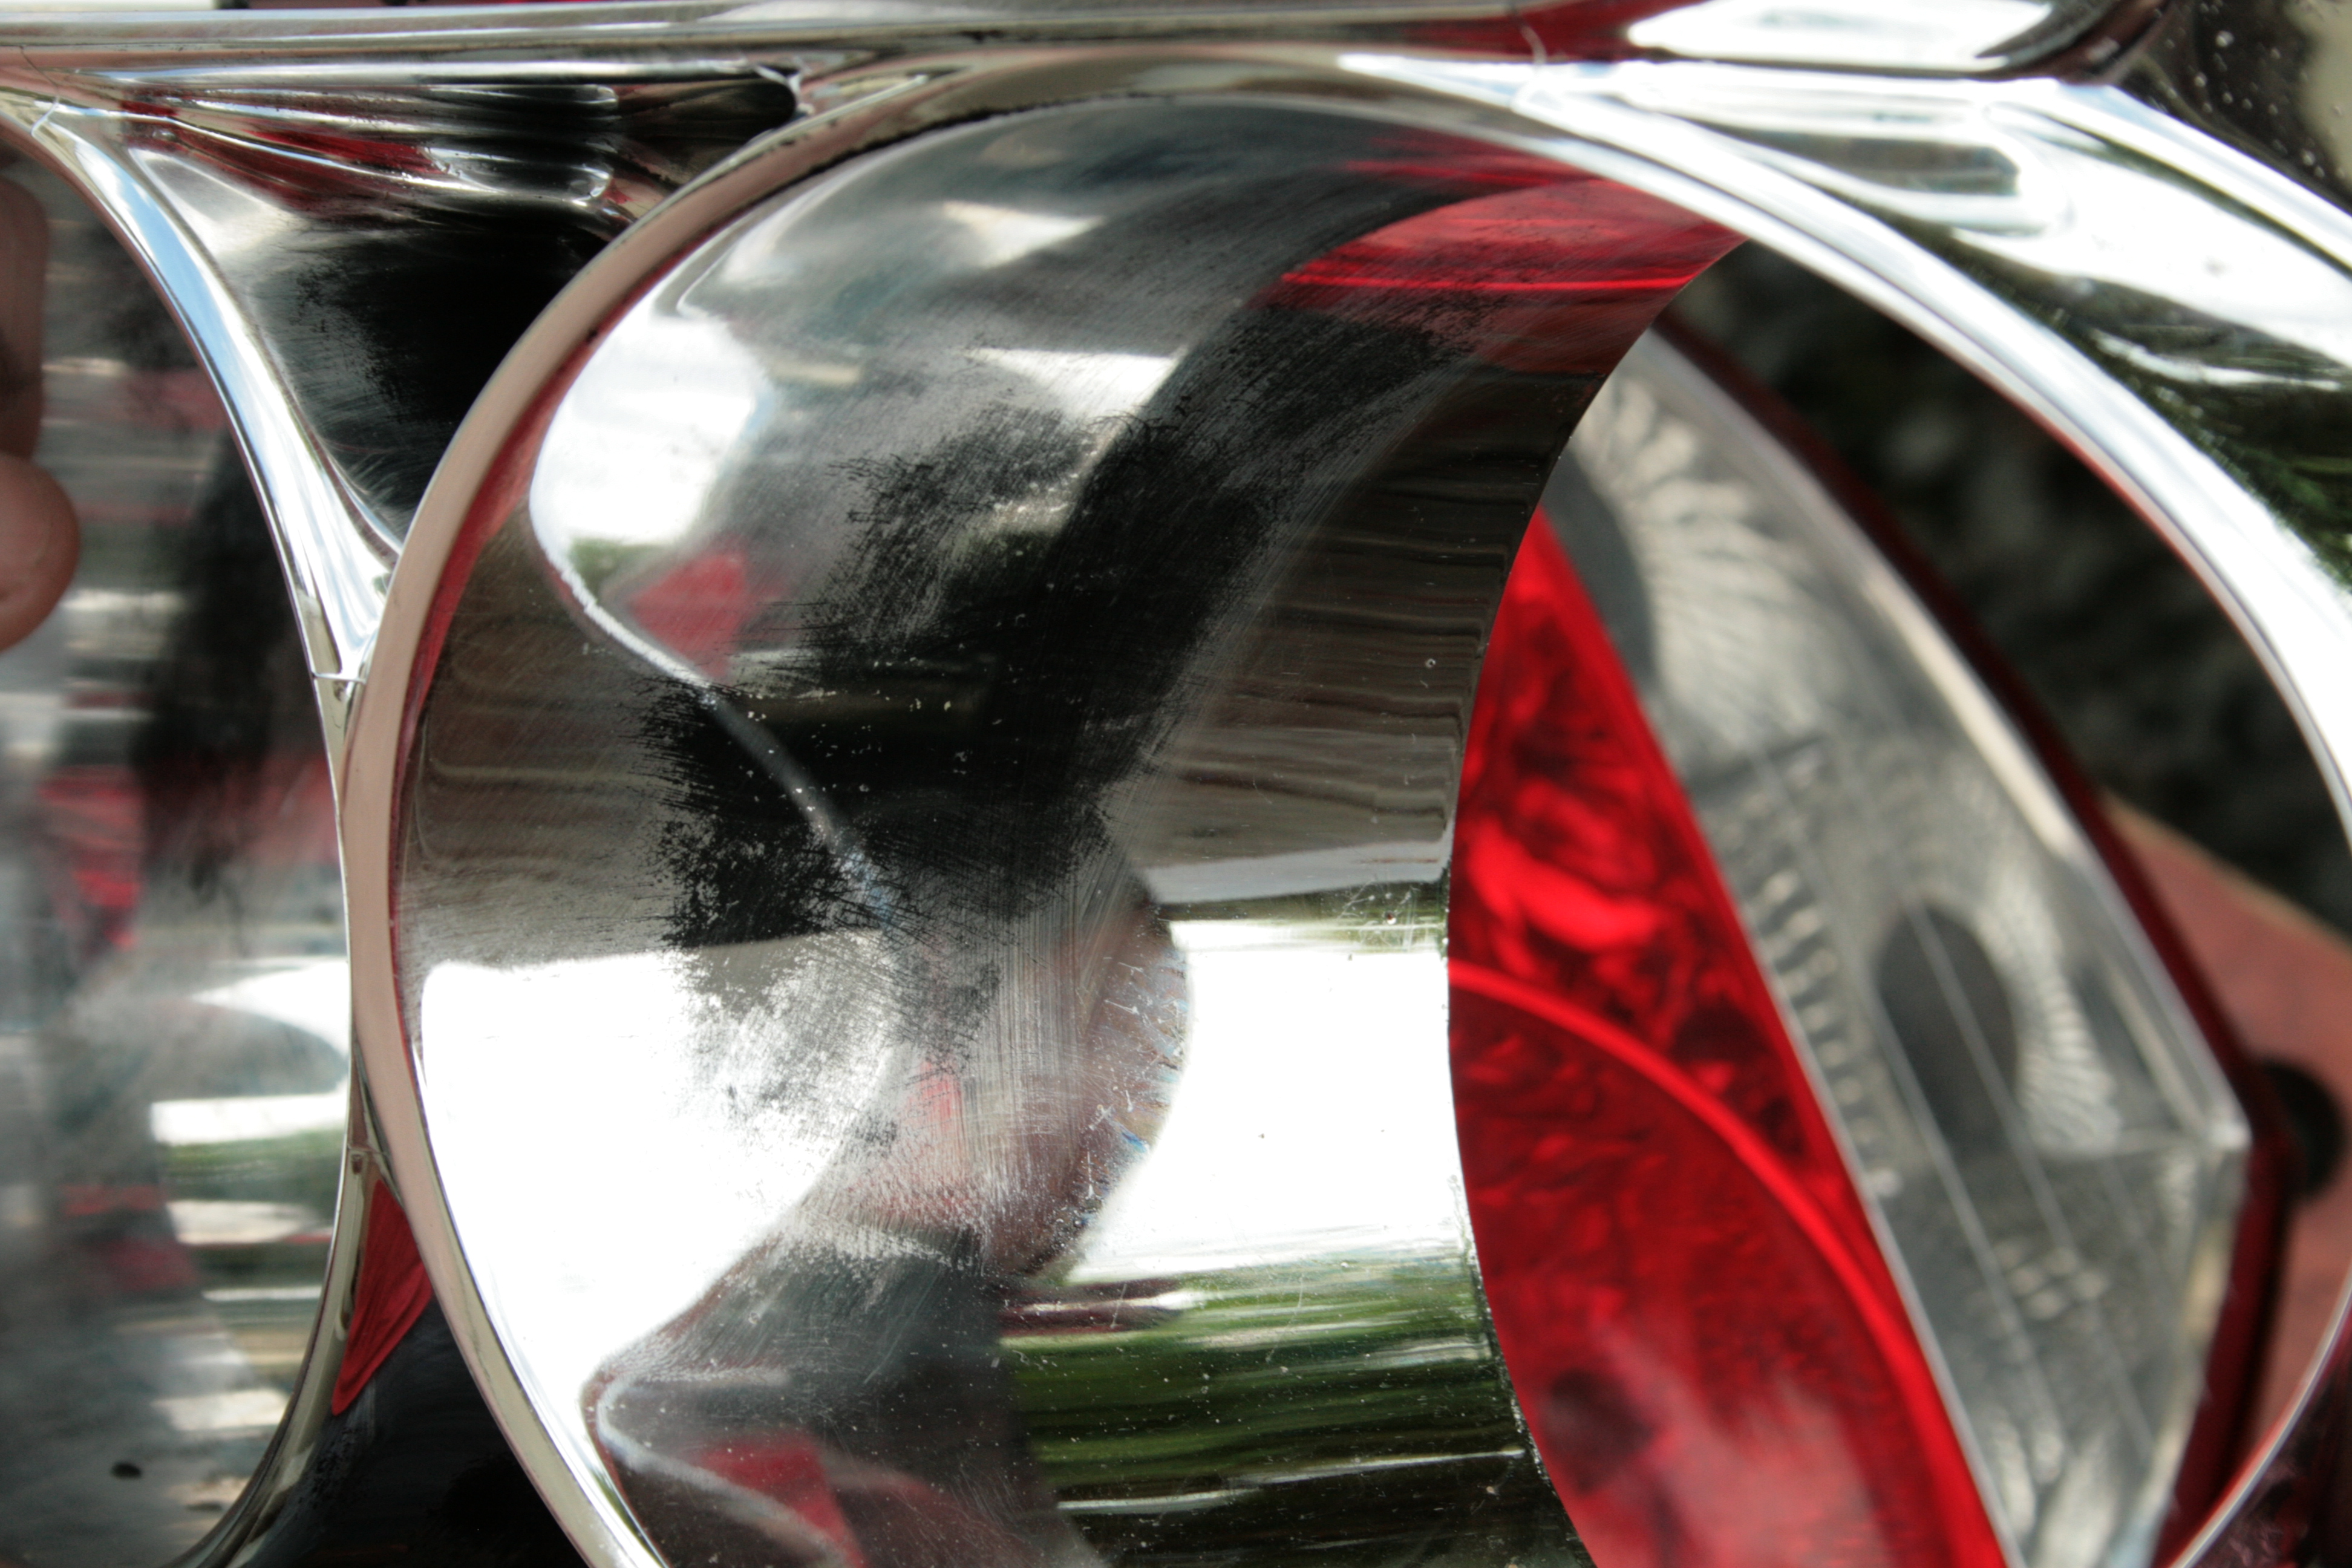
I always prefer an understated look with cars, lots of chrome just doesn't do it for me. What has always really stood out to me on my S-type is the rear lamps, they just look a bit, cheap, maybe even chintzy. What I've always liked is the STR units, I've only ever seen them in photos but they have that dark look to them. However, I'm not prepared to pay the sort of prices they seem to go for when that money could be used to make my car go/stop/handle better. What I needed was a cheapskates alternative, and I think I've found it. I got a pair of spare standard tail lamp units off a scrap car and went about trying to figure out the best way to tint them slightly darker. I hate the completely black look and peeling paint or film just looks rubbish so I needed a subtle, durable solution. I figured getting rid of some of the chrome inside the unit was the way, after all it is this you can see through the lens and is what gives the lamps that light, shiny look. The problem is that the lens is heat-bonded on to the main part of the unit. Drastic action was required. The problem with cutting ABS plastic is that it melts so easily. I started off with a slow speed to try to avoid this but it still melted, and clogged. I ended up on the highest speed and melted it purposely. Once I'd been all the way round the lens prised off, be careful though as the plastic is brittle. The lamp unit is made up of three major parts as seen here. It's that part in the lower left corner that I'm going to make black. I'd considered paint but then there's the risk of runs and it not sticking properly. On the back of this part there was some chrome missing, and joy, it was black! All I needed to do was remove all the chrome.. Enter a bottle of poundshop bicycle cleaner. This stuff will take the anodising off aluminium and the skin off your hands, in fact I'm not sure it's bicycle cleaner at all. I applied it to the part and stuck it in a carrier bag to stay wet and get to work on that chrome. Had I had more, or was able to go get it today, I would have emptied a couple of bottles or so into a pan and submerged the part in it, it's only £1 a litre after all and probably still fine to use on my bike afterwards. After repeated sprayings and baggings the chrome just rubbed off with a rag. Some bits were a little awkward, mould lines and some acute corners needed a bit more elbow grease. Here's a freshly de-chromed one compared to the standard finish. Here it is sat in the main part of the unit. None of the reflectors have been touched and the operation of the lamps will not be affected in any way. I've now glued the lenses back on both units with 2 part epoxy resin. The house will still stink of it in the morning. Whilst the seam is of course visible it will only be when the boot is open, no big deal to me. These are my first set and I'm sure improvements can be made and incorporated into the next pair. Tune in tomorrow for pictures of the completed units in the car and comparisons with the standard ones.


-
50/50 shield has rotted at the mounting tabs/pop rivets have rotted. The rivets are pretty big at 6mm and most rivet guns won't take them. I've seem a nut and bolt used instead but it's not good practice. The shields are available pretty cheap. Once they're loose the movement will fatigue the other tabs quite quickly so it's worth sorting.
-
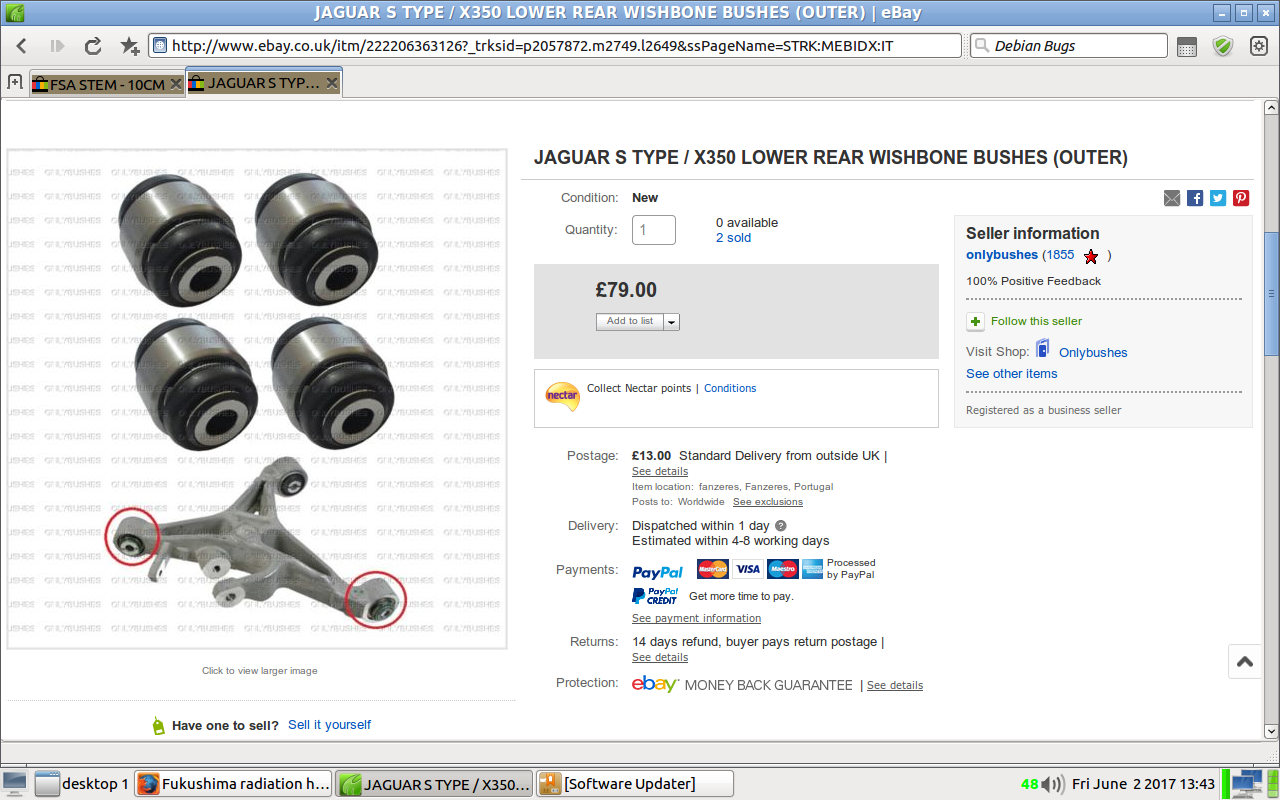
Thank you. I will set the tracking and see how many miles I can get out of the rear tyres, about 3k miles I reckon, one has slow puncture though. I paid £92 delivered for the bushes from http://www.ebay.co.uk/itm/222206363126?_trksid=p2057872.m2749.l2649&ssPageName=STRK:MEBIDX:IT As I said in another thread I waited for a month for Racing Green to show some small degree of customer care before giving up and getting these instead. They arrived in five days, no messing about. The track-rods came from d2pautoparts10 on ebay. The chap was very polite and apologetic when I called about the failure so it's only the product I have beef with so far. Unfortunately a lot of the time the majority of examples of a particular component are off the same production line with different brands stuck on the box so it's difficult to know what you're buying. Had just one failed then I could have put it down to a single manufacturing error but both of them are bad so I'm more inclined to think that they're just rubbish. The exacerbated wear did cross my mind but then even if it had reduced their life by, let's say, a ridiculous 90% they would still only have a life of 30k miles and that's still rubbish. No chicken about it, it's a big proposition for a lot of people. I could not have even attempted it without quite a lot of tools, space and time, all valuable commodities. If I earned even a half decent wage then it wouldn't have been economically viable to do it myself. Not that that would have stopped me, no I like doing these things myself and above all learning and gaining experience. One mistake I have made in this thread is in the title. I put XK instead of XF, is there any way to change it?

-
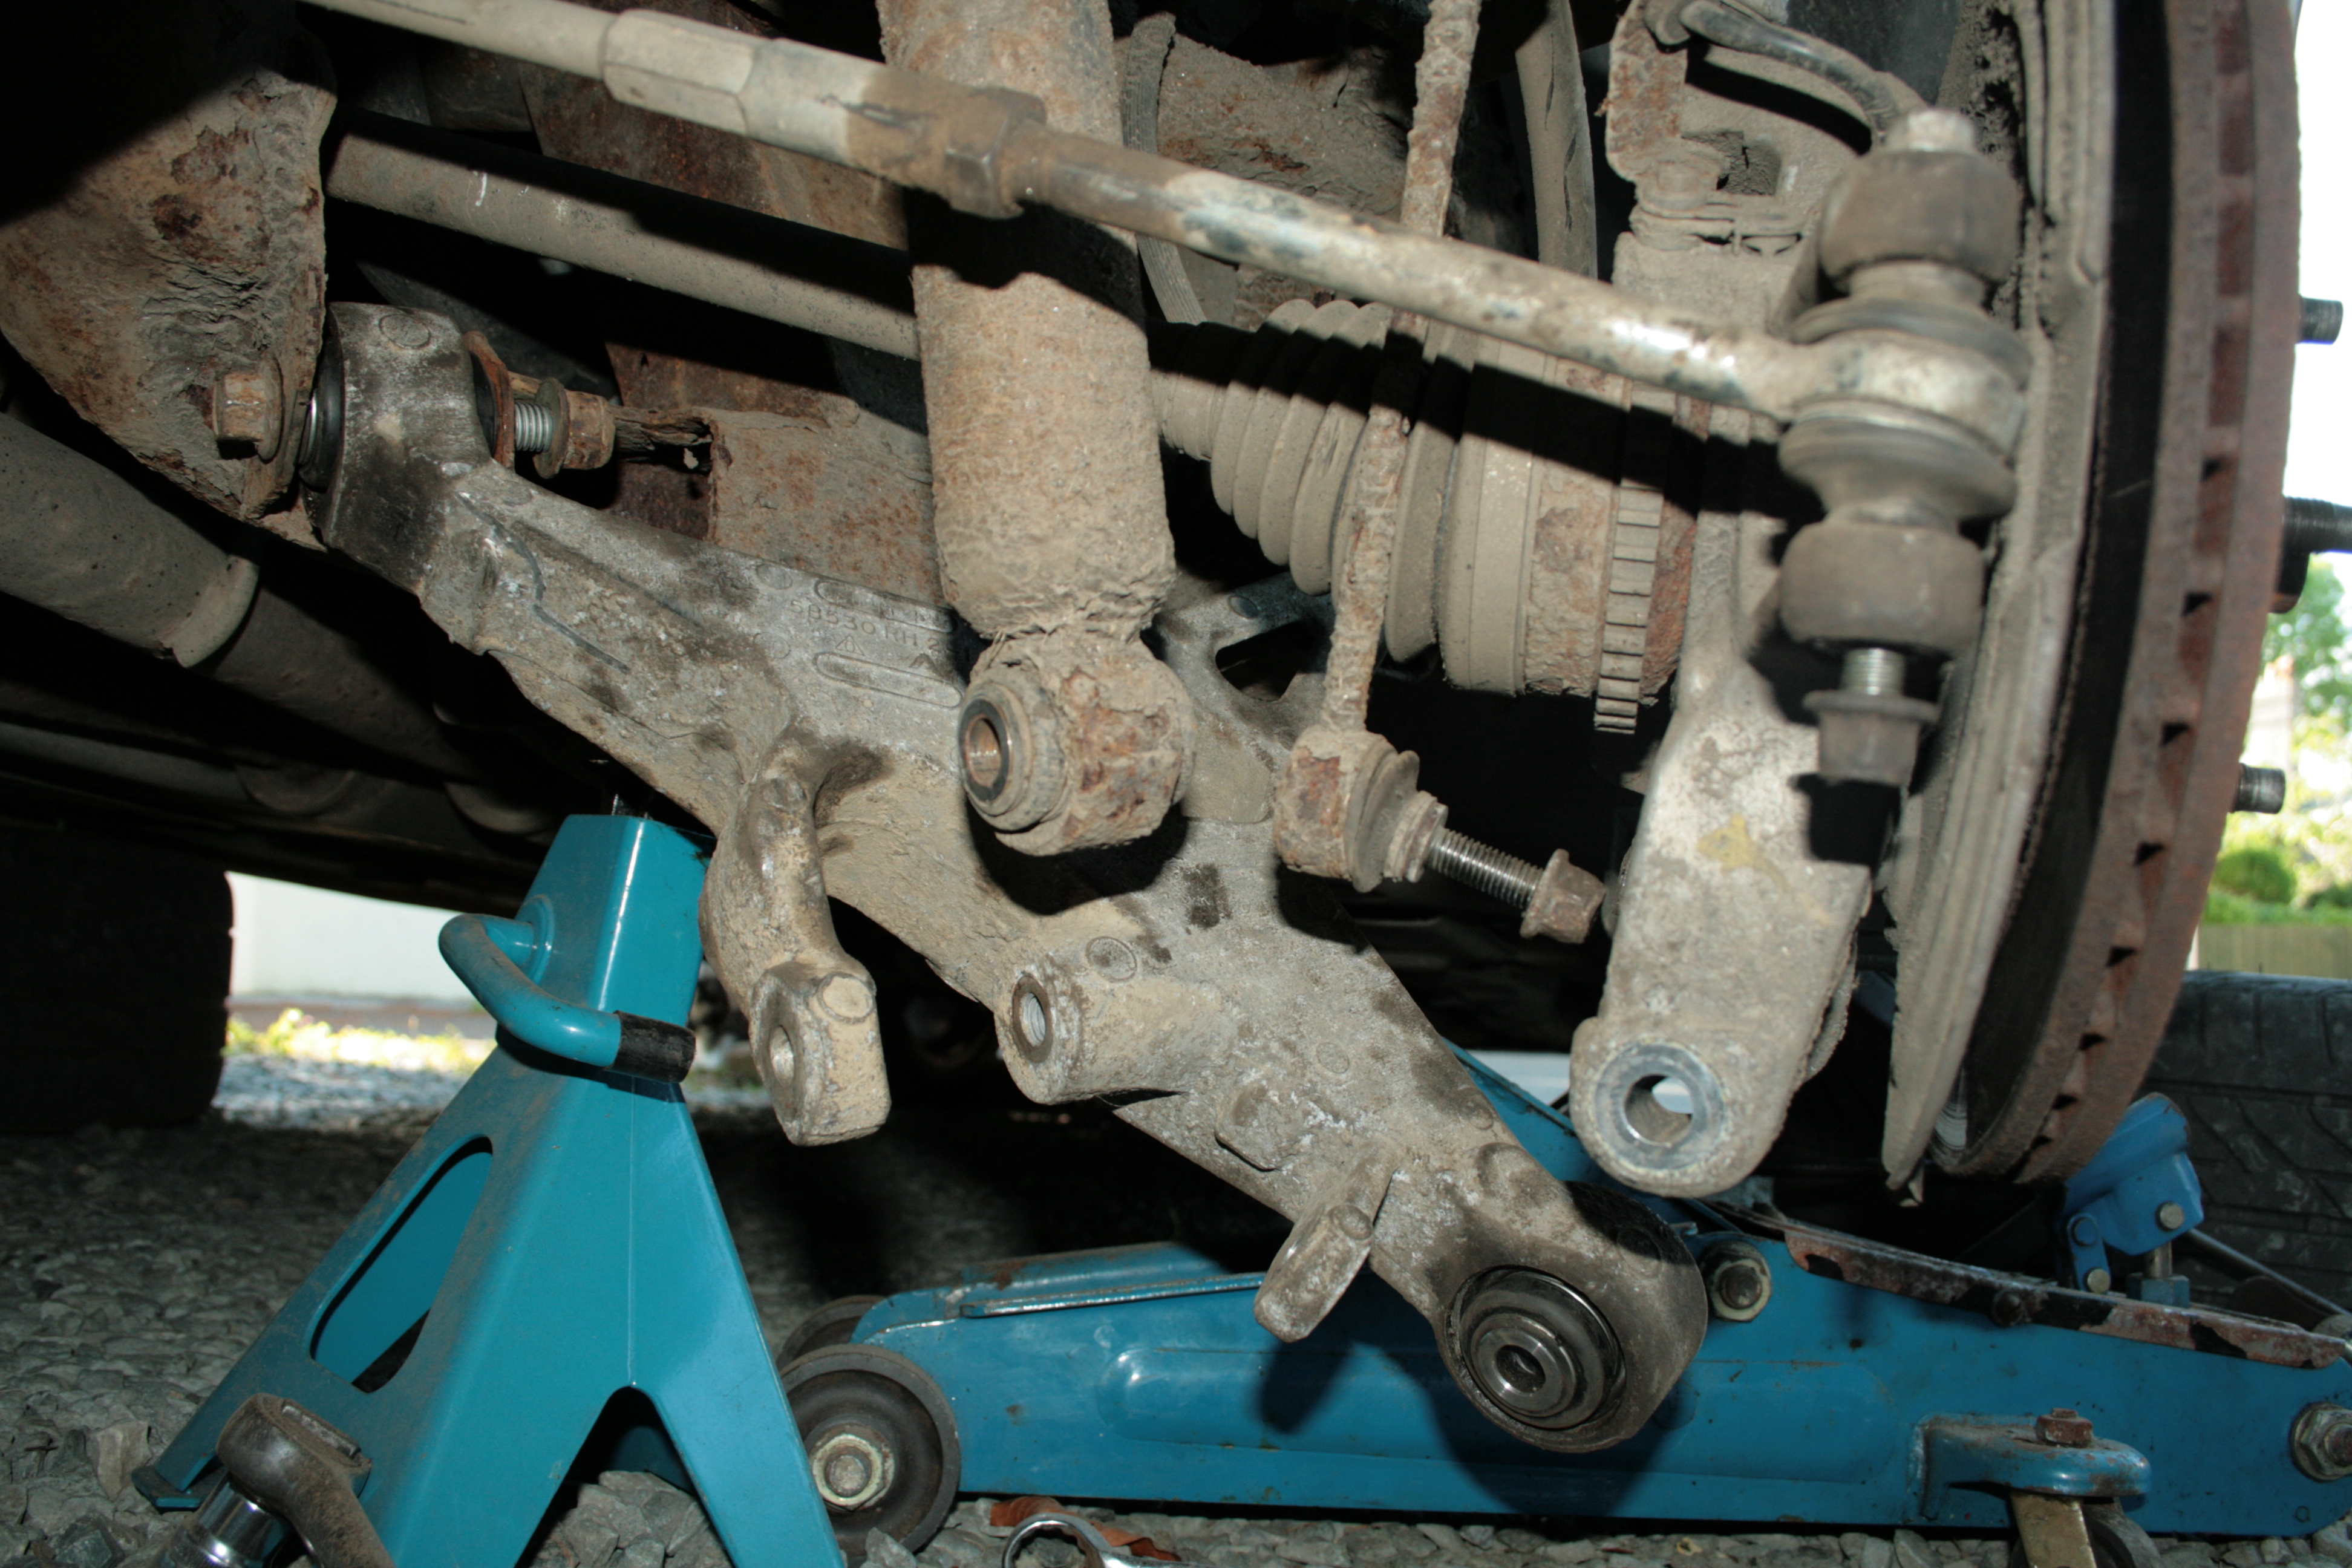
Fitting the new bushes was dead simple, "reversal of removal" as Haynes say. Again no pictures as such but there wasn't much to see, the purpose made tools were the important bit. On fitting the re-bushed arms today I found that the slider pins on one rear brake caliper carrier were seized solid. Some wrenching about in the vice freed them and they were put back together cleaned and coated in CV grease. More worryingly there was an awful of of play in the inner end ball-joints of both rear track-rods which I fitted brand new this year! They've done probably 3k miles at the most, absolutely shocking. The supplier offered to replace them but they're out of stock and I think I'll be calling back tomorrow to ask a refund instead of another set! I thought the wobbling was getting worse a quite a rate and these would be why, there was a good 5 degrees of free play in the toe of each rear wheel. I replaced the old ones because the outer bushes were worn out so I've reused the old inner ends with the new outers. All the suspension bolts came undone with no fuss save for the bottom of one drop link but even that was no real problem. The damper and the three bush bolts which are a mix of 21, 18 & 19mm. The drop link was a 7mm hex on the pin and a 15mm nut. Annoyingly the brake caliper an its' carrier have to come off to allow the outer bush bolt to come out, there's only an inch in it but it has to be done. The spare arms with two nice new bushes and one original, Well, two outta three ain't bad according to Meatloaf. Front inner bush. Outer bush, rear inner bush, drop link & damper. Fitting these arms is an easy job, even on a gravel driveway. Probably half my time was spent messing around with the other problems that I found along the way. The new bushes come with washers to pack the outer one out to fit. For some reason the original outer is about 5mm longer than the inner rear one which is otherwise identical. I'd imagine the after-market don't want to tool up for two different bushes, hence the washers, that's absolutely fine with me. I will set the tracking properly once I have new rear track-rods and a front track-rod end. Already the ride and handling is transformed from the level of a Ford Zephyr up to at least a Sierra and once I have done the front lower bushes and set up the entire geometry it should be really good! As little as I like having to replace suspension parts I do find a silver lining in the promise of a nicer, more involving drive.


-
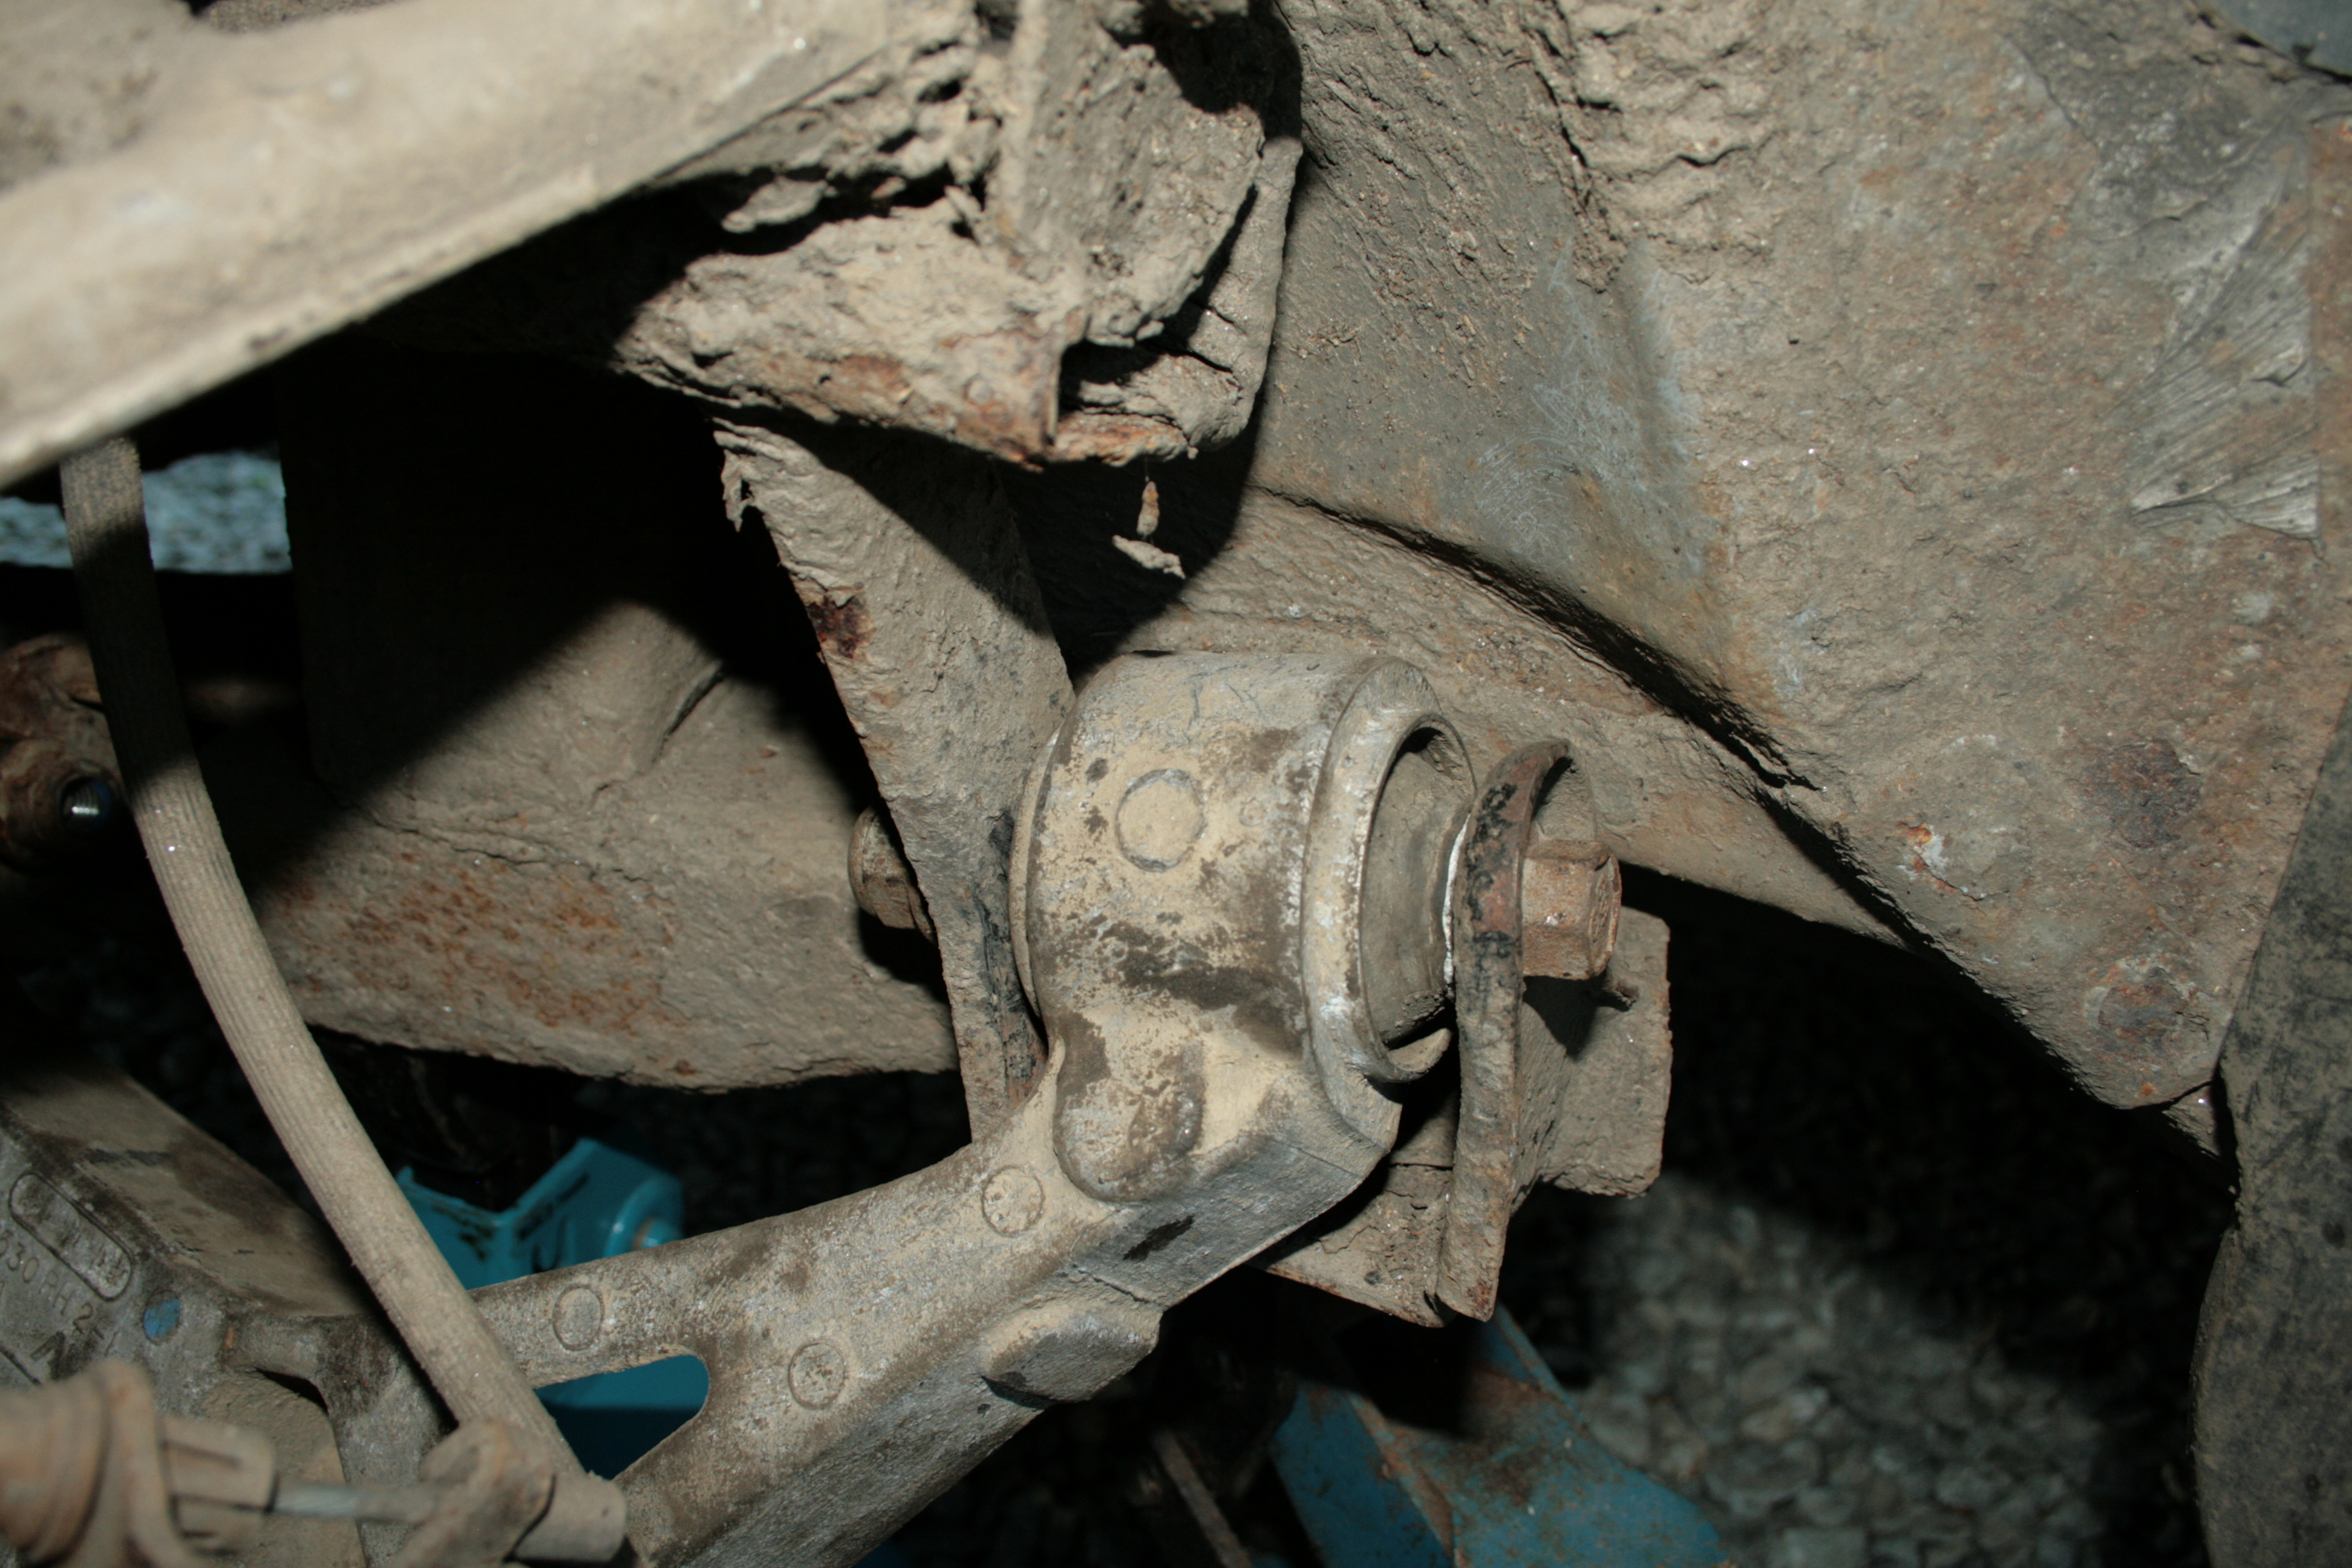
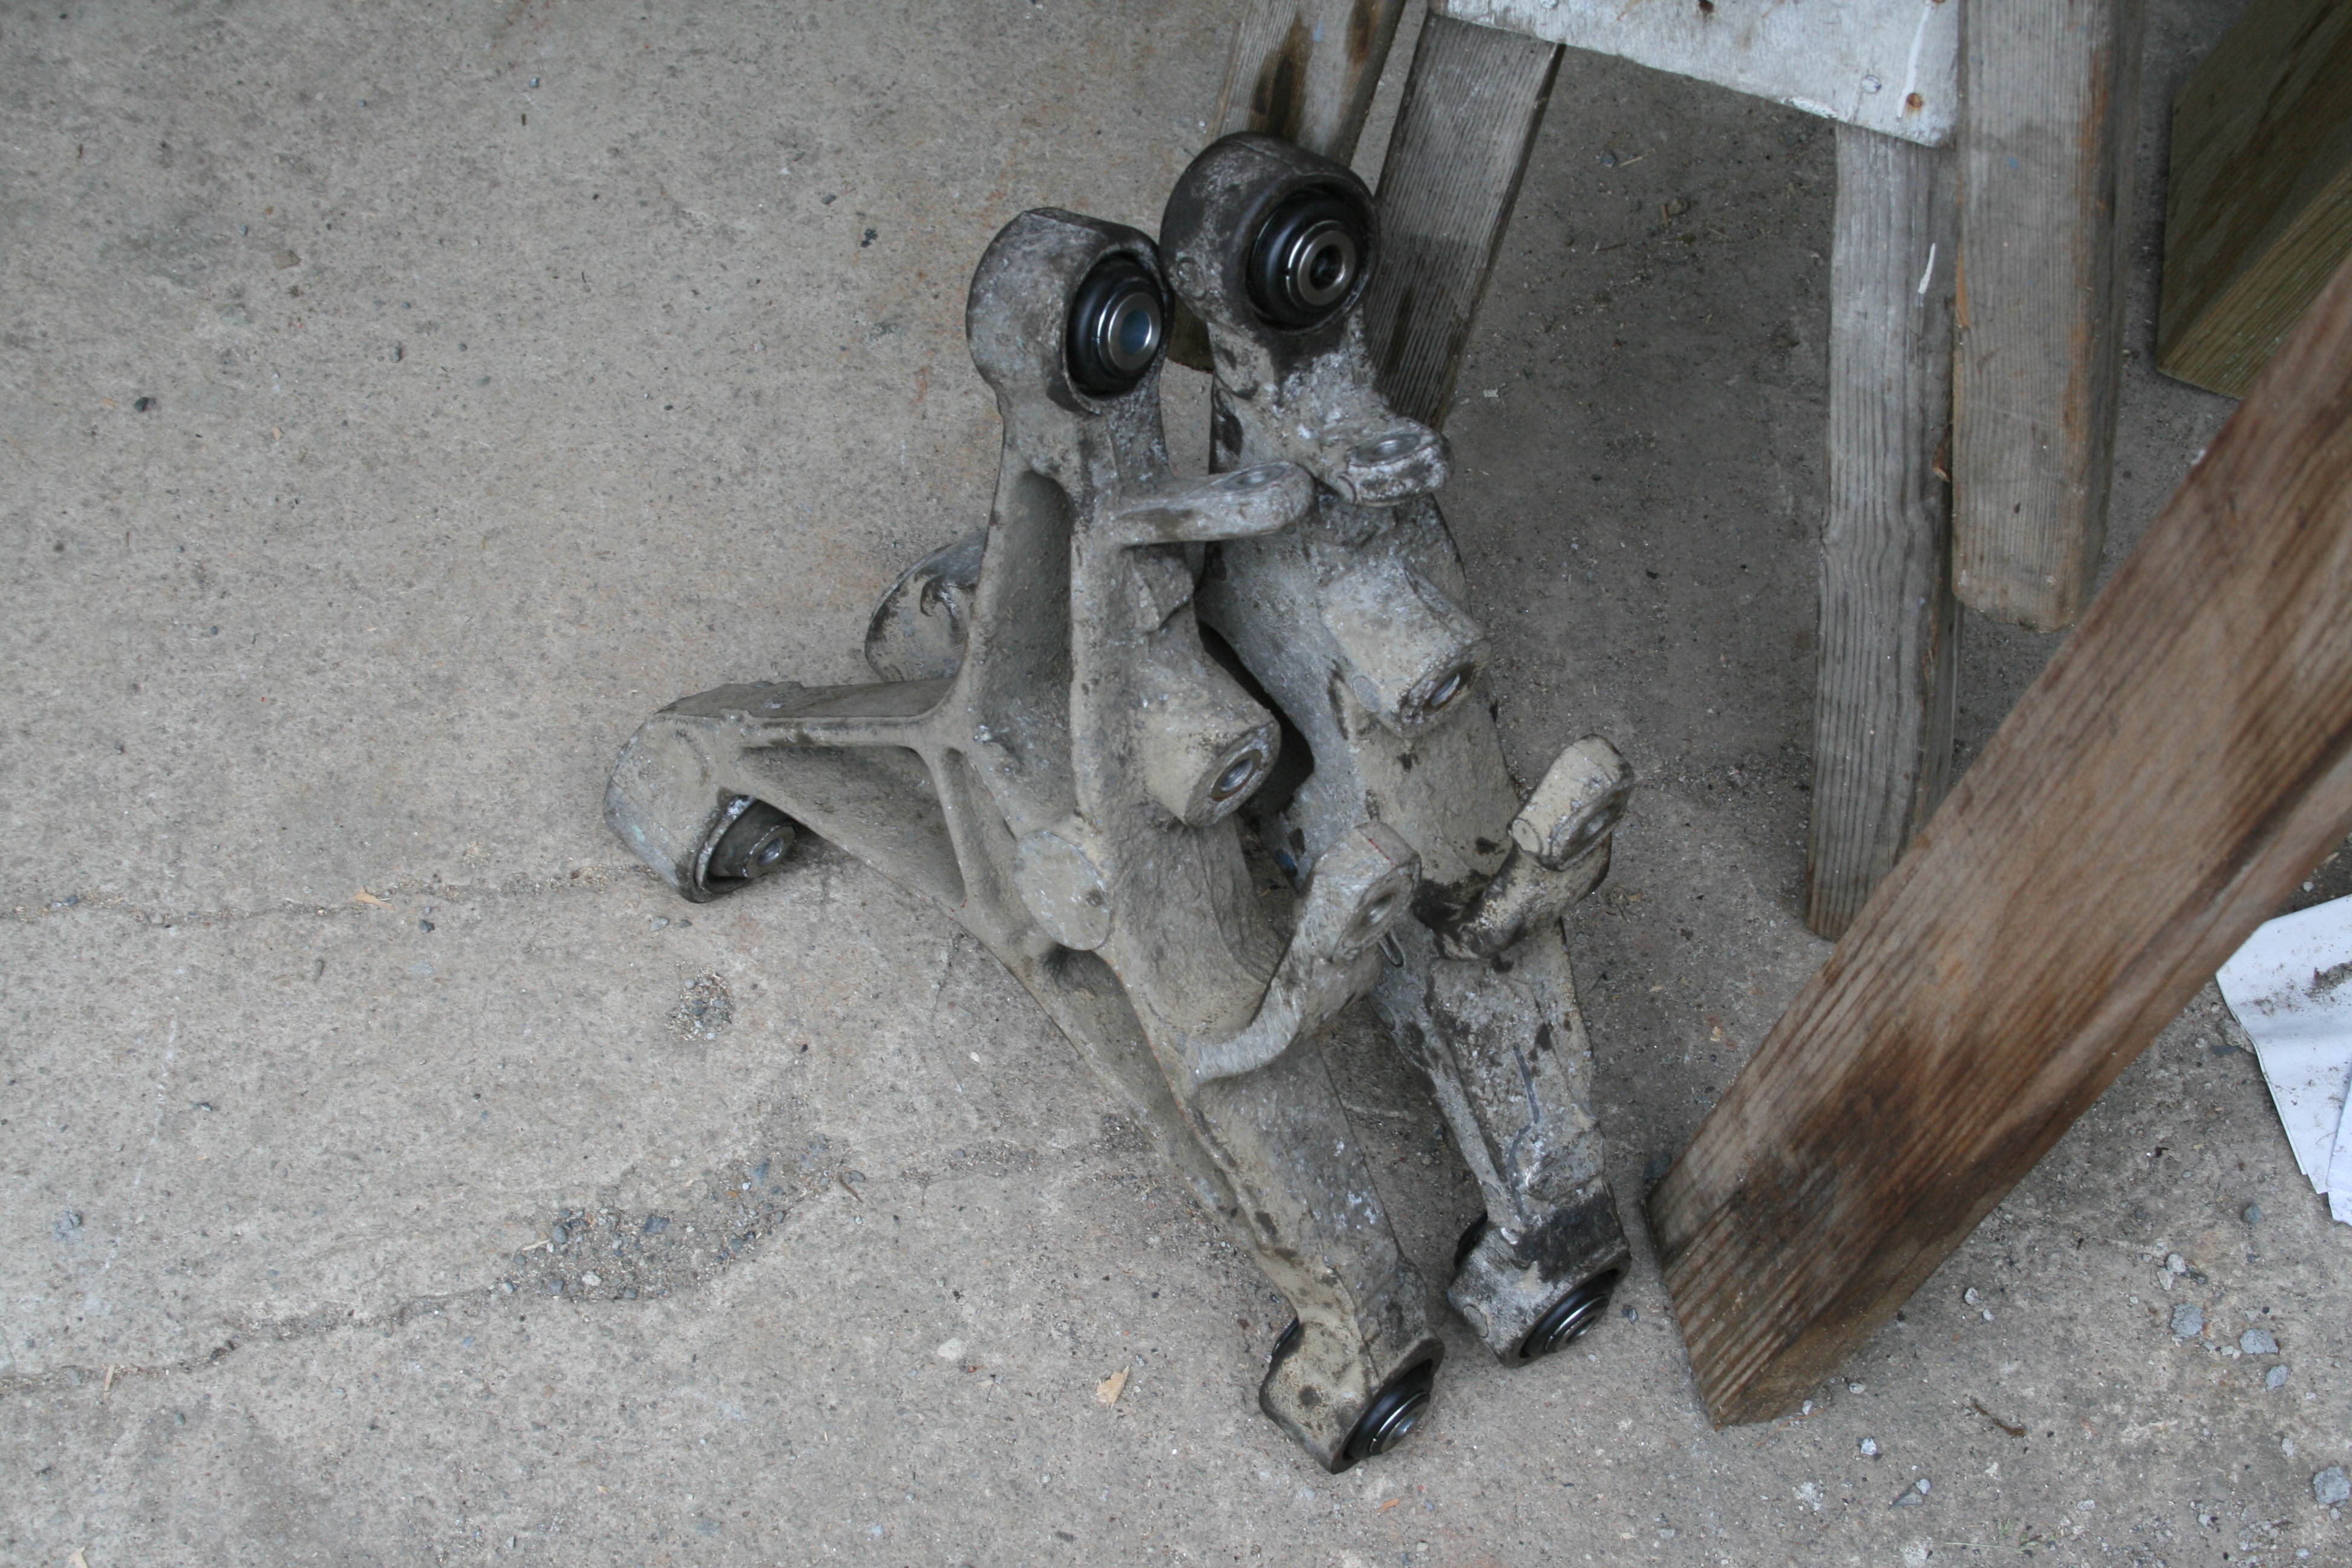
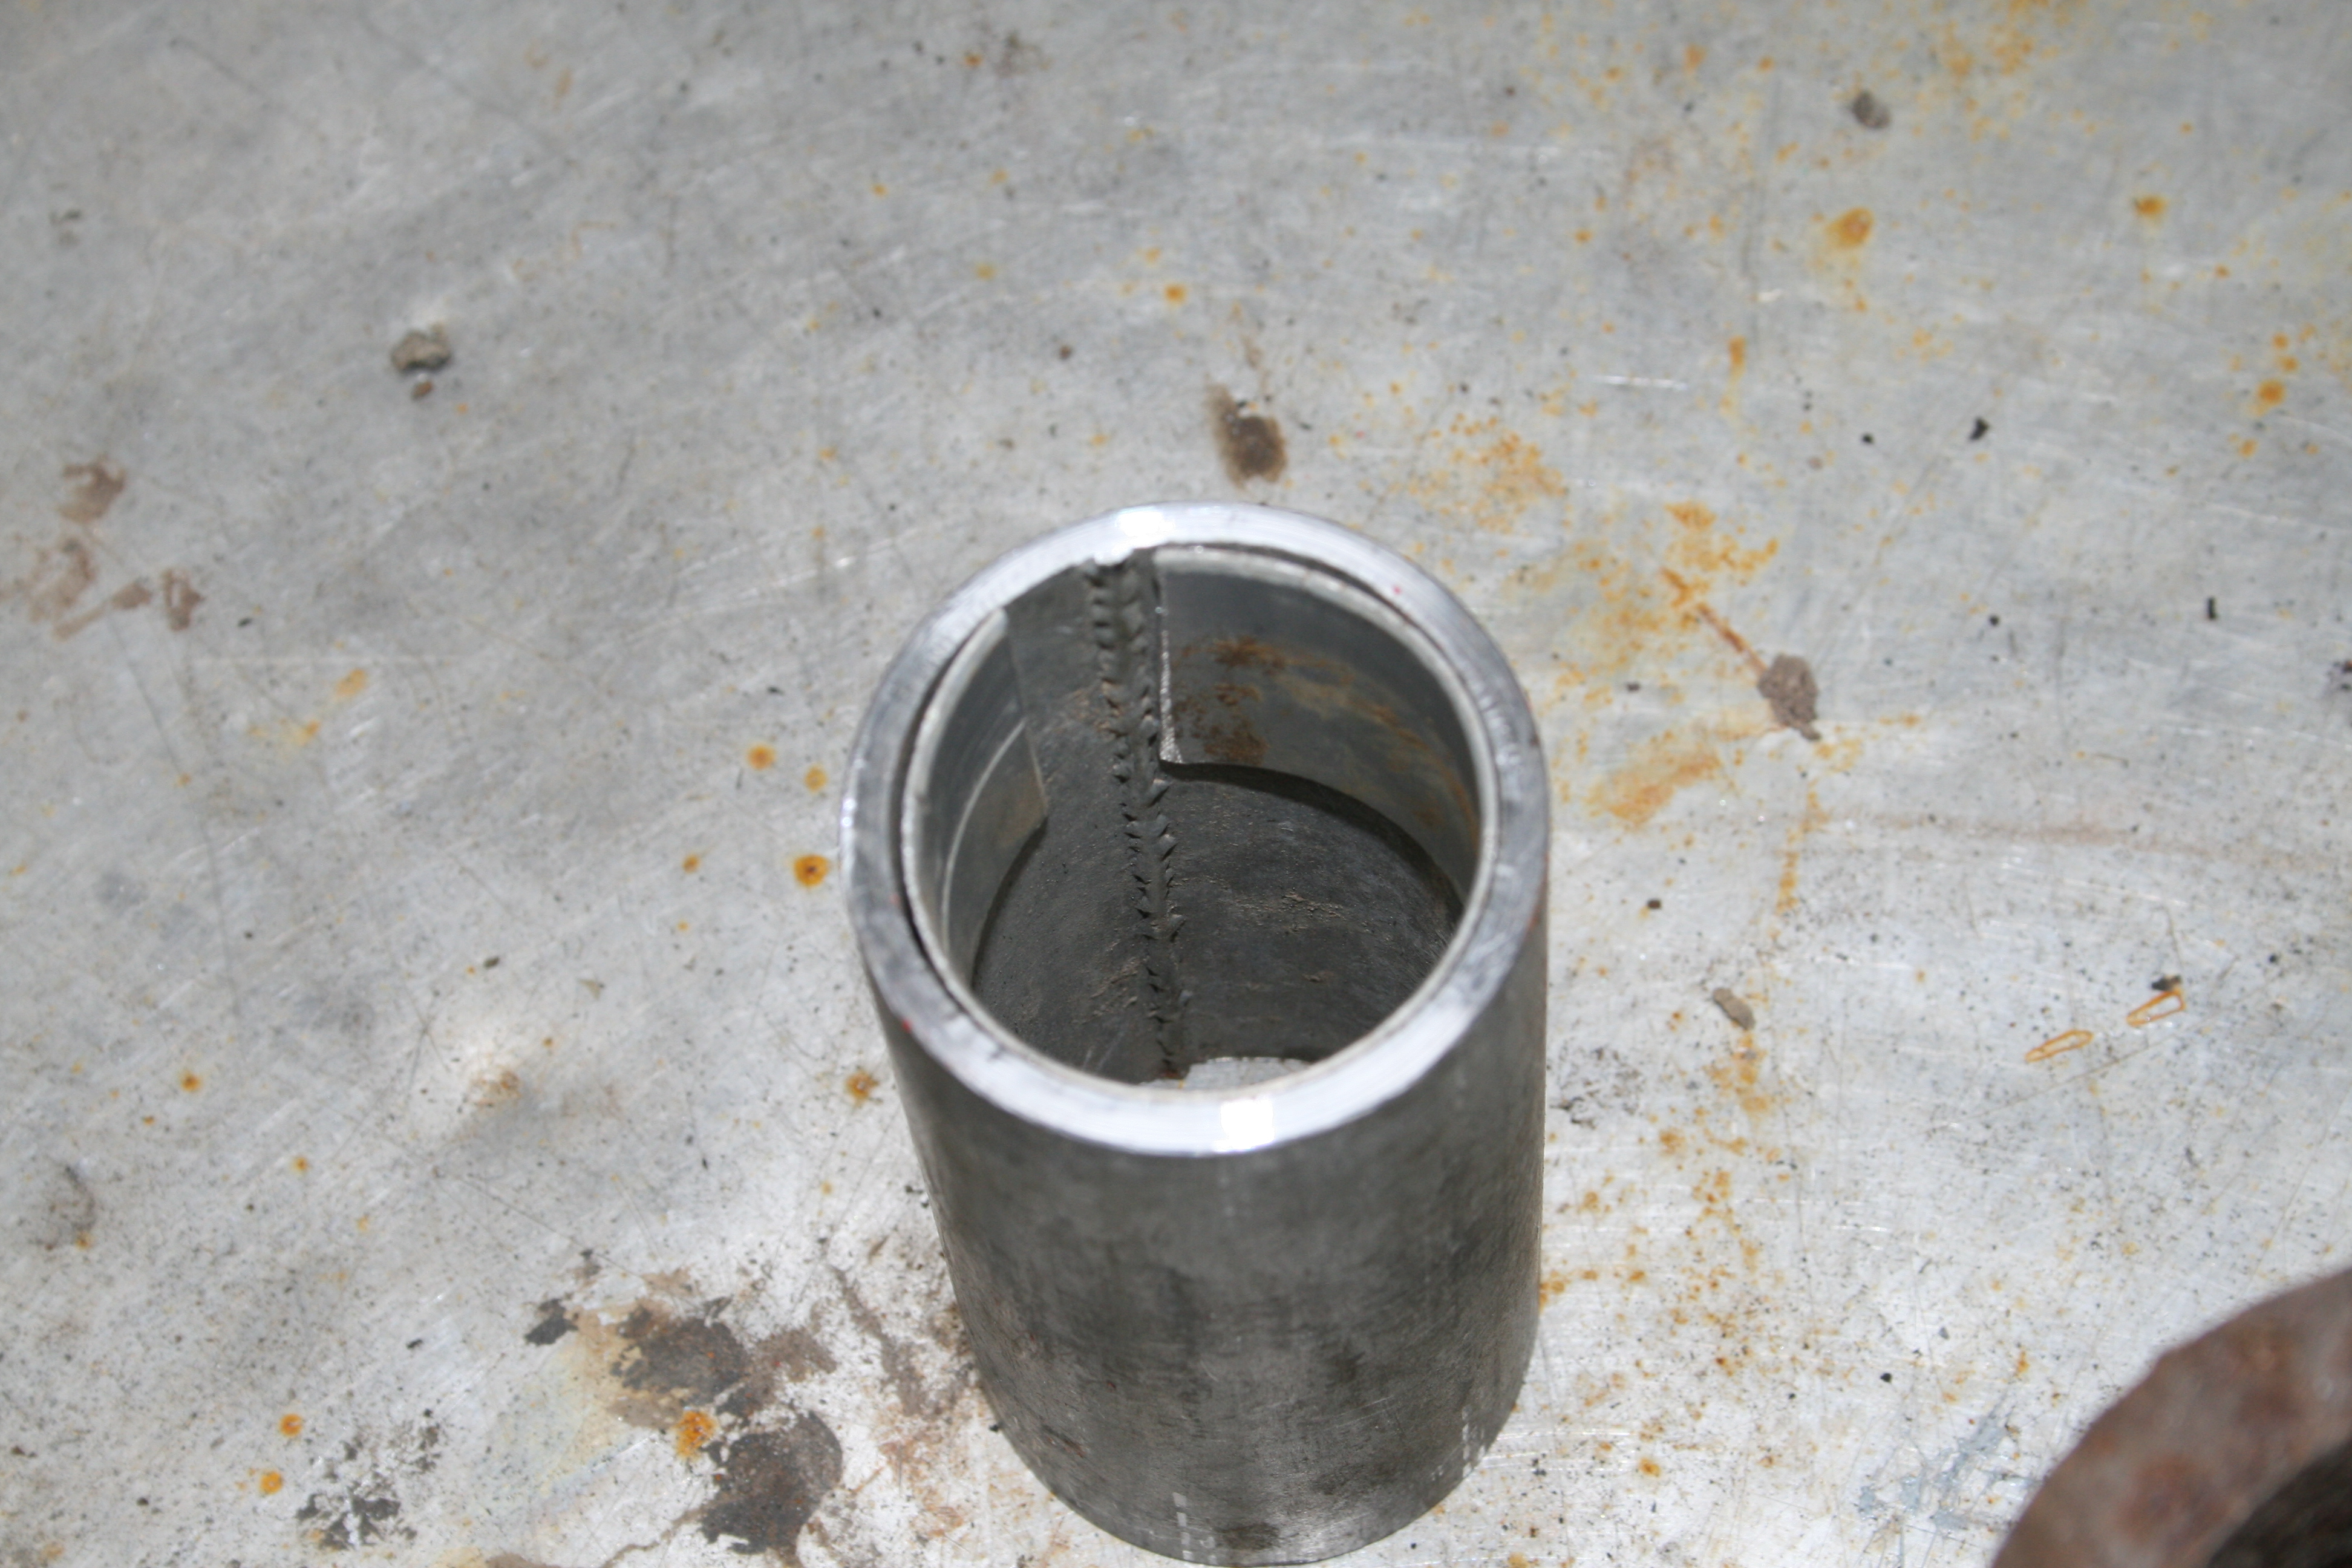
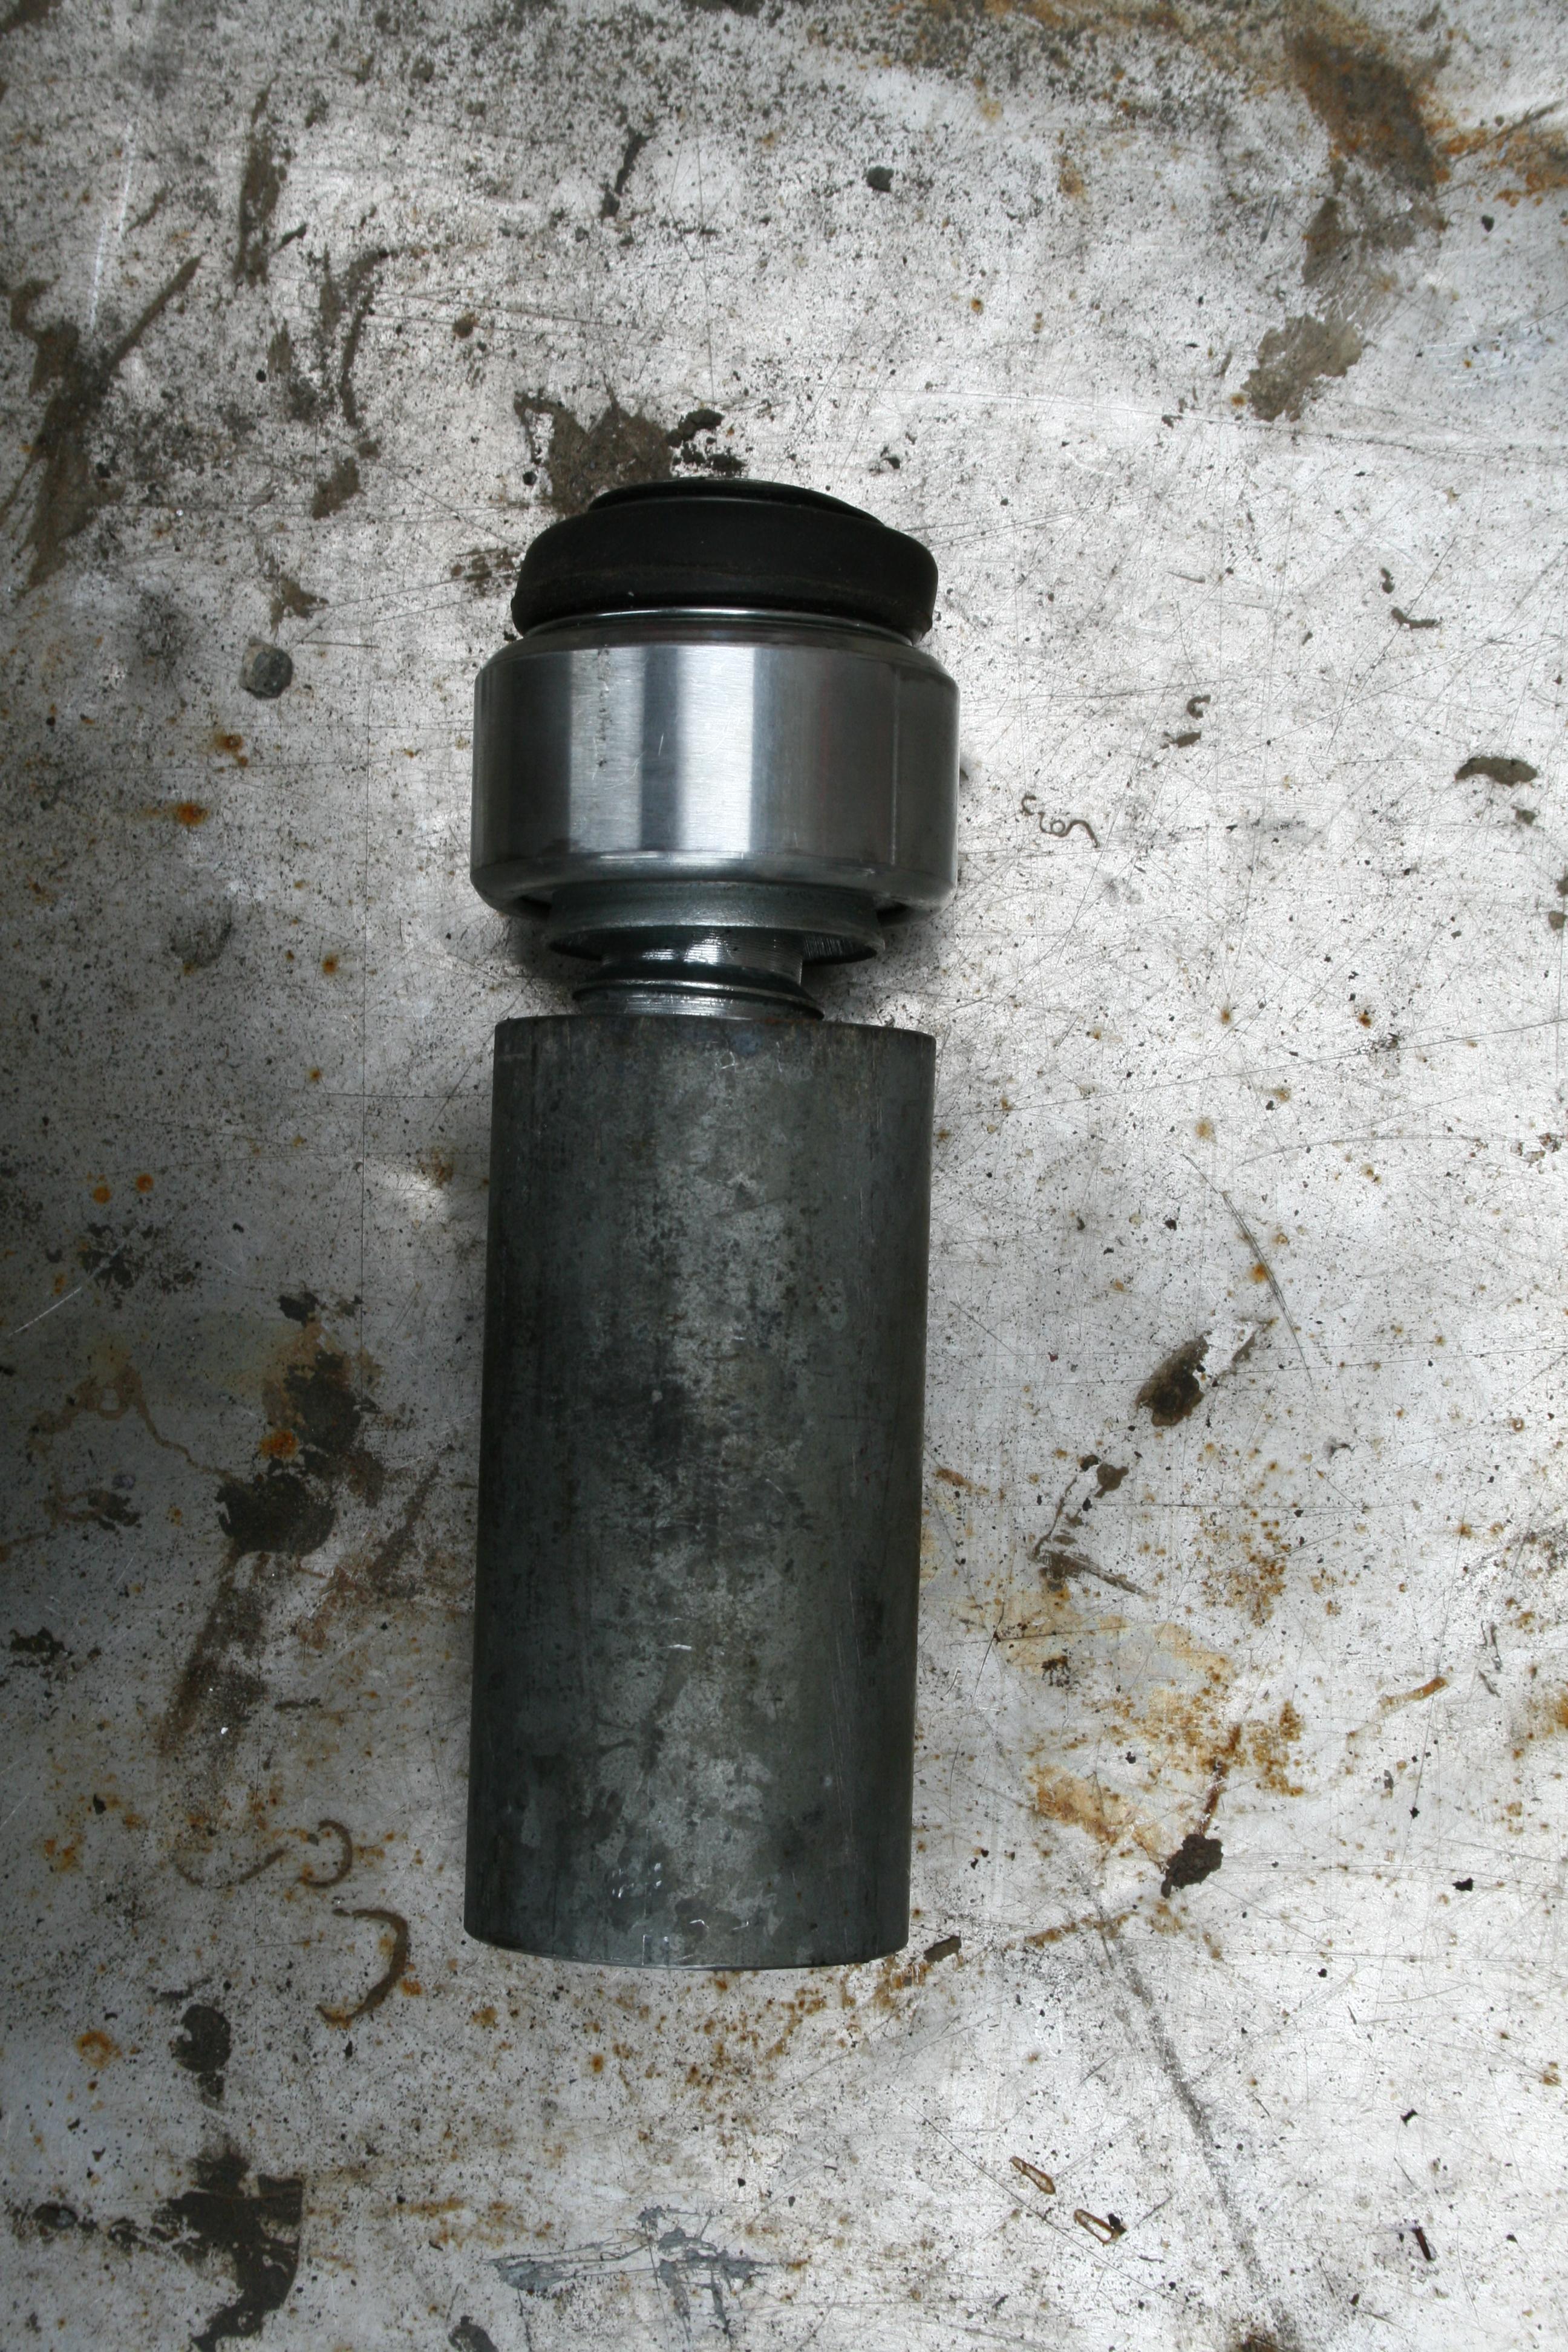
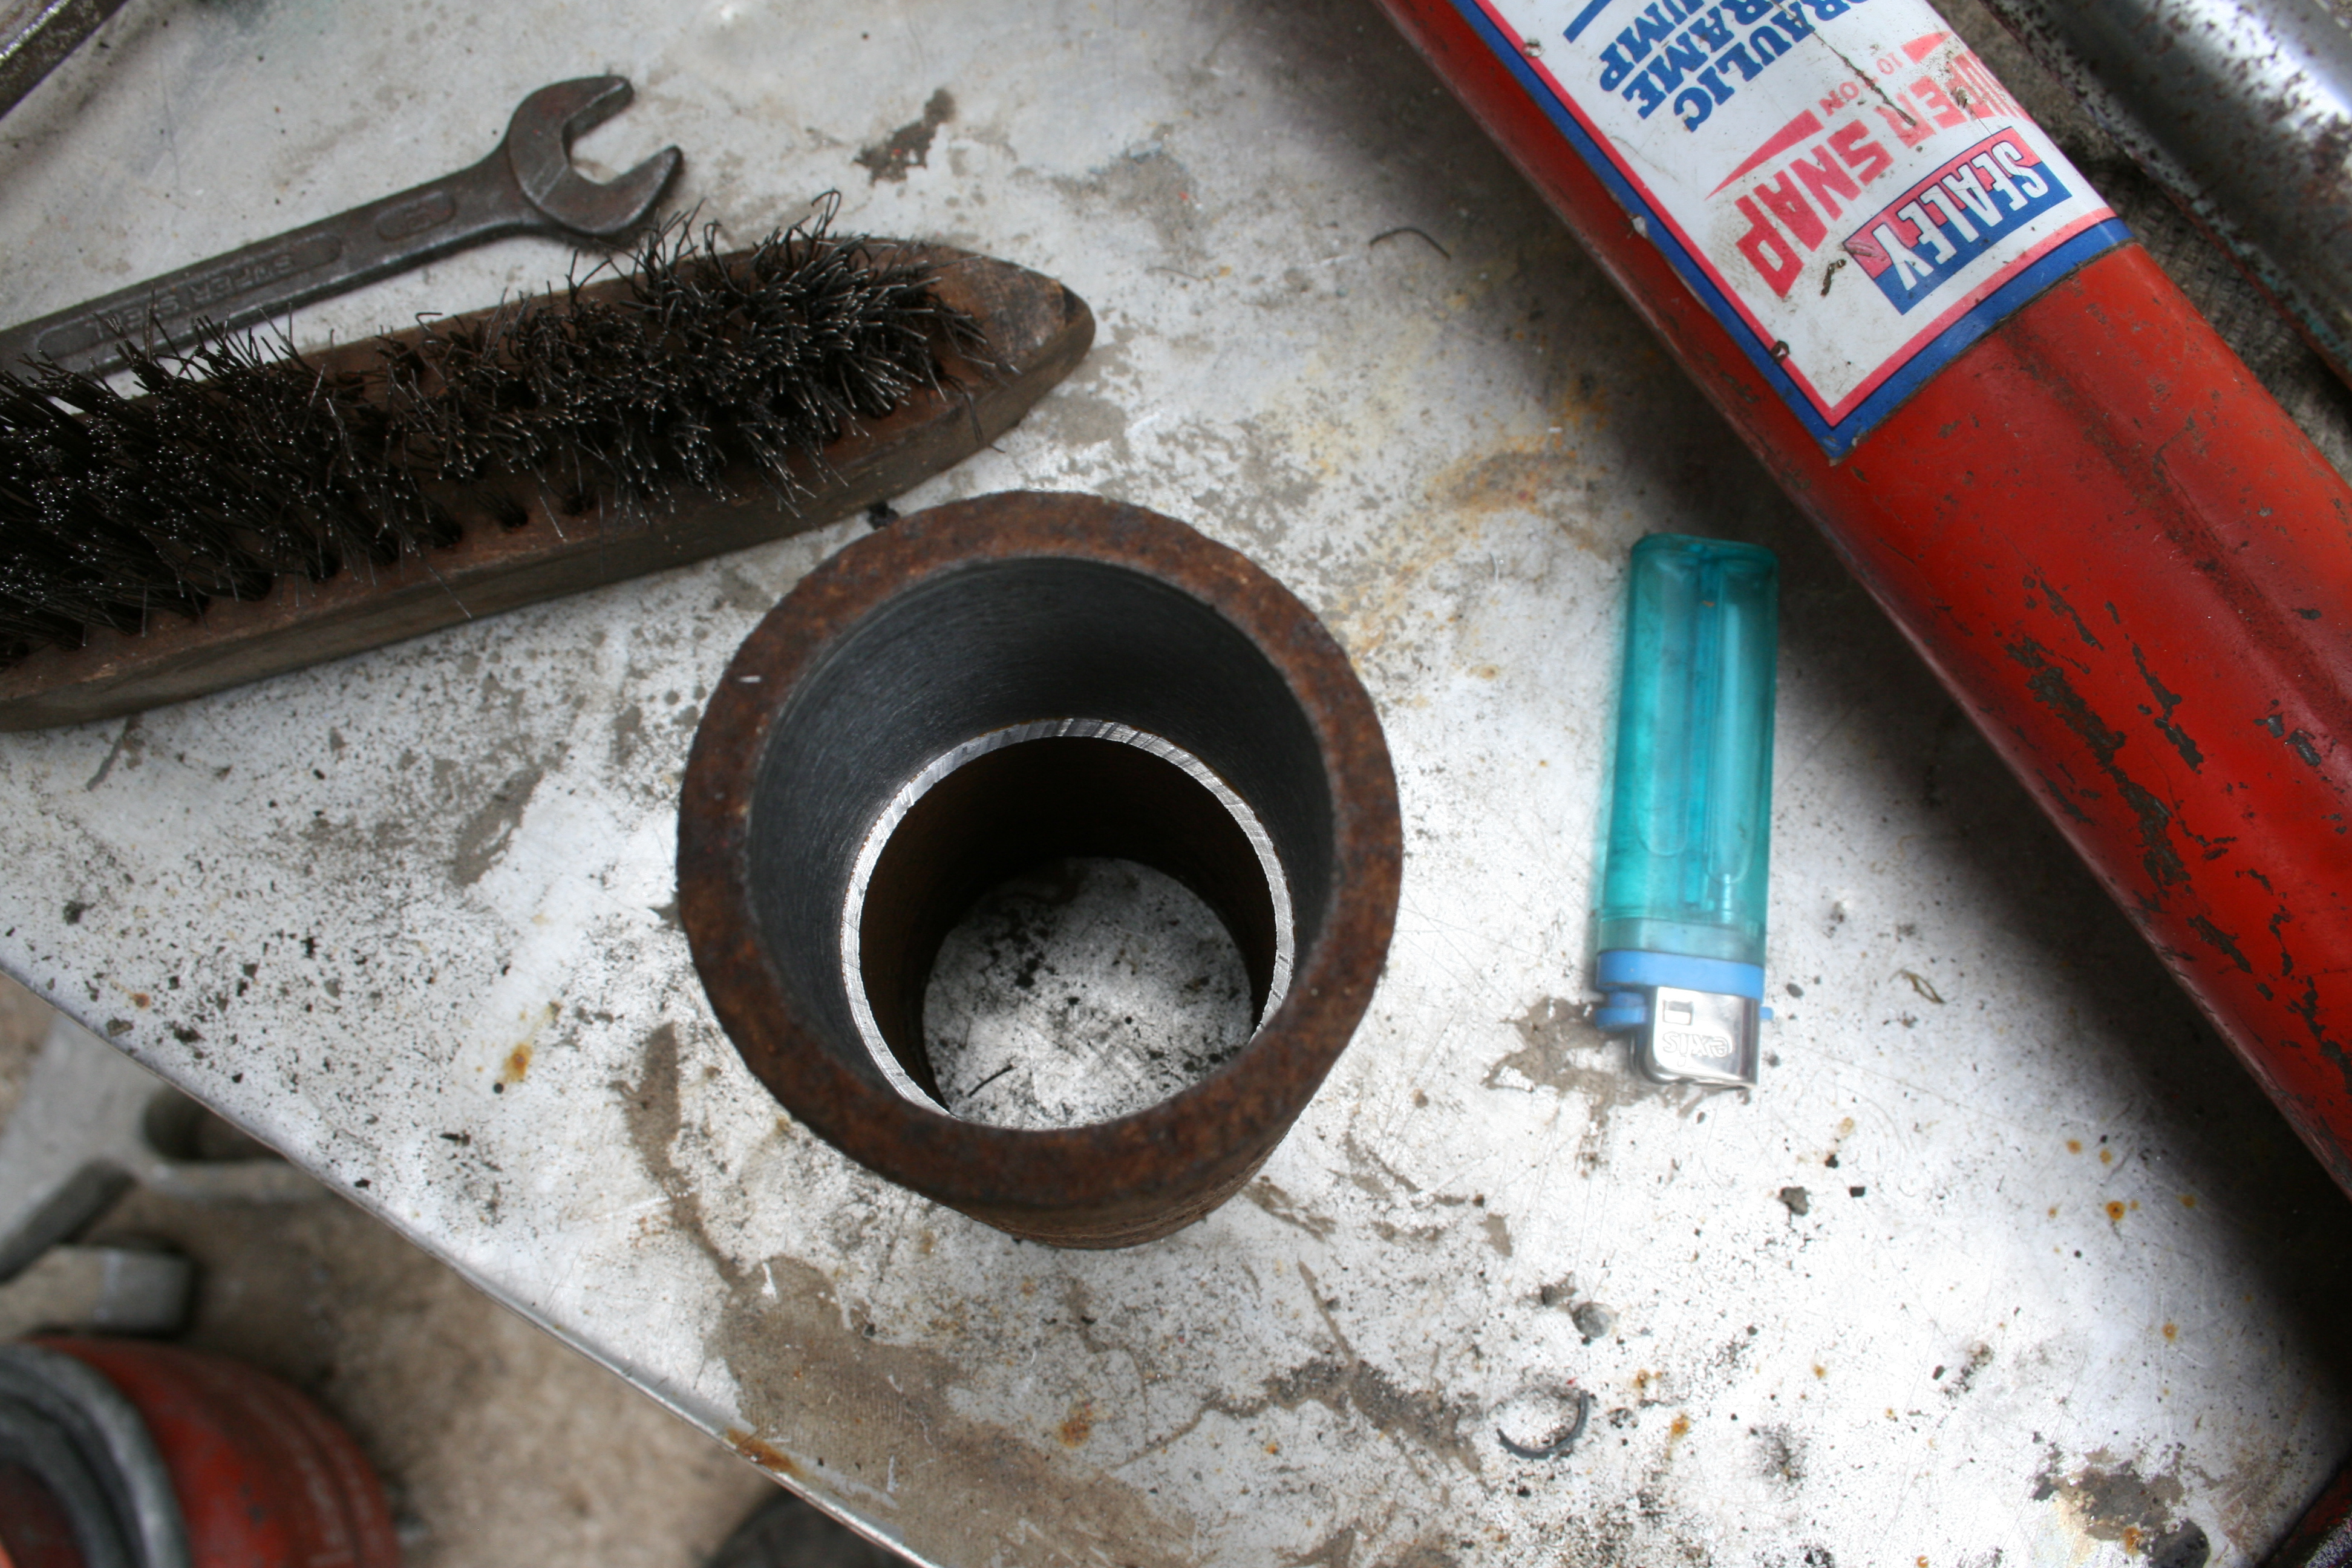
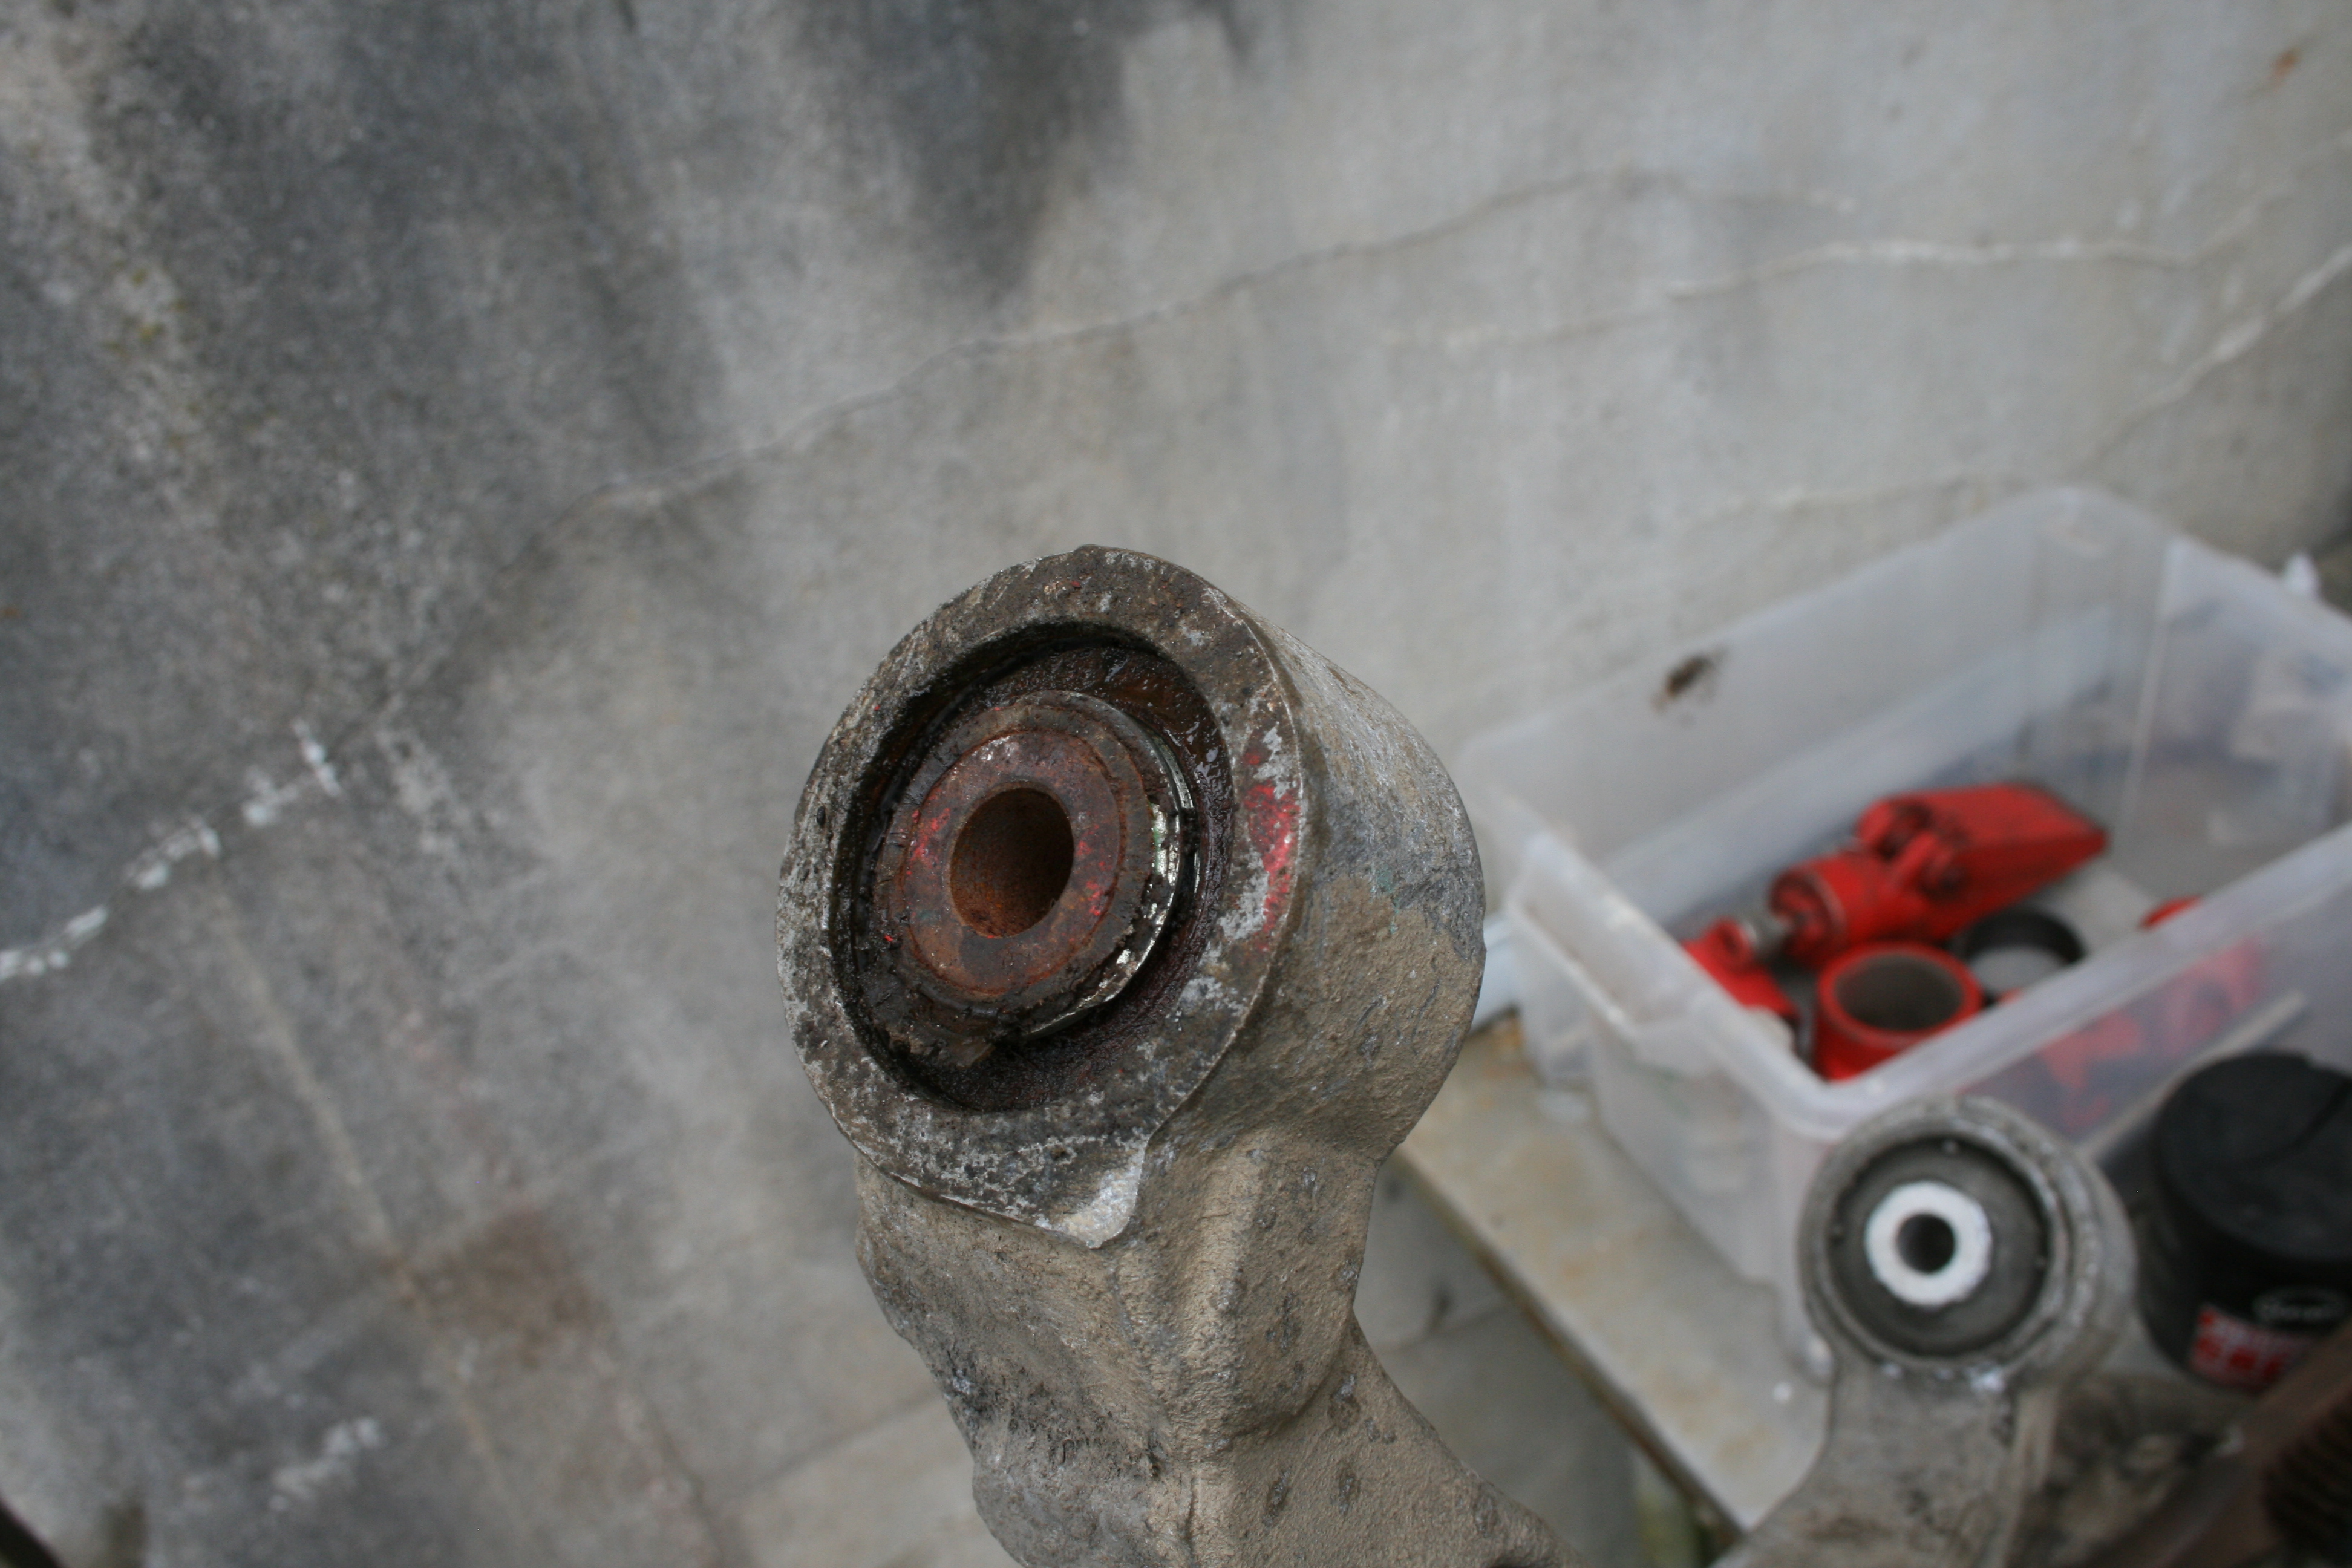
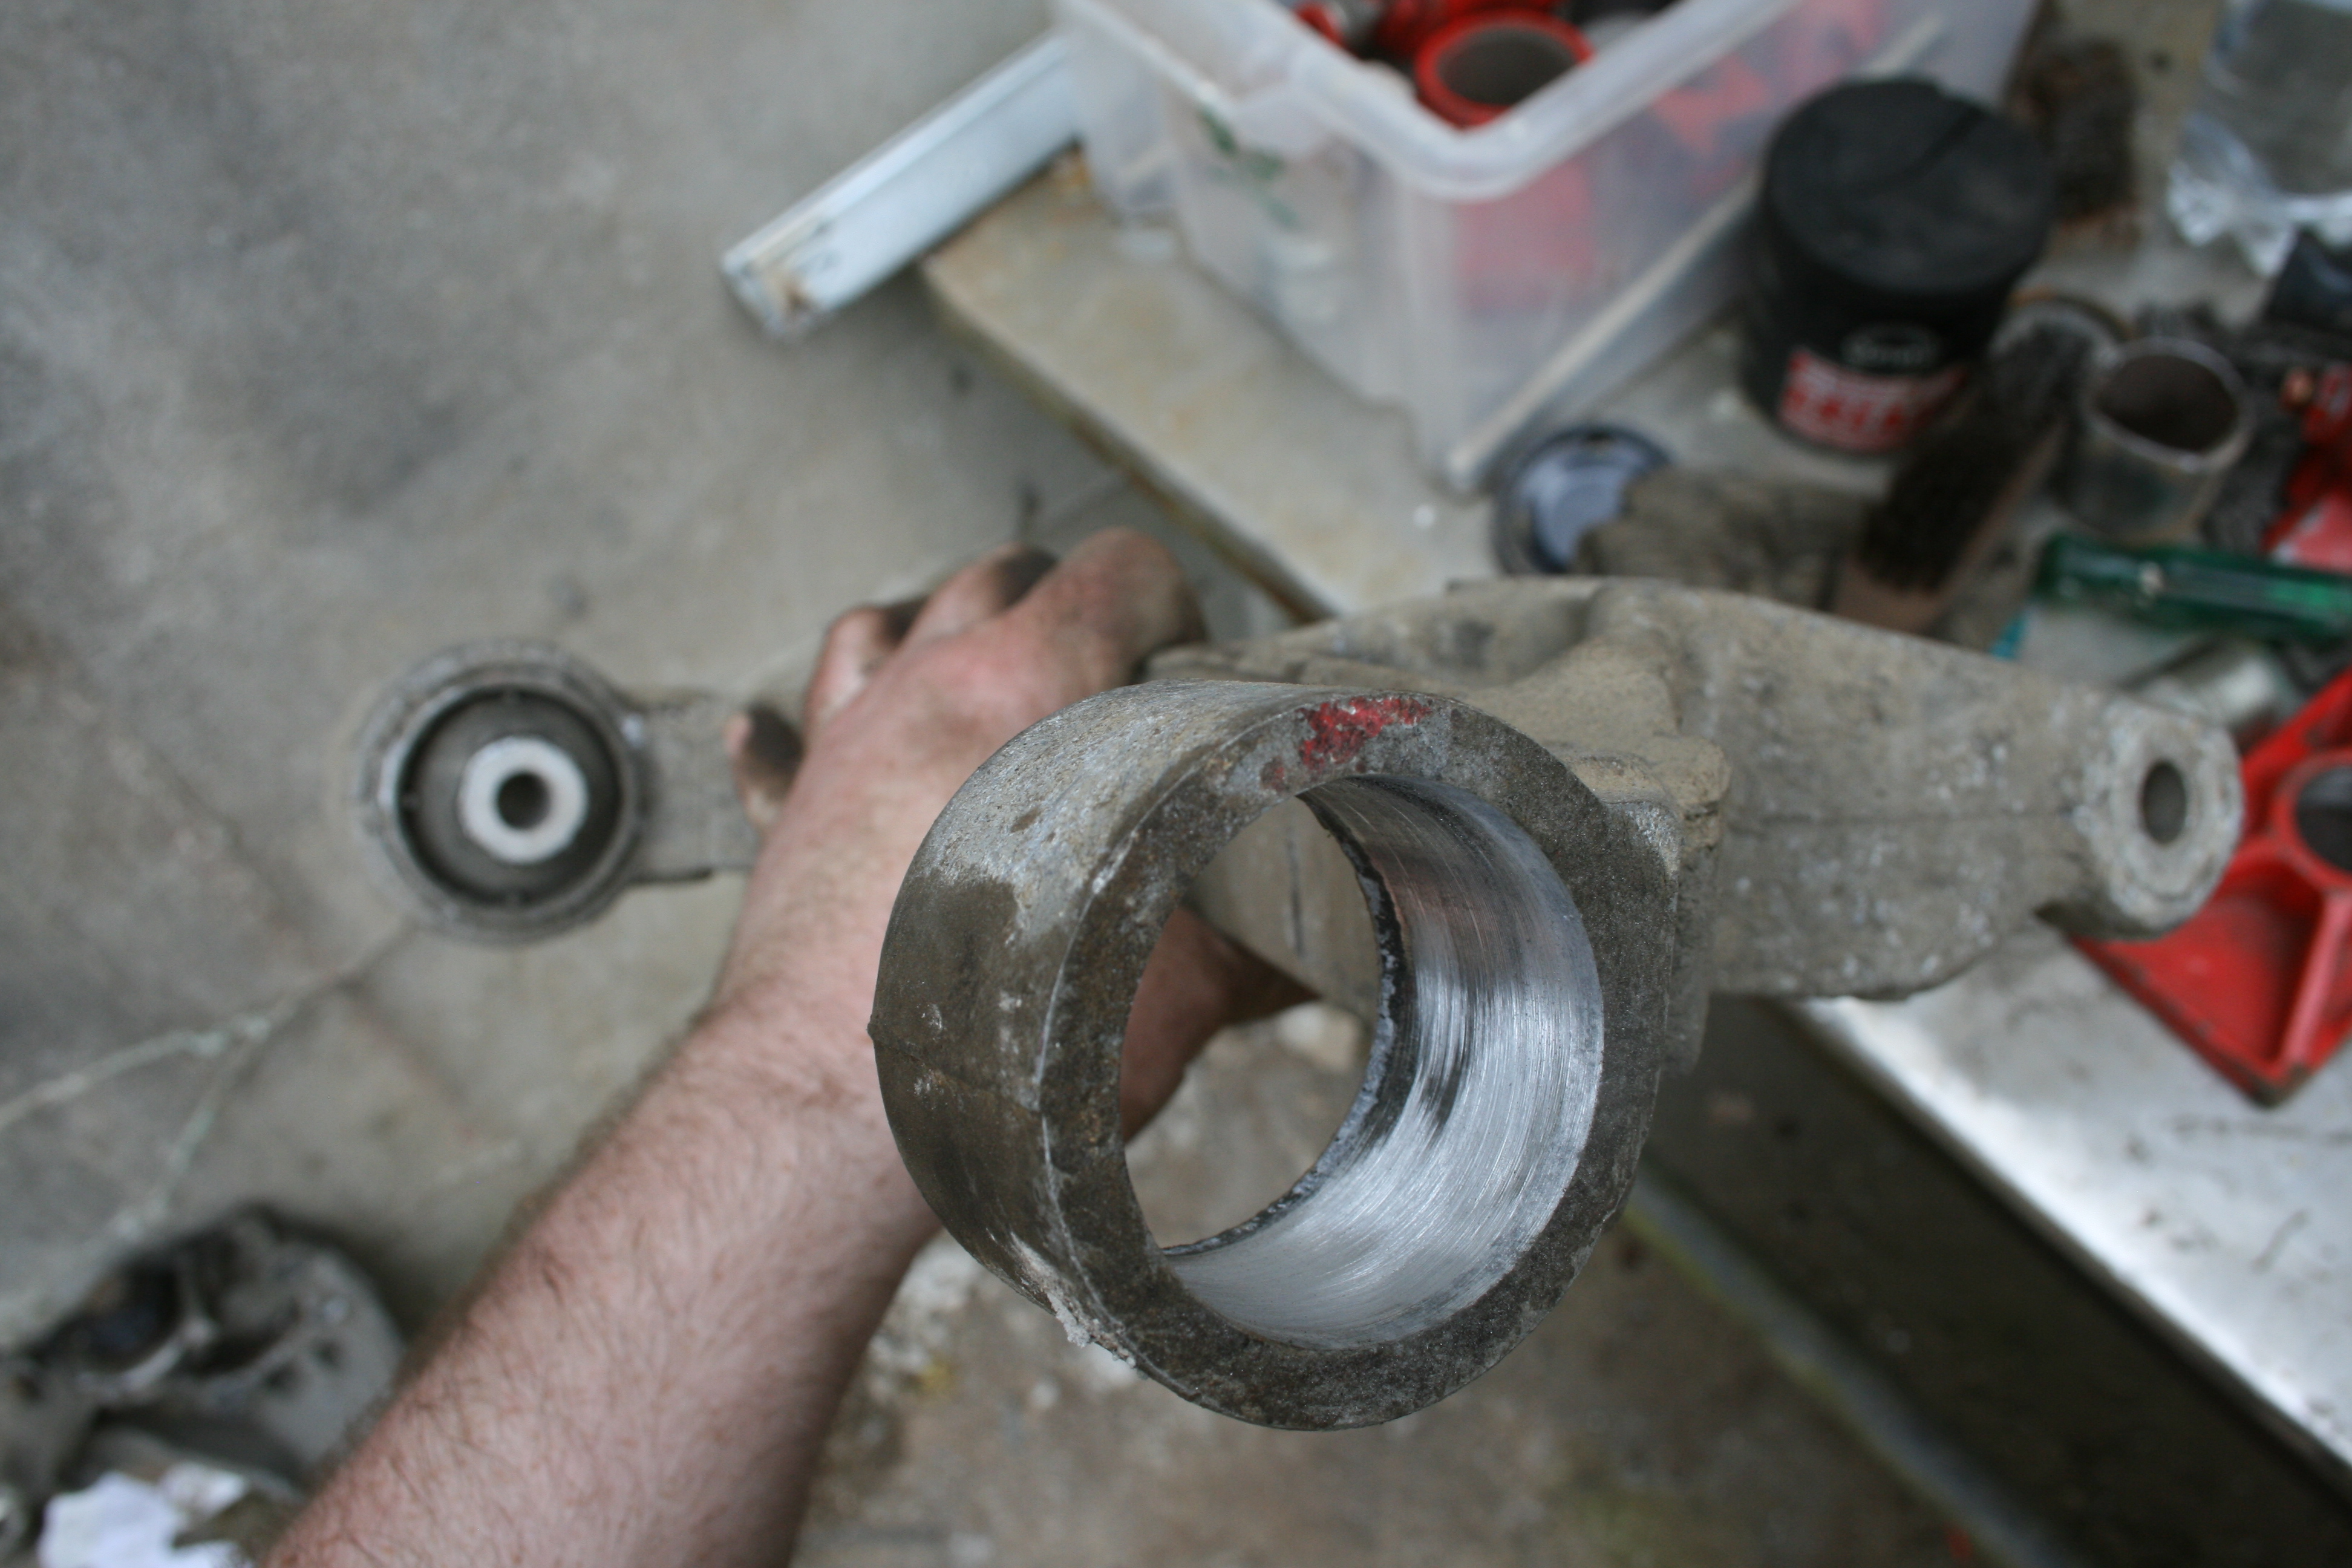
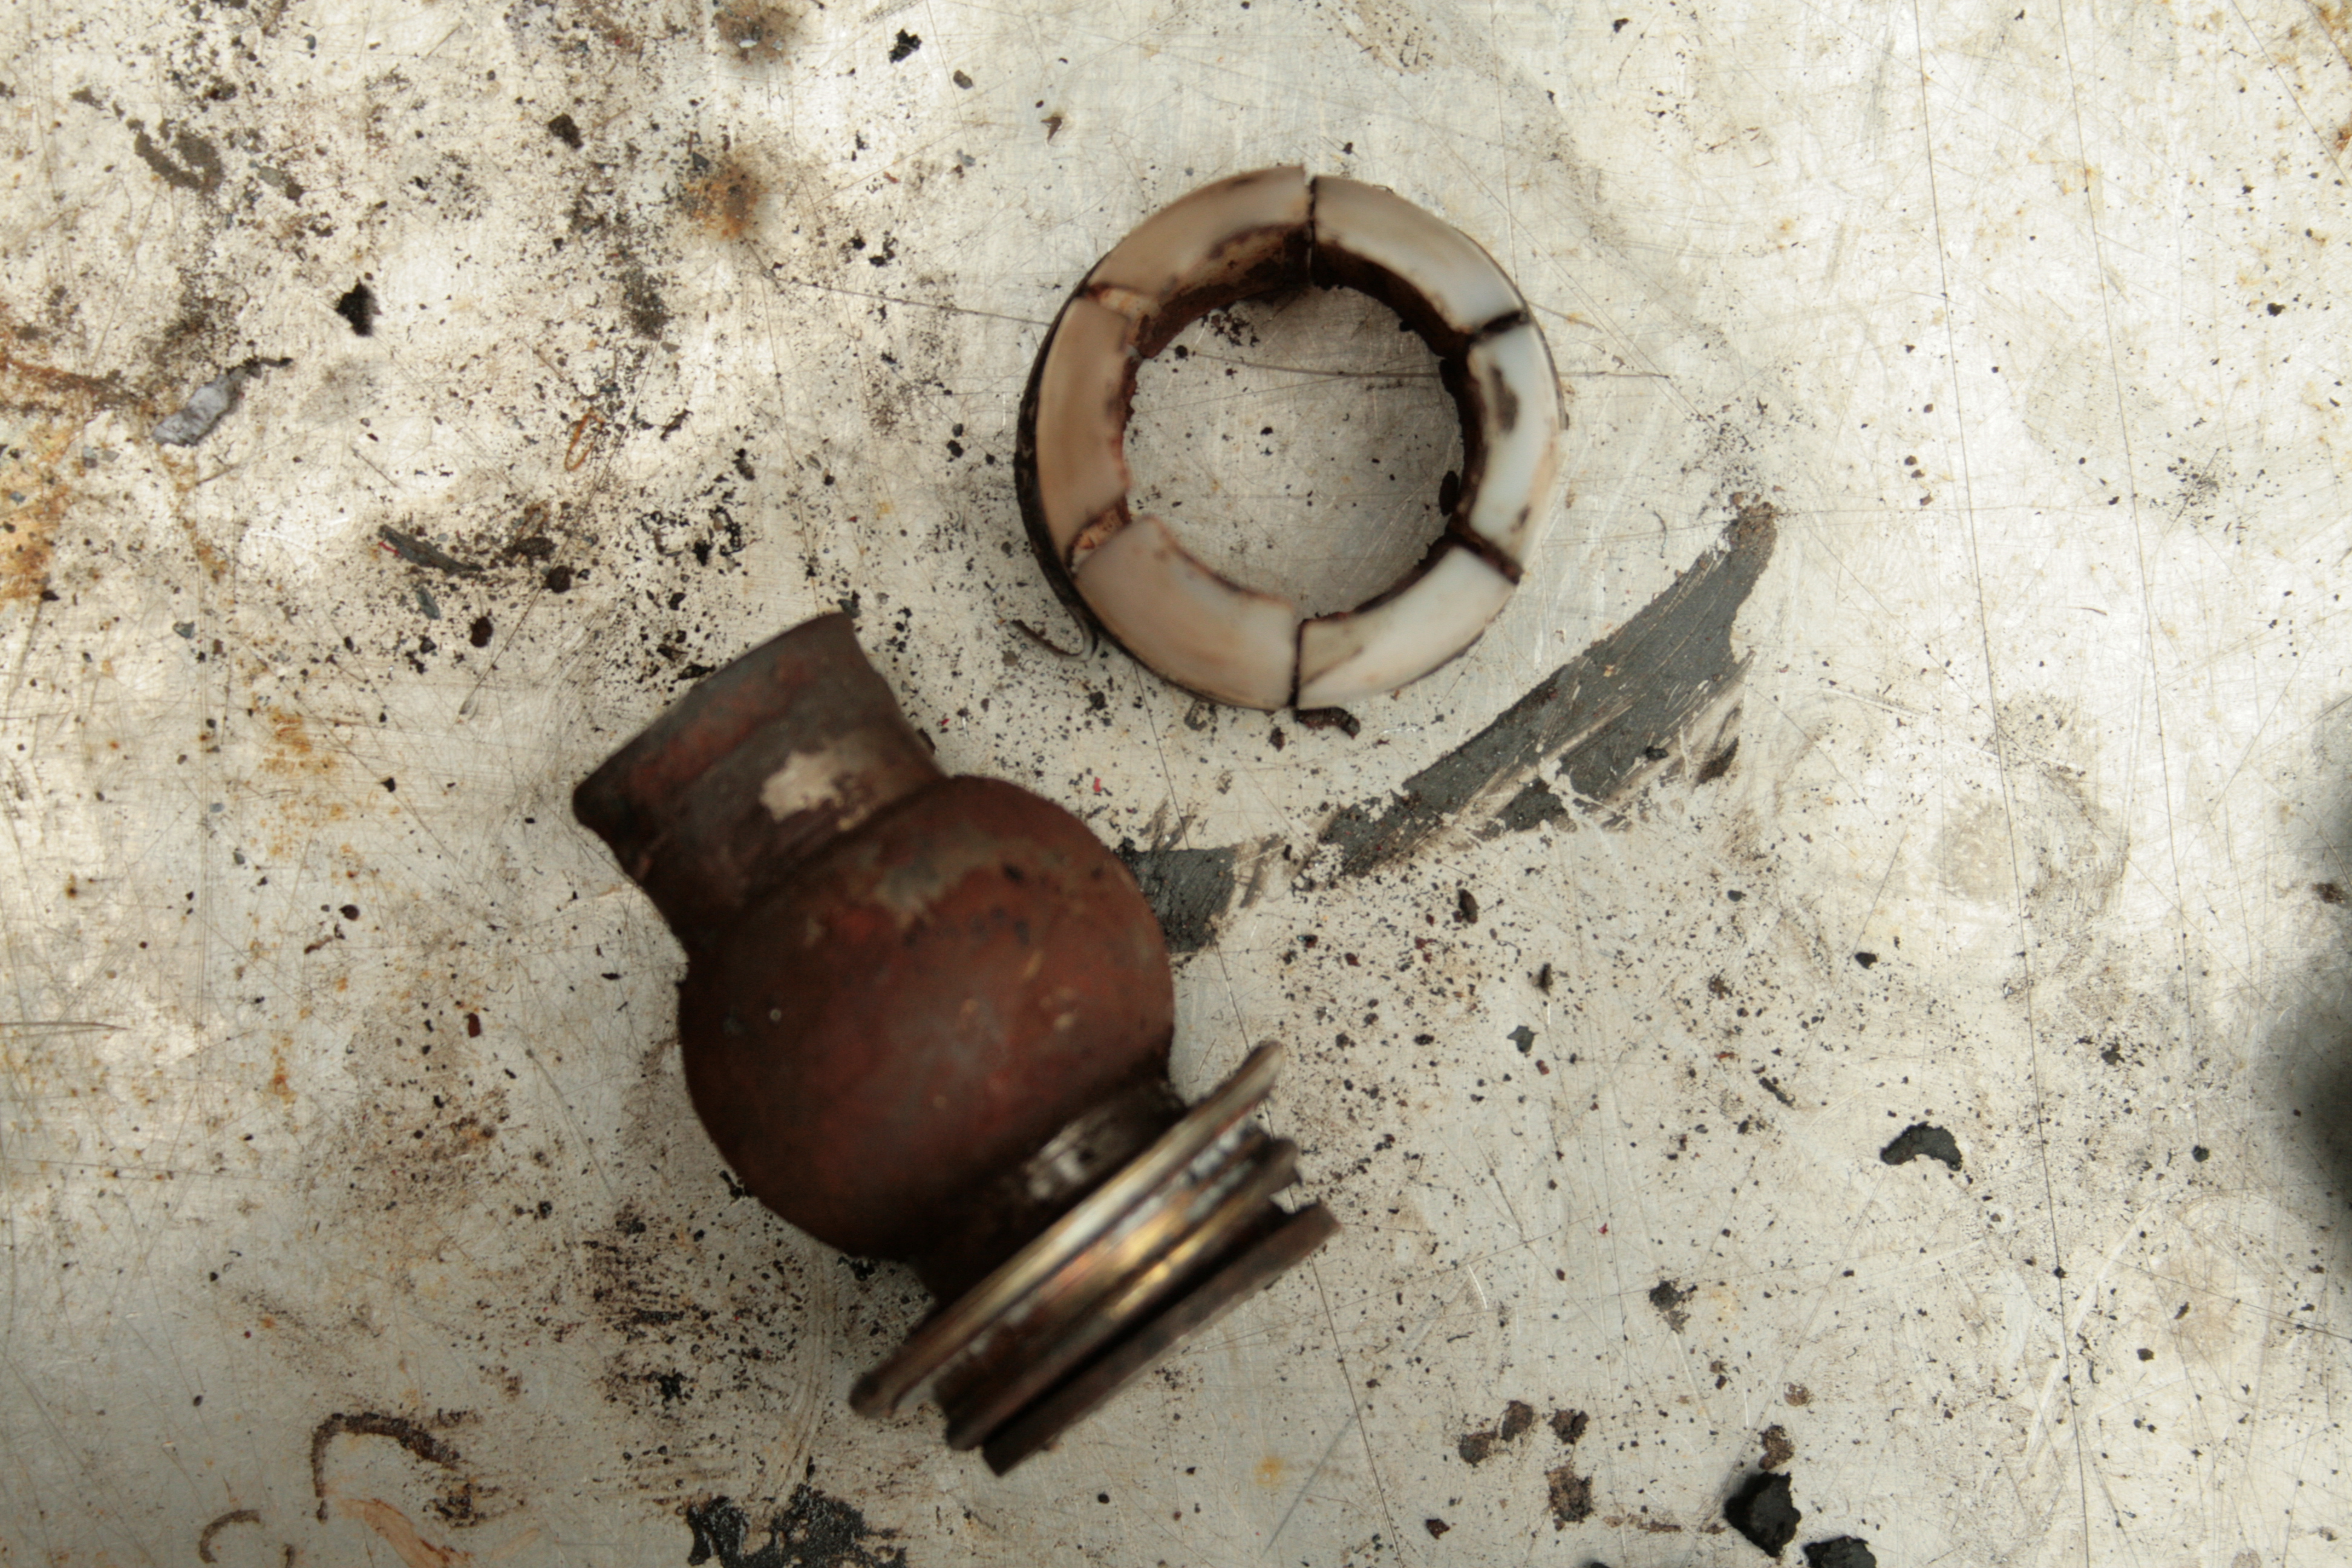
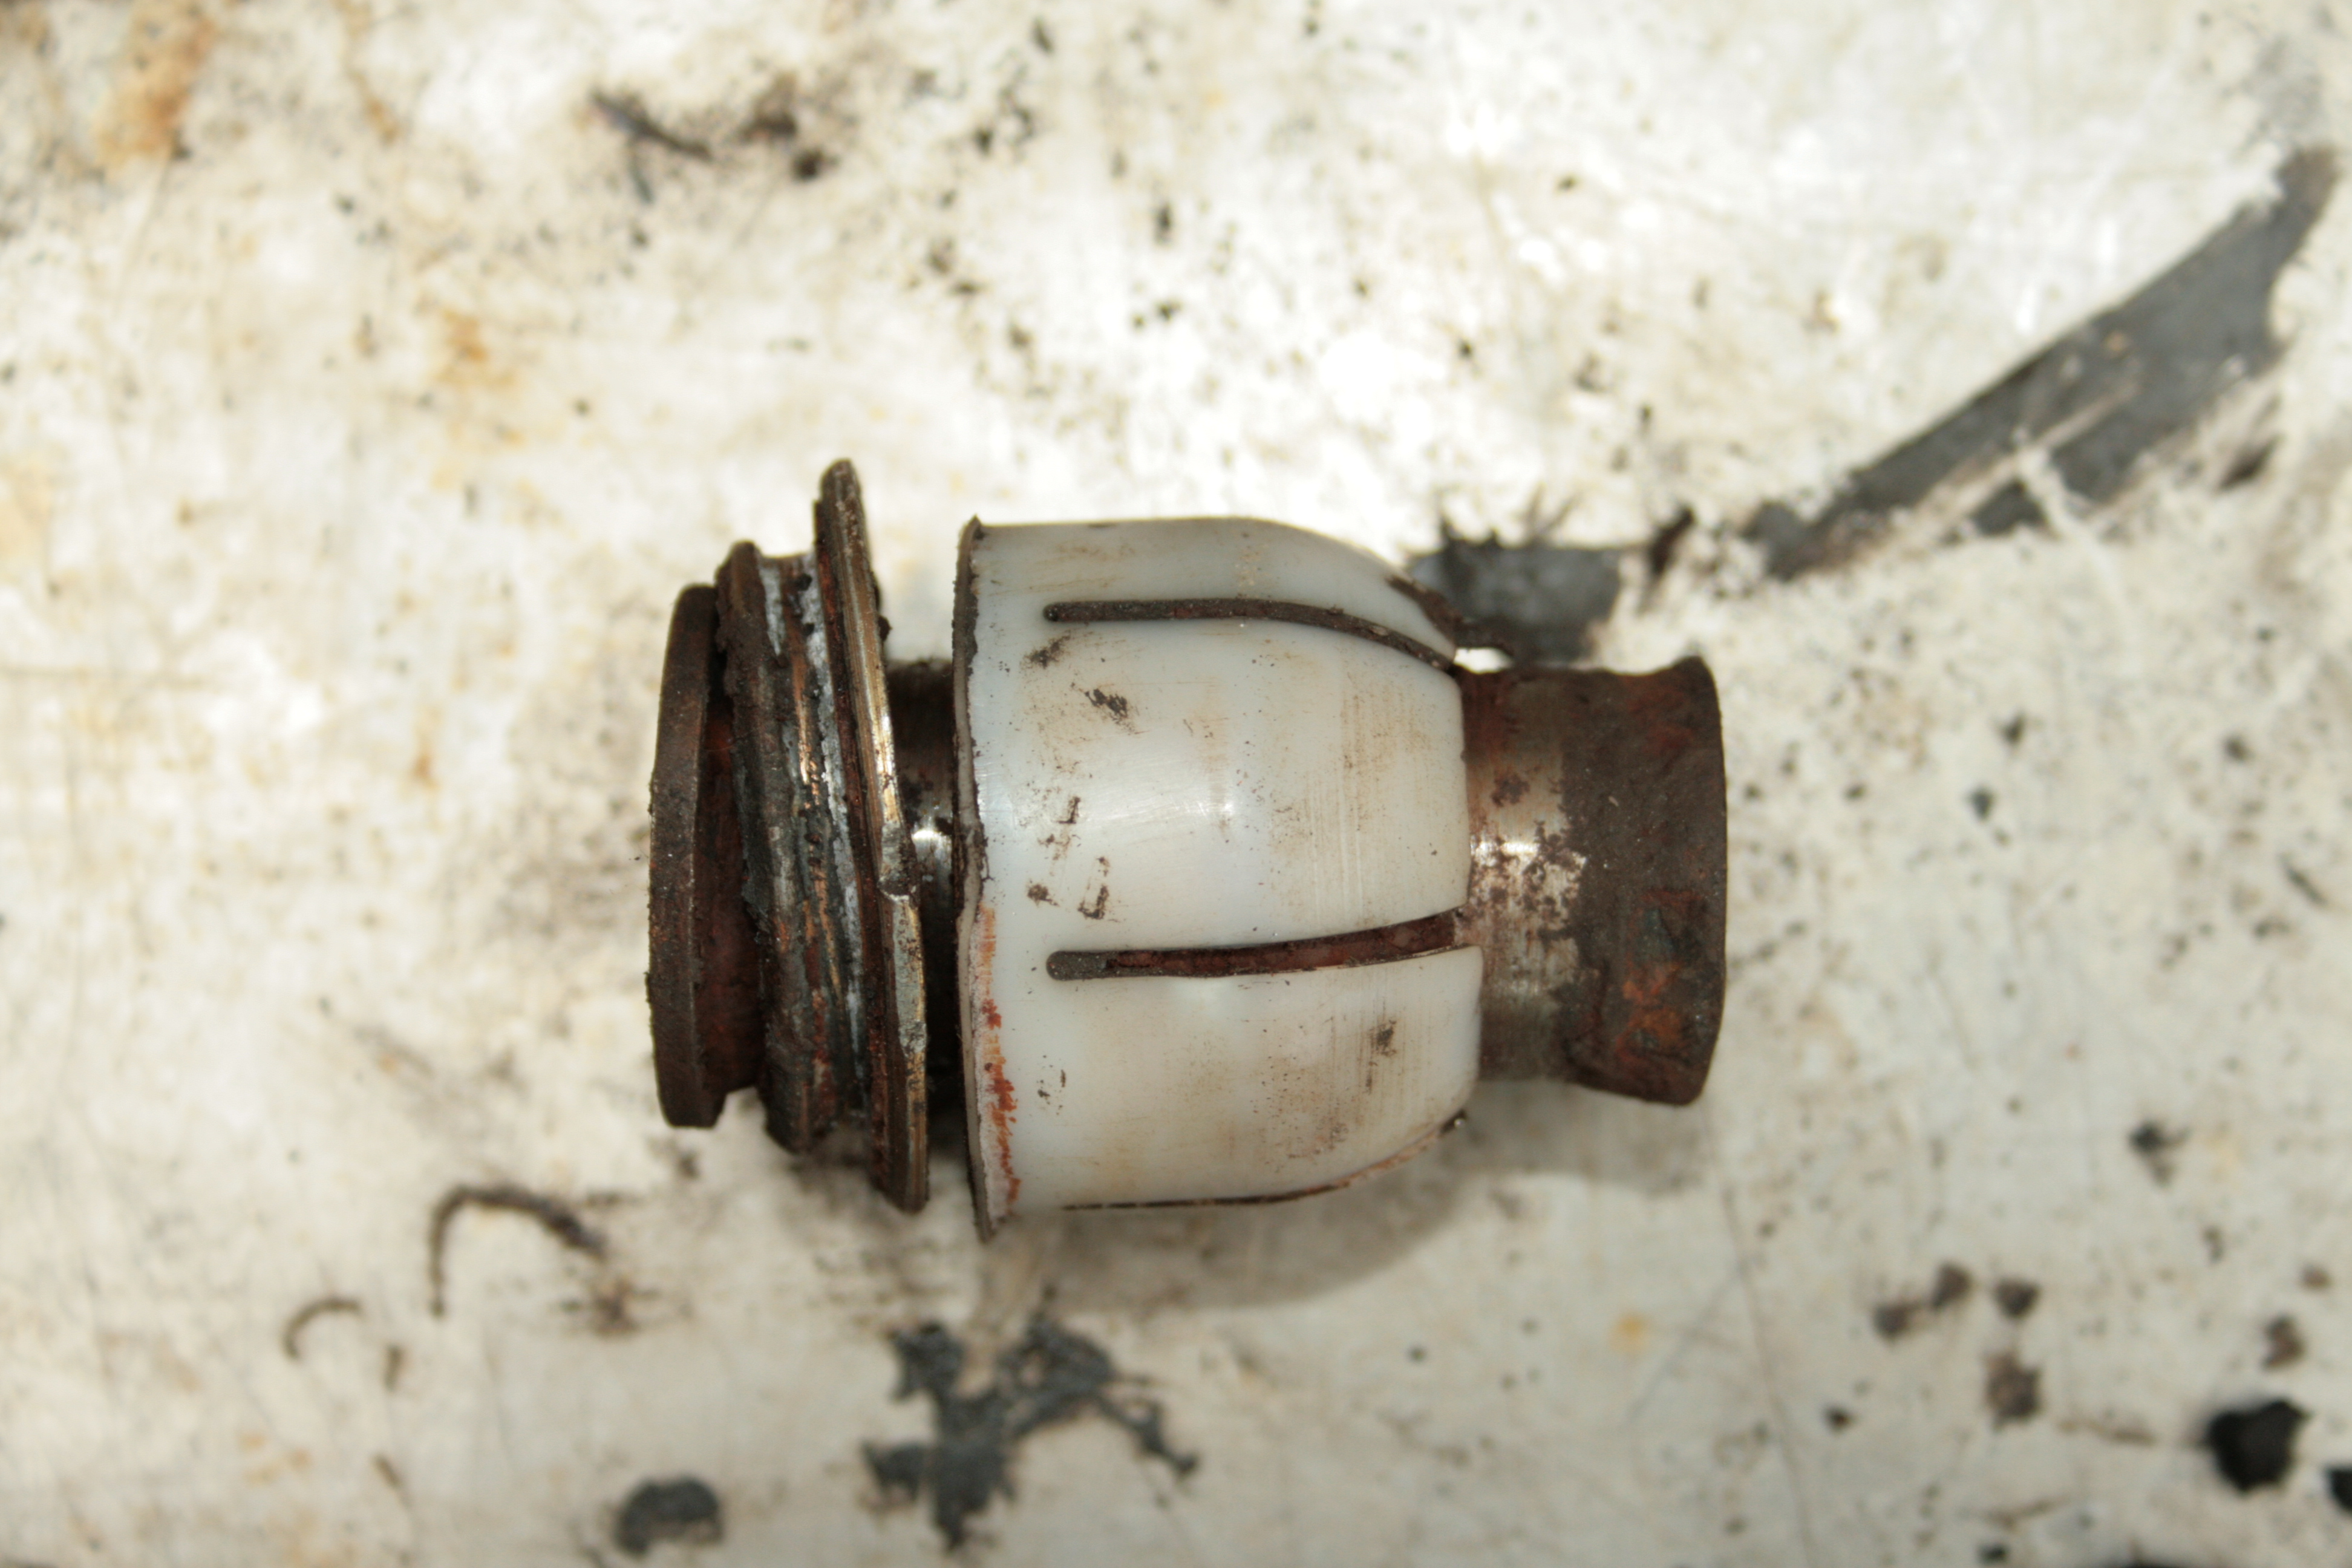
I finally got some new bushes for the rear of my car and set about fitting them to the spare lower rear arms I had for just this porpoise. I replaced only the pillowball type bushes (31Av & 31AW in the diagram) which go in the rear inner and outer registers on the arms. The inner front (31AU) is a solid rubber bush which seemed to be perfectly serviceable on both arms. Diagram: The first job was to make a tool to push the bushes in and out with. This is a piece of 1 3/4" water pipe. Inside it is a piece of aluminium to make it a snug fit on the seal lip of the bush purely to locate it centrally. . This tube is to support the arm and allow the old bush to pass through as it came out. It's a piece of old steam pipe from the railway, it was probably around when Dr Beeching was in short trousers. You can see where it's been machined out to allow room for the bush without needing pinpoint precision. Here's one of the old knackered bushes. All of them were loose from wear but at the same time unable to rotate axially as they were designed to. I didn't actually take any pictures of the bushes coming out. Once it's all position it's not really the time to stop to take snaps. Suffice to say I stacked up the steam pipe, then the arm then the water pipe, line it all up and press. There was no real drama, they all let go quite easily and the tools did their jobs. One arm sans bush. The registers were cleaned up with a sandpaper drum(?) in a electric drill. This was just get rid of any corrosion present. One thing which you must be aware of is that only one end of the register is machined flat and at right angles to the register itself. This is the side that must be down on the bed of the press to get the bush to go in straight. I did purposely push the insides out of one of the old bushes to have a look. An interesting design but I really think the sealing should be more robust. All of the seals were in tatters, much the same as the ones on my car.


-
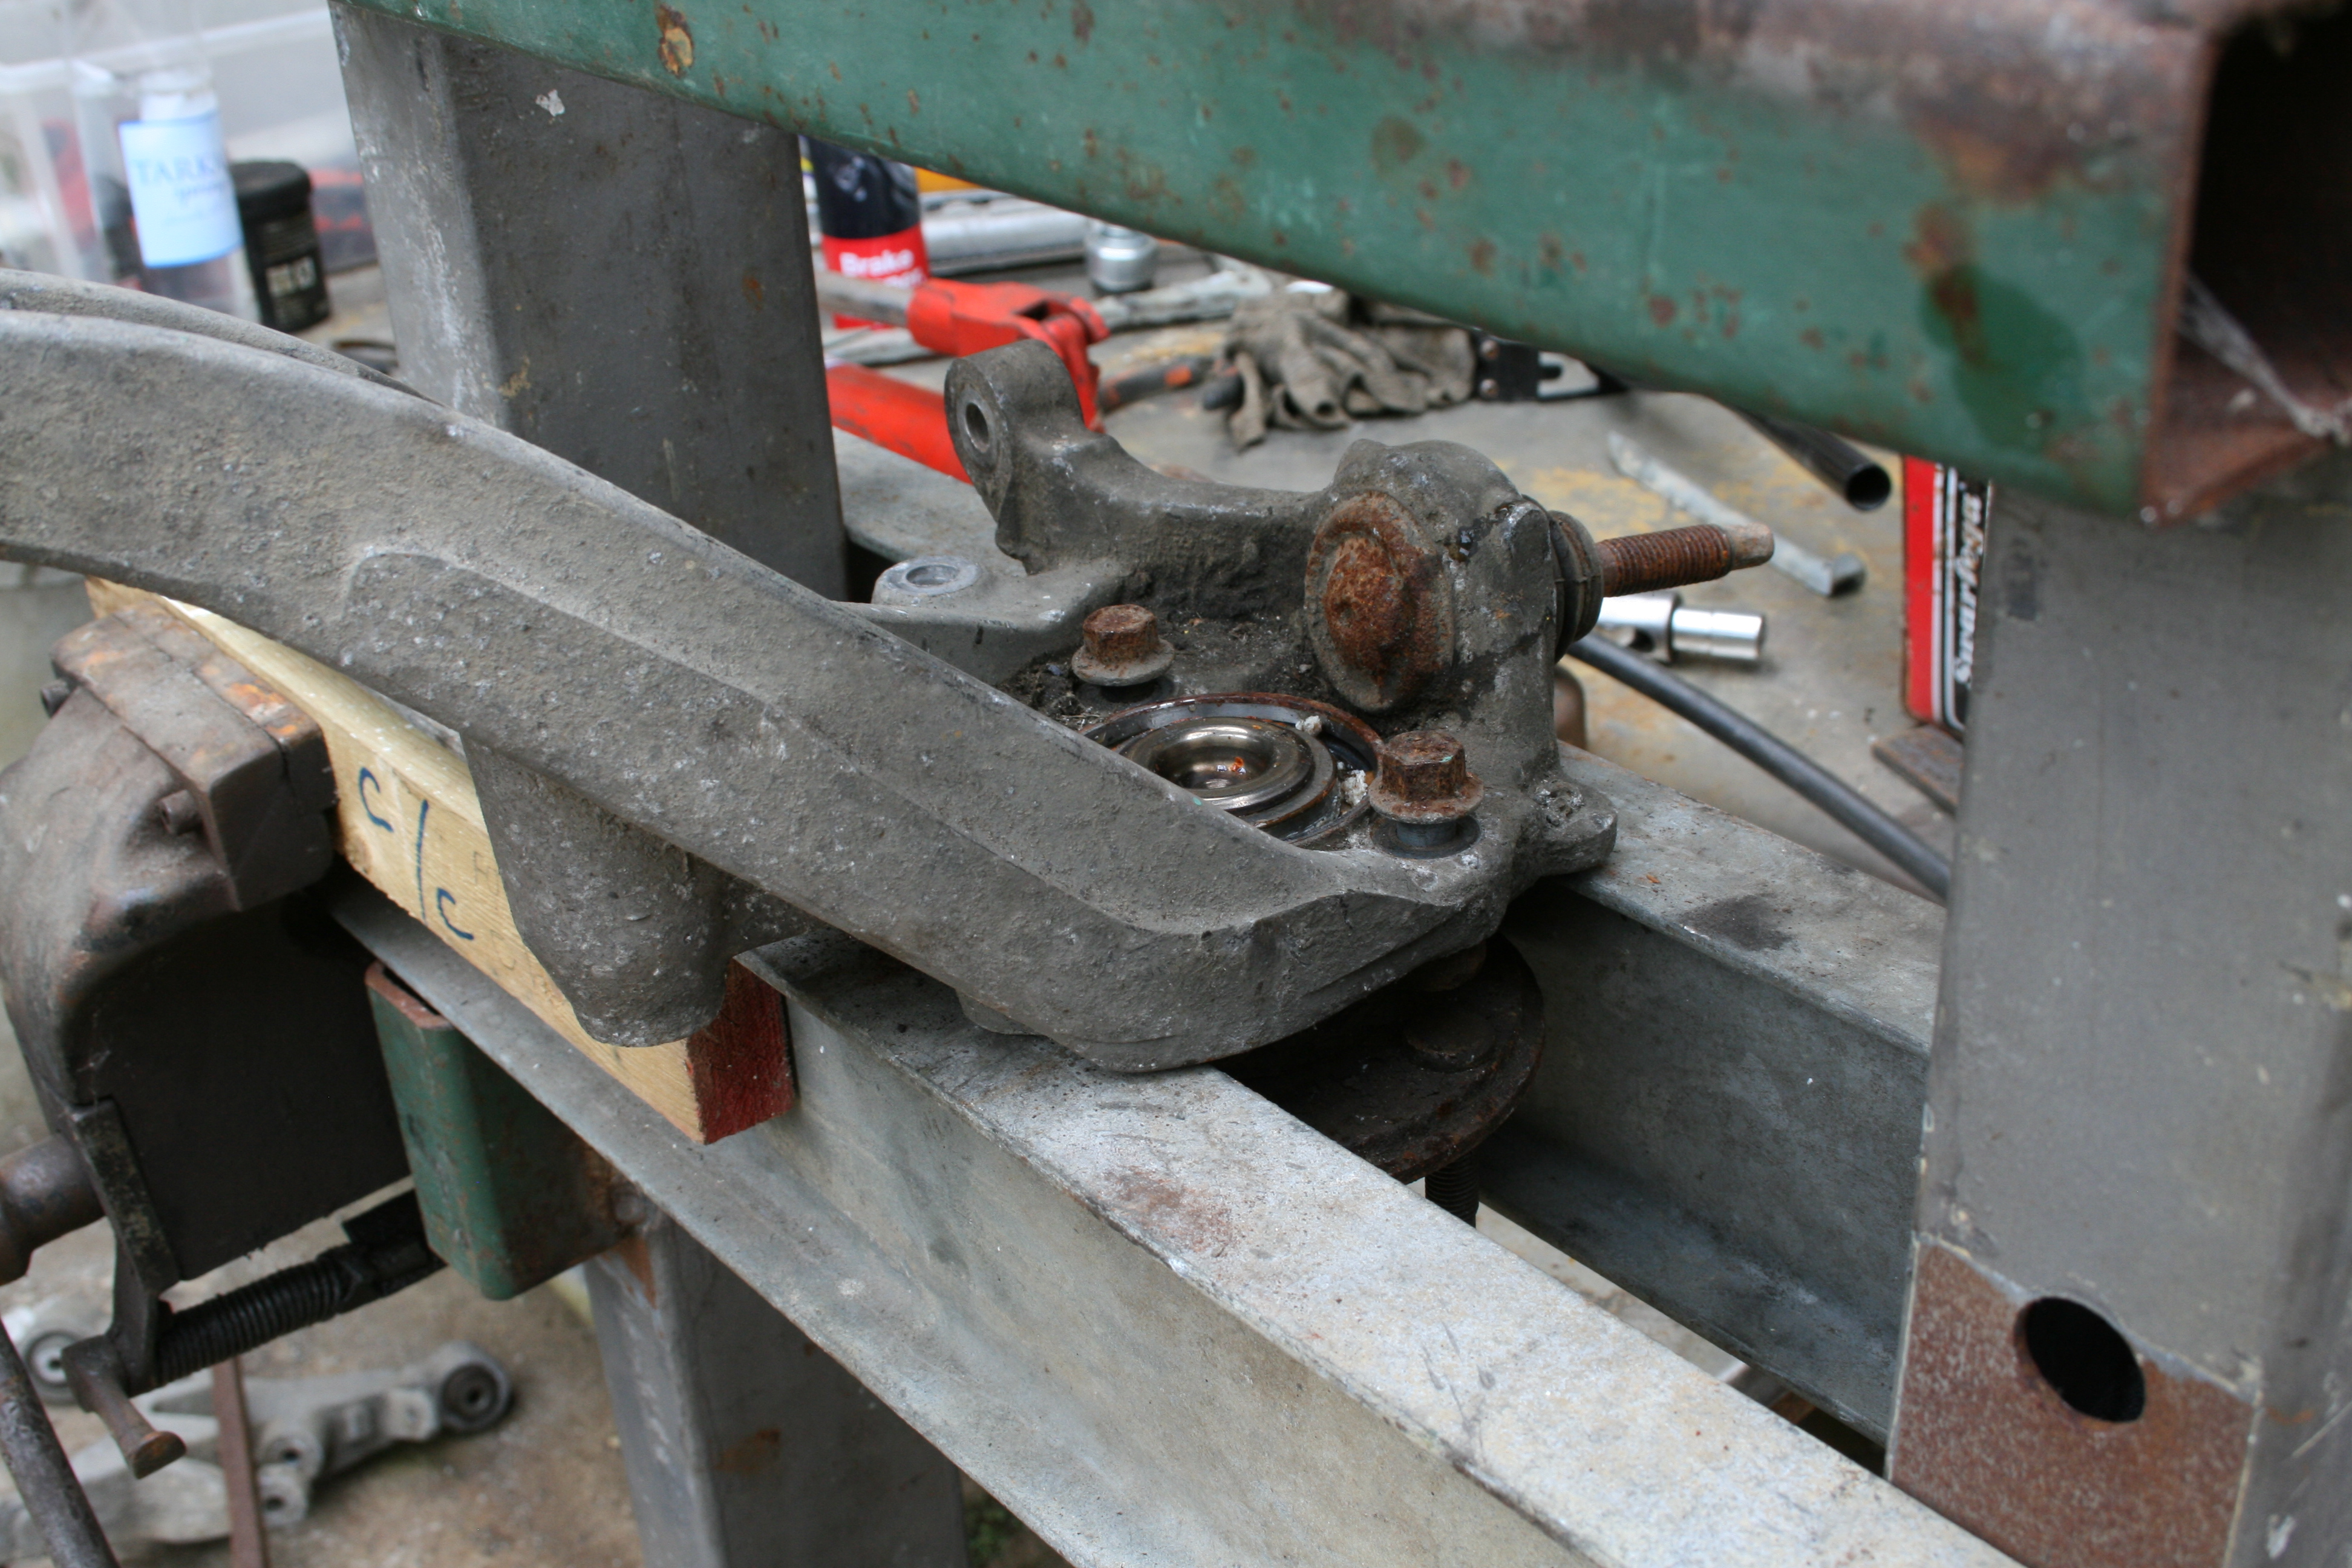
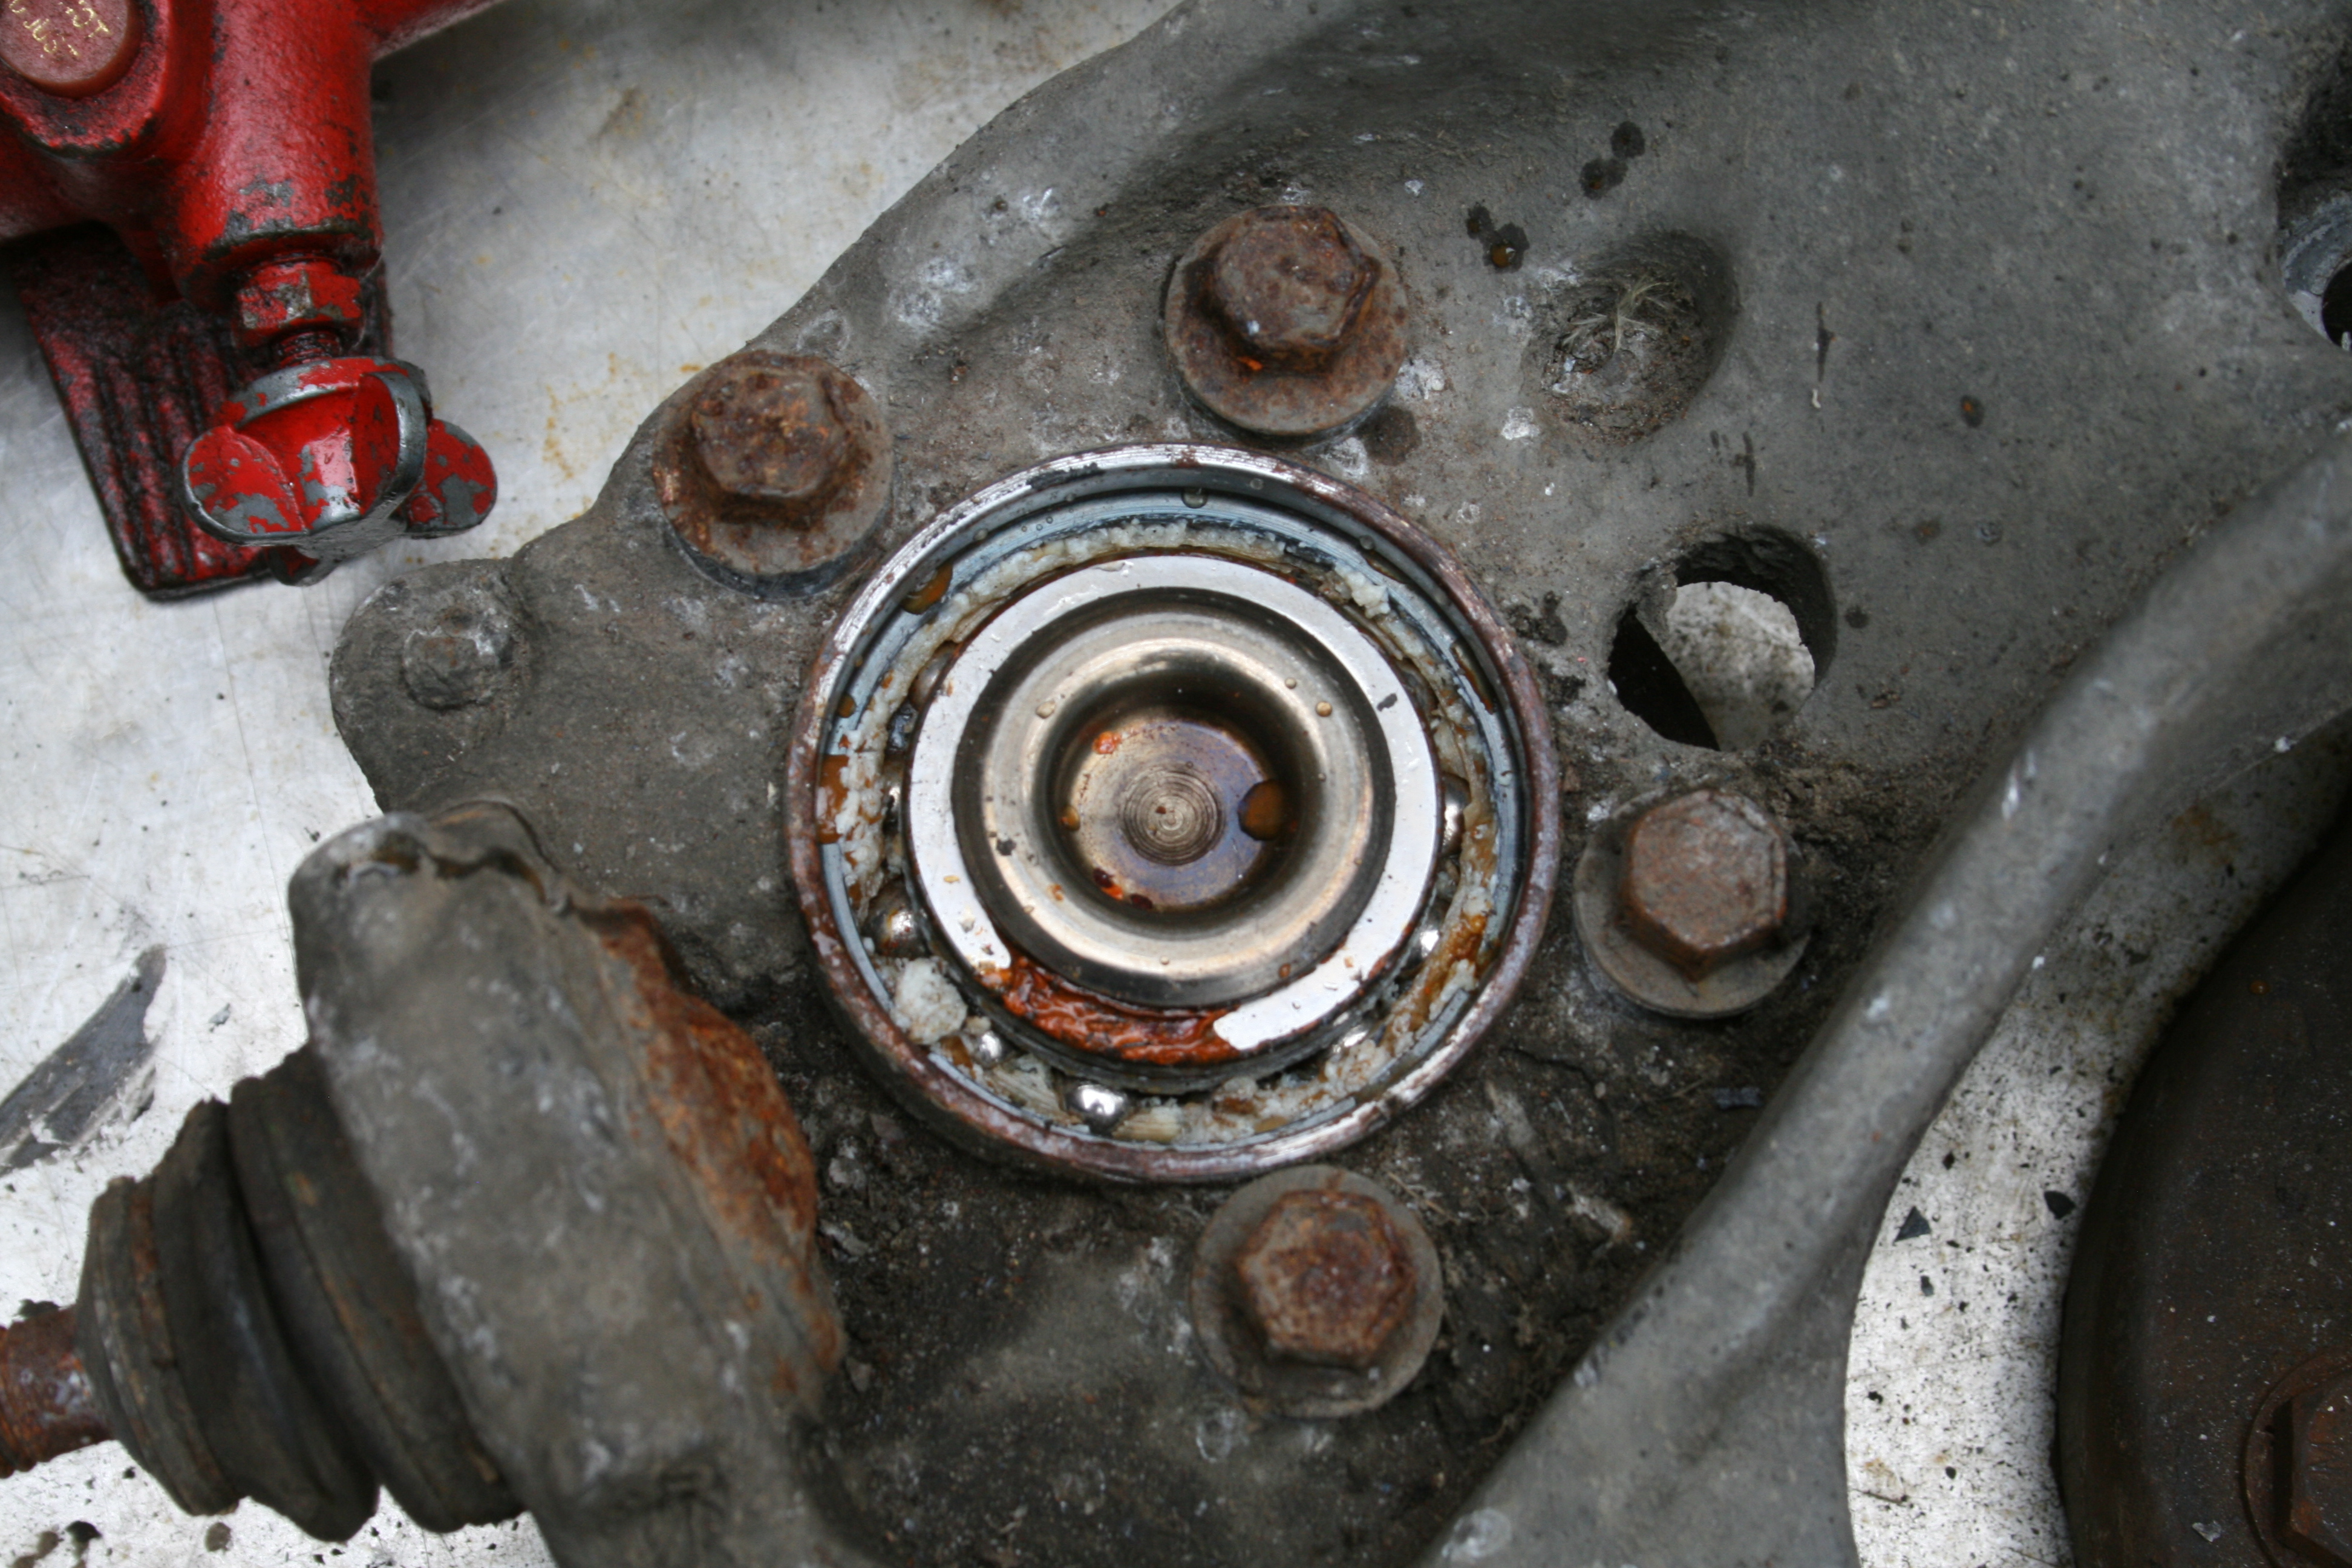
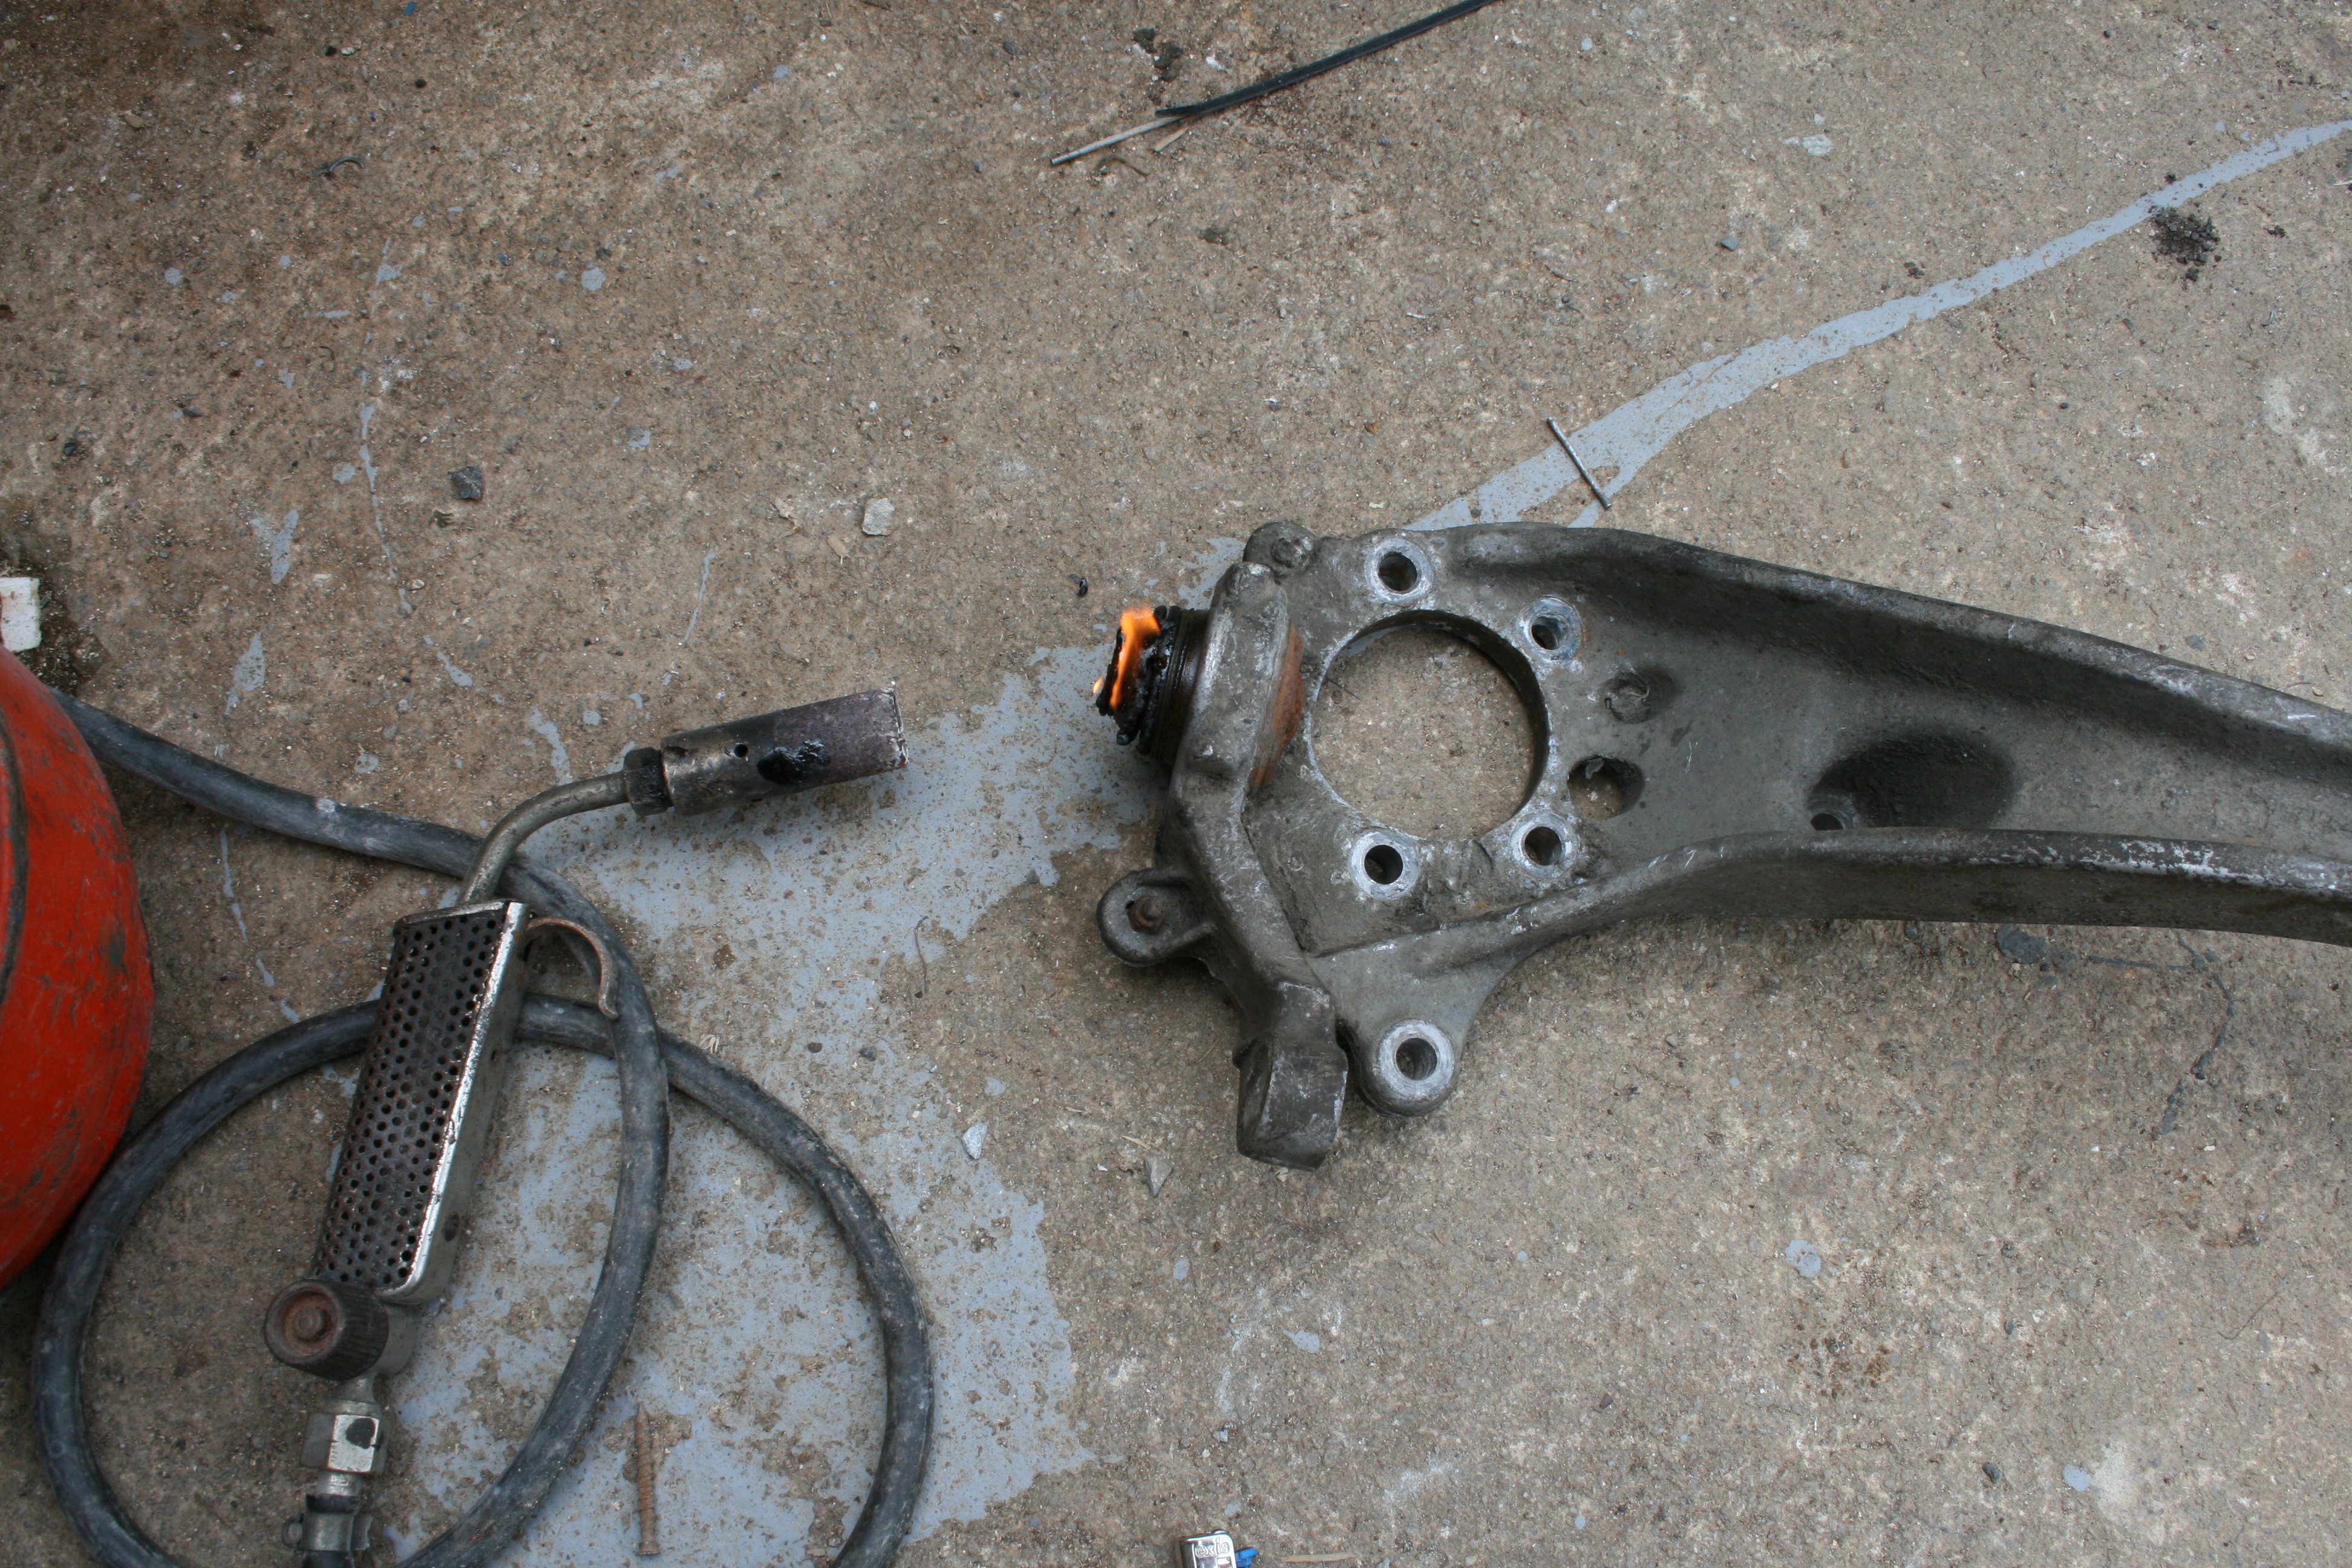
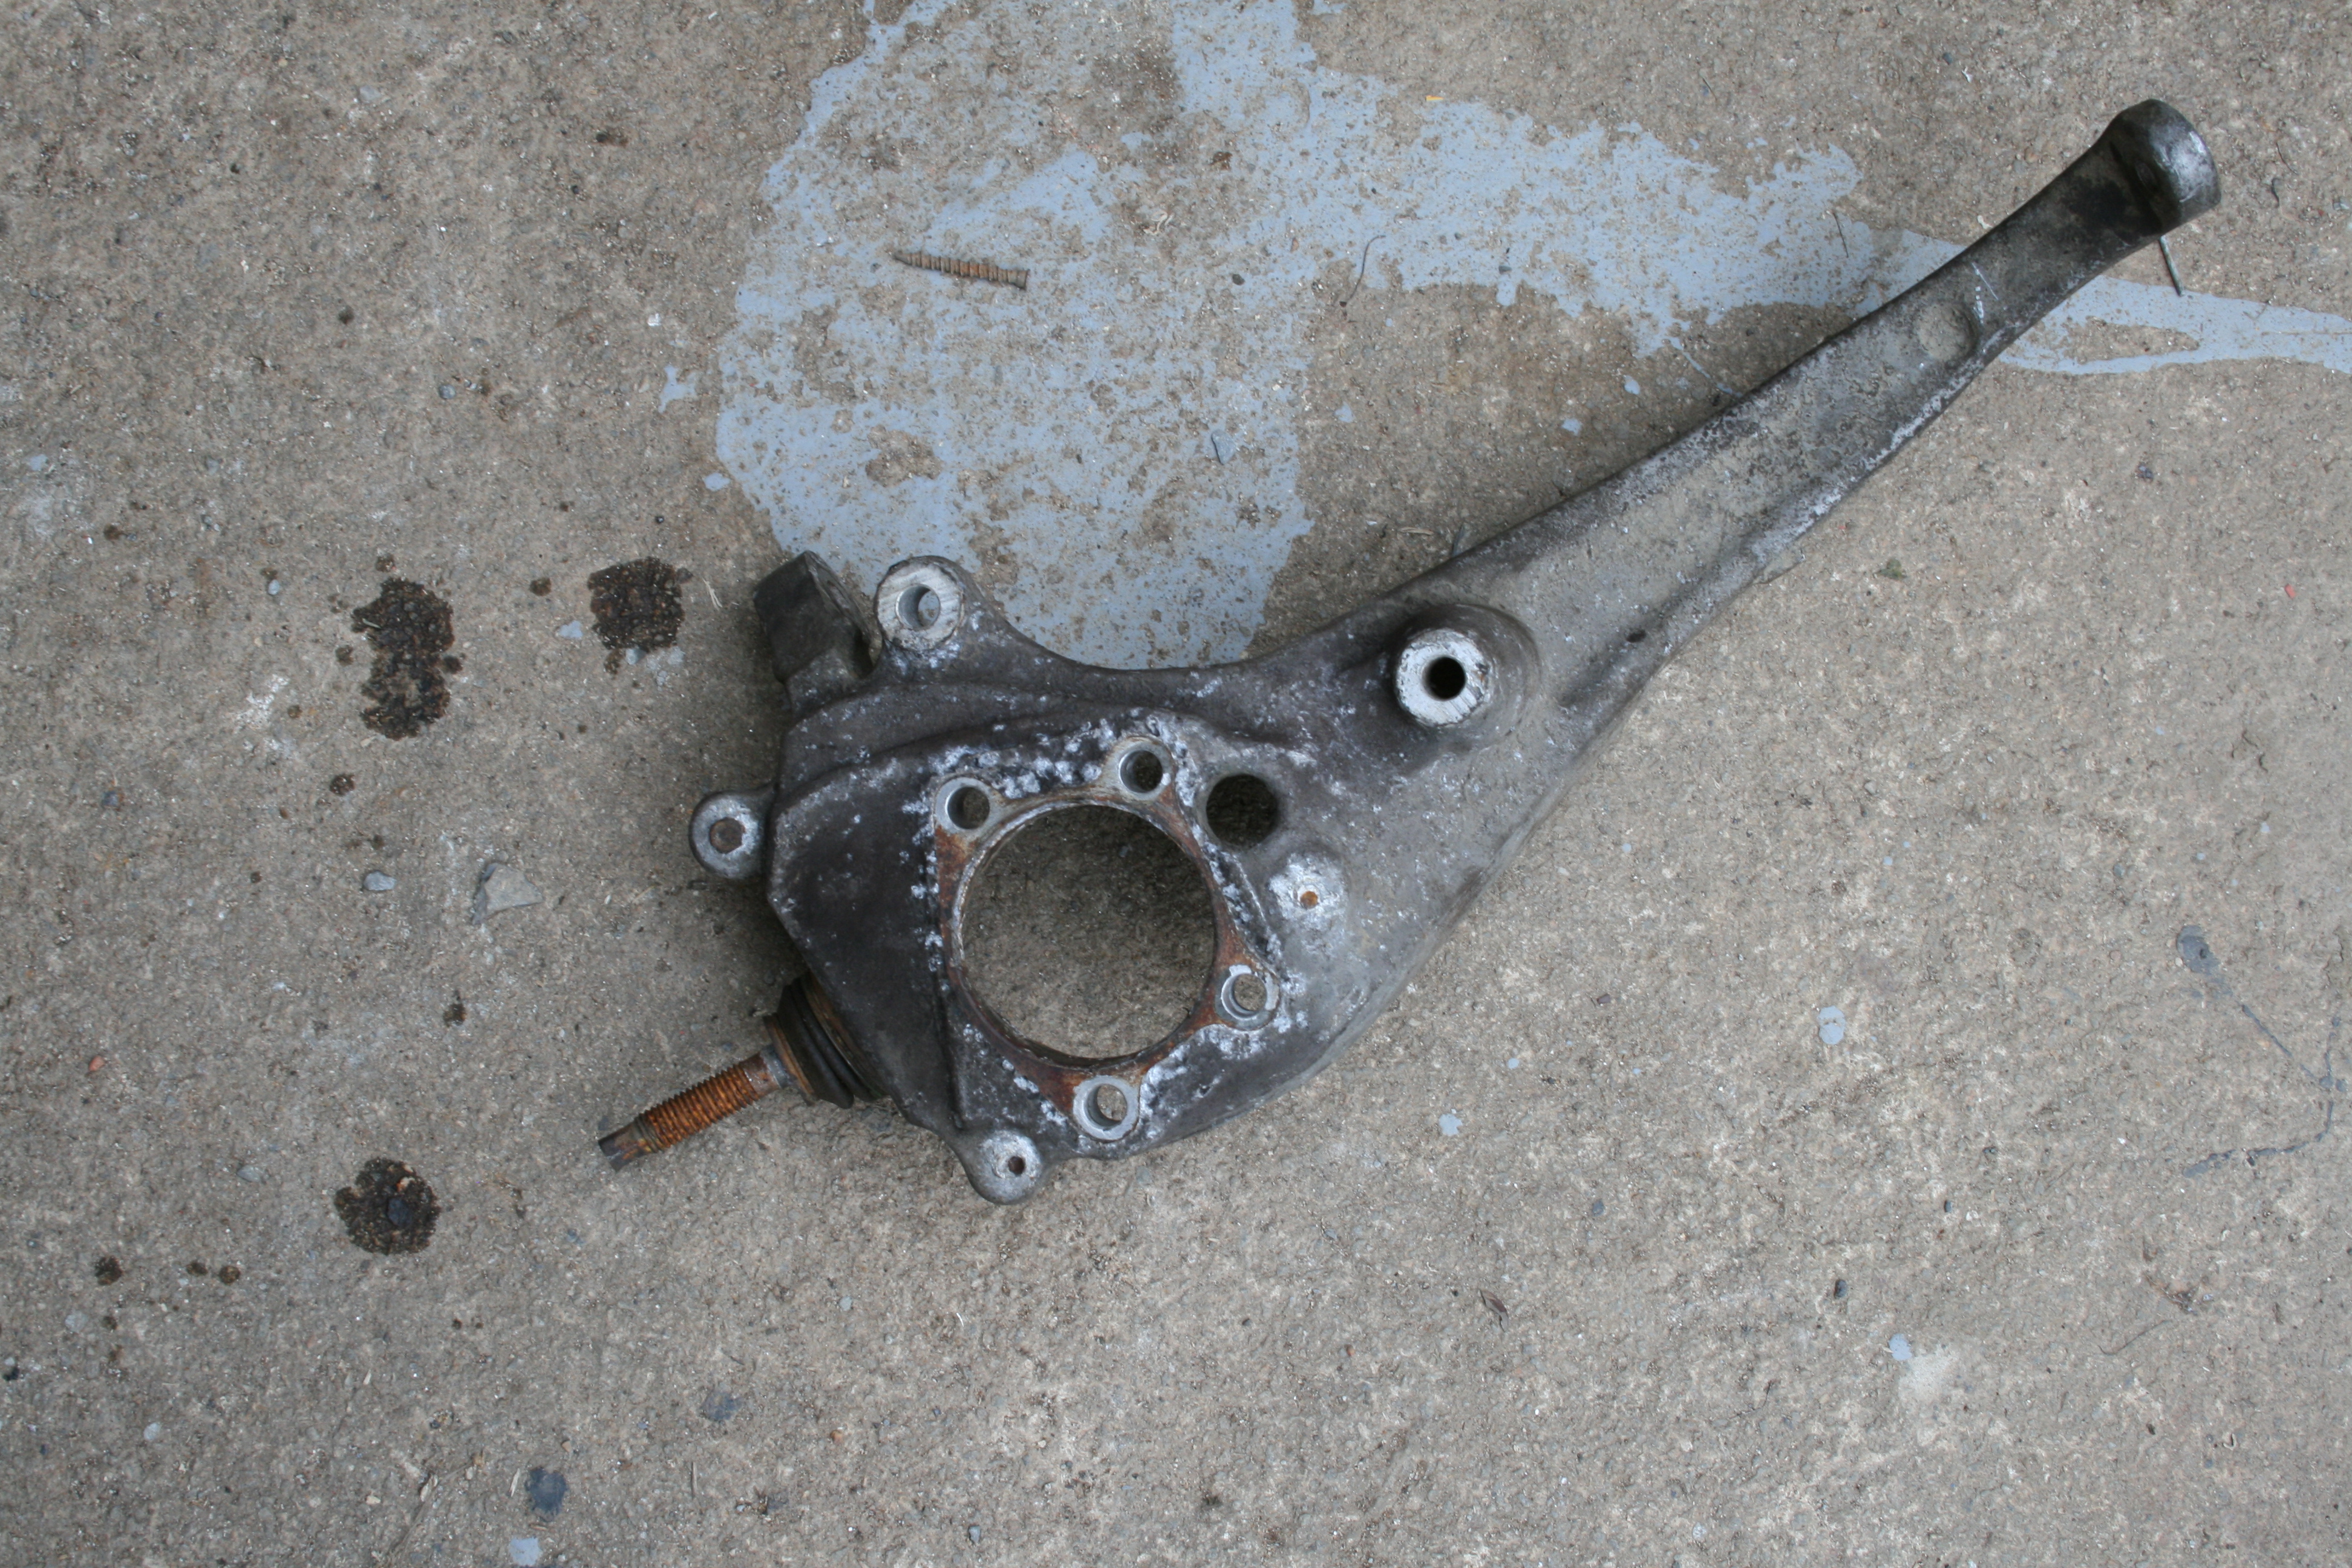
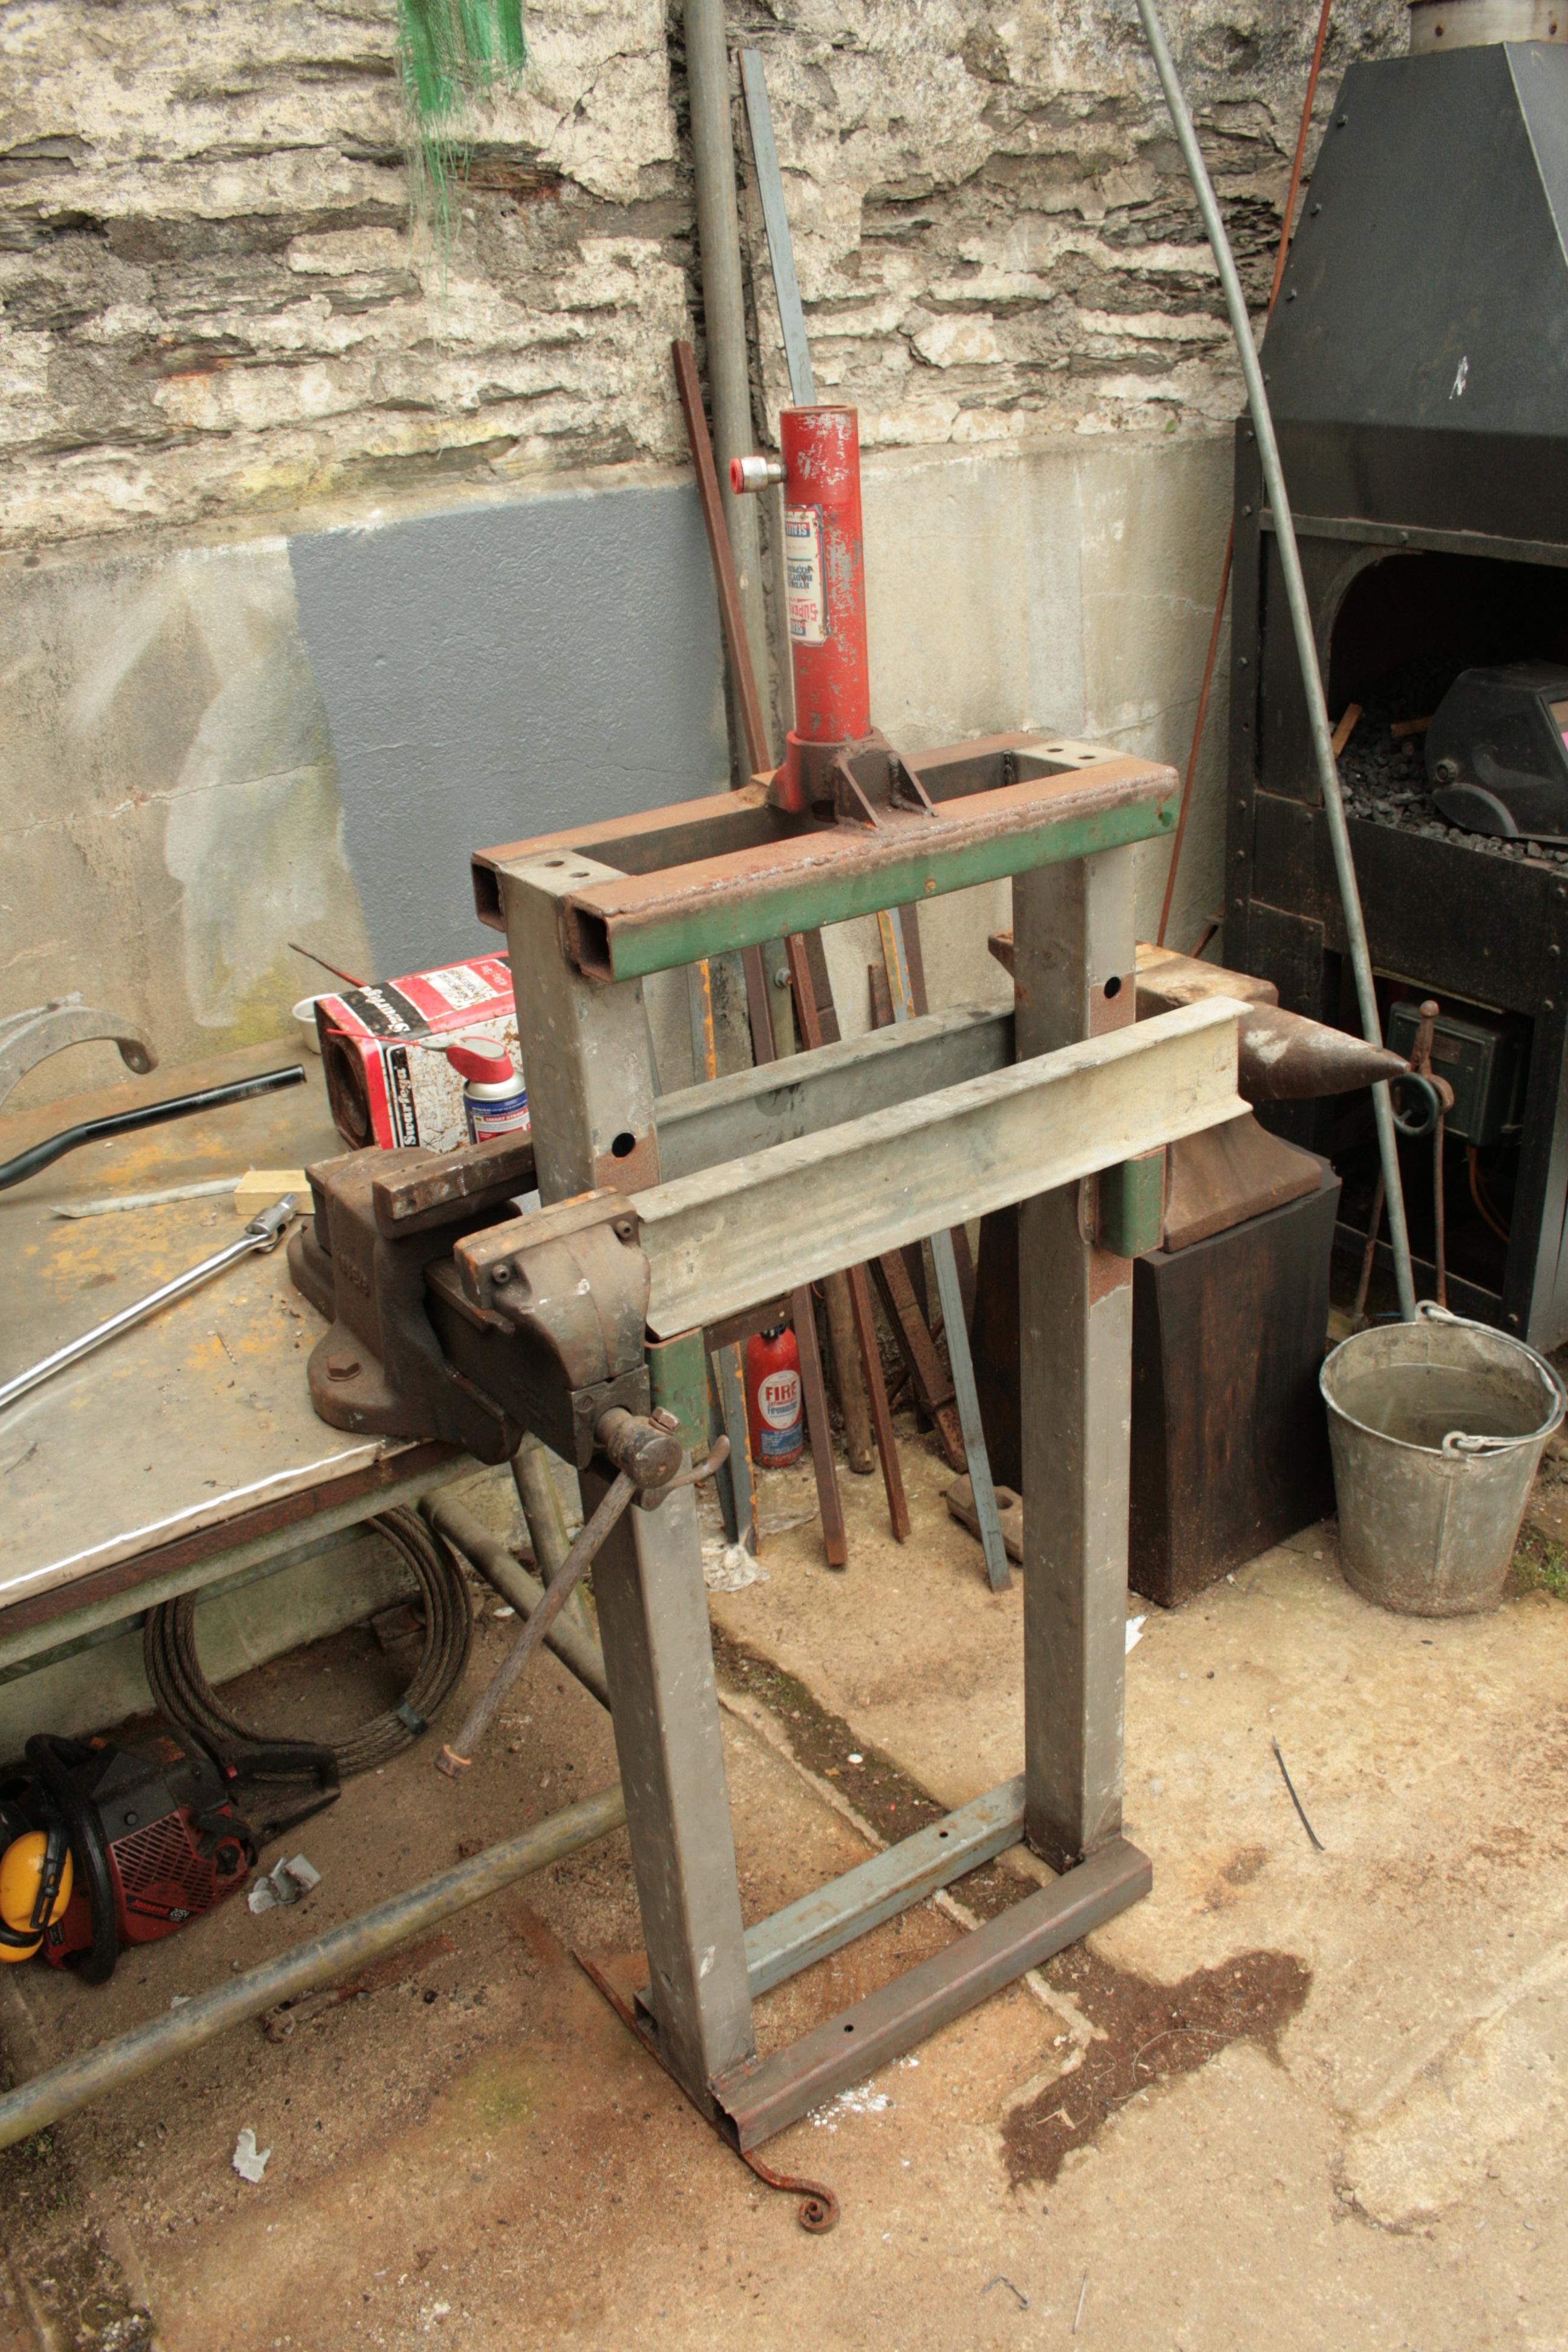
Here I press out the hub and ball-joint from my spare o/s front suspension upright ready to fit new parts. It's not a complicated job as such but you do need the right kit and the ability to hit things really hard without breaking them. This is a basic diagram of the front suspension : The home made press frame which utilises a porta power hydraulic chassis repair ram. Here's the upright in the press. I loosened the four bolts but left them in an equal amount so I could push on them all at once to start with rather than the centre of the hub. This lessens the chance of the hub going out of alignment and damaging the upright: A clearer view of the back of the hub: This hub came out with barely any pressure, unlike the ball-joint which was stuck so very tight: Setting fire to it didn't help.. I cut the pin off as it makes it easier to push, hammer and generally abuse the joint. Eventually the ball-joint let go. It took two of us, a lot of heat in the upright and lots of hammering to get it to move. Once it moved a little getting it out the rest of the way was easy. I did the other side last year and in contrast the ball-joint was dead easy whilst the hub put up a real fight and took over 12 tons to push out. I actually prefer that it that way around because getting the upright correctly set up in a press for the ball-joint is very tricky. The upper end of the upright is right in the way and as you can see there's very little meat on the upright around the ball-joint to get a purchase on. Having anything even a little of centre is not an option, you have to be spot on with these sorts of forces involved and the consequences of distorting the alloy parts are pretty big, especially if it's your cars original one. All in I would say that this is a doable but awkward job with many variables relating to the corrosion holding onto the hub and ball-joint. It could be easy, it could take you all afternoon. Personally I wouldn't tackle it with the original upright from my car, only with a spare one as I did here because if it goes wrong then you aren't stranded with no car and no spare upright. I have heard of them being scrap because the hub is stuck so tight.. Fitting the new hub is easy as it's not a true interference fit, just snug. The ball-joint is different. It's purely interference and the same things that make it awkward to remove in a press make it a pain to fit. I will be exploring different options and will update as and when I do it.


-
Thanks for this. One of mine on my S-type rounded yesterday as I torqued it up, but it was late and a cup of tea seemed like the best option. The first thing I did when I got my car home was throw the locking nuts away, the ones on my previous car cost me many hours of my life. I really wasn't expecting this kind of nonsense with the standard ones! Give me rusty, unsightly nuts any day, as long as they work. Don't be too pleased about tyre fitters using torque wrenches. The ones I've seen just use them to check the nuts are at least tight enough, which of course they are when they've been put in with an impact driver. They don't check that they're actually at the correct torque, and none of them have ever asked me what that figure is. Tyre fitting is one of the few jobs I don't do myself but at this rate I'm going to get my own fitting machine.
-
I haven't actually done anything to the car as such. However, I do now have a pair of lower rear arms sat in the shed with new outer and rear-inner bushes having pressed them in myself on Monday. I was tempted to change the front-inner bush as well but it's solid rubber and seemed to be in good order on both arms so I left them. Plus I need to budget for new front lower arm bushes which I believe are more important, not ideal but I can always take it apart again later.. I'll get the arms fitted asap, hopefully today. Then start a separate thread outlining how the whole thing was done.
-
Make sure they have a proper and thorough look with a pry bar as those lower arm bushes can be a bit sneaky and not seem half as bad at a casual glance as they really are. Like all ball-joints they can wear out from one particular arc of motion, giving lots of play in use, and yet with load from another direction be just fine. I'm just up the road, Launceston.
-
I'd be inclined to re-check the wiring and electrical contacts in the wheel and then if necessary at whatever module they lead to. I don't know what form these take as I've never had mine apart but as the components that the code relates to are presumed good then they have to be the next suspects.
-
My car is doing just this but with added wobble on the overrun and when cornering, it's wear in the rear suspension. I replaced the track rods the other week as the outer ends on both were knackered but didn't properly track it as I knew I'd be changing the lower rear arm bushes which are also done for. In fact I finished re-bushing my spare arms half an hour ago, ready to fit tomorrow. If you jack the back end up with the handbrake off you could probably feel untoward movement by wrenching the wheels around. There are some bushes at the rear that are actually ball-joints with dust seals which can split and let the grease out, then the "bush" is on borrowed time and will wear out very quickly. A couple of mine had done this and the others had just worn out. Whereabouts in Kernow be you?
-
Mk1 Fiesta Citroen Visa Vauxhall Viva x many Mk2 Astra Mk4 Escort x2 Volvo 131 LDV Convoy Mk3 Astra Skoda Estelle BMW e30 x 3 Rover 820 Vitesse Mitsubishi Carisma (lacked any) Peugeot 205 Volvo 940 Turbo Daihatsu Sportrack Vauxhall Firenza VW Corrado Discovery V8 Porsche 944 VW Golf Jaguar S-type I still have the last six.. I only paid over £1k for one of them, can you guess which?