


david moore
-
Posts
351 -
Joined
-
Last visited
-
Days Won
23
Content Type
Profiles
Forums
Events
Gallery
Store
Premium Membership Discounts
News
Videos
Everything posted by david moore
-
on the underneath of the plastic sill there are 9 clips which you have to remove, on mine i used a screwdriver so it undone a little bit then pull the clip out very carefully so as not to damage the clip. then open all doors and grab from the top of the sill, and pull towards you...not up and not down. the clips look like what they use in the door cards. i would say there are about 5 clips. hope that helps.
-
sounds like you have had a good day doing all the things that make it feel positive in what youve done. peter enjoy the rest of your evening :-)
-
hi bryan, look at my photos in my profile and you can see how my sills were?
-
if head gasket has gone or leaking? the sign for this is undo the oil filler cap and see if its like a creamy sluge! then that answers your problem :-(
-
sounds like you are getting there, but still check water pump? also it may need a complete system flush! does them good too, as when was the last time it was done? good luck
-
UK South East Annual Brighton Convoy & Meet 29th May 2016
david moore replied to SteveSheldon's topic in Jaguar Owners Lounge
steve the main event will be fine, jaguar x type 2.0d many thanks. -
start car and let it run, then check expansion bottle for coolant/water, then very very carefully check the coolant hose`s with your hand (if you are confident) be very careful of fans as they may cut in? keep a check on temp gauge in car. if it reads off the scale/red, fans should cut in on the radiator? put car heating on full and feel if it gets red hot! thats a good sign if it does. check for any onboard messages regarding. check coolant levels, check for leaks, if none? this may be sensor or thermostat or electric engine coolant sensor on engine block. all things for you to check first, good luck.
-
UK South East Annual Brighton Convoy & Meet 29th May 2016
david moore replied to SteveSheldon's topic in Jaguar Owners Lounge
hope to take a trip down, me + one and meet on the sea front, depends on how long it takes to get there? giving the jaguar a blow of the old cobwebs. hope to see a good lot of you :-) lets hope the weather is good to us all that day? -
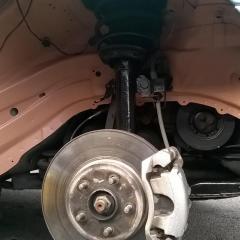
after checking the discs, as joe said check the calipers and that all pistons are moving when very gently applying brakes. if they all move ok, then check all bolts for correct torque/tighten. spin disc and then apply brake and with both hands try to move the disc side to side up/down, if movement when doing this its then wheel bearings. good luck.
-
cheers andrew, it all makes sense seeing the photos and also how you have explained on the fitting. many thanks for replying,
-
in the gear box you have solenoids which also operate with speed sensors, if these are not working correctly then this may be your problem? you need to get a garage to link up to your tcm on the auto box, and it may help narrow the issue...
-
just a quick check guide on turbo x type
david moore replied to david moore's topic in New Members Introductions
we had a chap at work who was told his turbo was knackered! and would cost over £600 +vat .... but we checked it out with this list and it turned out to be the actuator ! cost of repair £82 and we fitted it in half an hour. guess what though weeks later he sold the car.... -
turbo, Fuel Charging and Controls - Turbocharger - Turbocharger Diagnosis and Testing Overview For information on the operation of the turbocharger: REFER to: Turbocharger (303-04C Fuel Charging and Controls - Turbocharger, Description and Operation). Inspection and Verification • WARNINGS: The following tests may involve working in close proximity to hot components. Make sure adequate protection is used. Failure to follow this instruction may result in personal injury. The turbocharger can continue to rotate after the engine has stopped. Do not attempt to check the turbocharger until one minute has elapsed since the engine was switched off. Failure to follow this instruction may result in personal injury. 1. Verify the 1. customer concern. 2. 2. Visually inspect for obvious mechanical or electrical faults. Visual inspection chart Mechanical Electrical Intake air system Hose(s)/hose connections Turbocharger General engine condition. Circuit(s) Electrical connections and harnesses Manifold absolute pressure and temperature (MAPT) sensor Turbocharger actuator Engine control module (ECM) Symptom chart Symptom Possible source Action Poor performance (off-boost) Low/Contaminated fuel Restricted intake air system General engine condition Engine control module (ECM) failure Check the fuel level and condition. Draw off approximately 1 ltr (2.11 pints) of fuel and allow to stand for 1 minute. Check to make sure there is no separation of the fuel indicating water or other liquid in the fuel. Check the intake air system for restriction. Check the engine condition, compressions, etc. if there are indications of a mechanical fault. Check for DTCs indicating a module fault. Refer to the warranty policy and procedures manual if a module is suspect. No boost Electrical connections and harnesses Restricted intake air system Charge air cooler restricted/leaking Turbocharger actuator failure Turbocharger failure Engine control module (ECM) failure Check the electrical connections and harnesses. Check the intake air system for restriction/leakage. Check the turbocharger actuator and circuit. Refer to the electrical guides. Check the turbocharger for wear. Disconnect the turbocharger intake and outlet pipework and turn the turbocharger by hand. Any roughness indicates a fault. Check any up and down movement in the turbocharger shaft. Excessive movement indicates a fault. If in doubt, compare the suspect unit with a new turbocharger. Check for DTCs indicating an actuator or module fault. Refer to the warranty policy and procedures manual if a module is suspect. No boost/excessive noise Turbocharger failure Disconnect the turbocharger intake and outlet pipework and turn the turbocharger by hand. Any roughness indicates a fault. Check any up and down movement in the turbocharger shaft. Excessive movement indicates a fault. If in doubt, compare the suspect unit with a new turbocharger. For a complete list of all diagnostic trouble codes that could be logged on this vehicle. REFER to: Electronic Engine Controls (303-14B Electronic Engine Controls - 2.0L Duratorq-TDCi/2.2L Duratorq-TDCi (110kW/150PS) - Puma, Diagnosis and Testing). Diagnostic Trouble Codes (DTC) Relating to Turbocharger Issues DTC Description P2263 Turbocharger/Supercharger Boost System Performance . This vehicle may not feature all of the components listed. . This DTC may be caused by: . Damaged or disconnected vacuum hose. Check for air leaks at turbocharger. Vanes on the turbocharger sticking closed. Turbocharger defective. . Or . Fault reported by the rotary electronic actuator. . This DTC may be caused by: . CAN communication BUS fault. Rotary electric actuator. Low battery voltage. Turbocharger defective. P132A Turbocharger/Supercharger Boost Control A Electrical . Fault reported by the rotary electronic actuator. . This DTC may be caused by: . Rotary electric actuator. Renew the variable geometry turbocharger. P132B Turbocharger/Supercharger Boost Control A Performance . Fault reported by the rotary electronic actuator. . This DTC may be caused by: . Faulty turbocharger, mechanism may be sticking. . Rotary electric actuator. Renew the variable geometry turbocharger. P132CTurbocharger/Supercharger Boost Control A Voltage . Fault reported by the rotary electronic actuator. DTC Description . This DTC may be caused by: . Low battery voltage. Check the condition of the battery. Check the wiring and the appropriate fuse. High battery voltage. Check the battery charging system. P138DTurbocharger/Supercharger Boost Control A Temperature Too High . Fault reported by the rotary electronic actuator. . This DTC may be caused by: . Leaking exhaust system. Engine overheat condition. . Rotary electric actuator. Renew the variable geometry turbocharger. P179ACAN Engine Control Module (ECM)/Turbocharger Boost Control A Actuator Circuit Malfunction . Fault reported by the rotary electronic actuator or powertrain control module (PCM). . This DTC may be caused by: . Controller area network (CAN) communication BUS fault. Check CAN wiring/CAN Network is functioning. If CAN wiring/CAN Network is functioning but the vehicle has loss of power, then renew the variable geometry turbocharger. Diagnostic Procedure Log any concerns raised by the customer regarding the fault with the vehicle – Discuss with workshop supervisor/receptionist Check logged DTC - Rectify concern Check the vehicle Integrated Diagnostic System (IDS) DVD patch file calibration – Update to the latest level Quick Check List Listen for unusual mechanical noise and watch for vibration Listen for a high pitched noise (it can indicate air or gas leaks) Listen for noise level cycling. It can indicate a restriction in the air cleaner or ducting Inspect for missing or loose nuts, bolts, clamps and washers Inspect for loose or damaged intake and exhaust manifolds and their ducting and clamps Inspect for damaged or restricted oil supply and drain lines Inspect for cracked or deteriorating turbocharger housings Inspect for external oil leakage; external deposits (indicates air, oil, exhaust or coolant leakage) Inspect for a restricted air filter Check the turbocharger variable vane actuator arm for normal operation, free movement and damage Point Health Check: 1. Turbocharger Data Plate: - 1. Check the turbocharger data stamped on the compressor housing. Record assembly number, serial number and turbocharger type - 2. Ensure turbocharger type and assembly number are correct for the engine application 2. Compressor/Turbine Wheel (Turbocharger System Trouble Shooting): - WARNING: Ensure wheels have stopped rotating before handling CAUTION: Never attempt to straighten blades. If any bent blades are detected replace the turbocharger • NOTE: Root cause of failure should be identified to eliminate repeat failure. Please make reference to section 'Turbocharger Trouble Shooting' 1. Check for cracked/bent or damaged compressor (impeller) blades - Replace turbocharger if damaged - 2. Check for cracked/bent or damaged turbine blades - Replace turbocharger if damaged 3. Compressor/Turbine Housing: - • NOTE: Removal of the compressor or turbine housings will invalidate the Warranty 1. Check for foreign objects, damage, or for excessive oil at the compressor housing air inlet and outlet - 2. Check for foreign objects, damage, or for excessive oil at the turbine housing exhaust inlet and outlet 4. Turbocharger Bearing Clearances: - • NOTE: If there is contact between compressor/turbine wheel and housing - Replace the turbocharger 1. Gently rotate the compressor wheel and check for smooth operation - 2. Gently hold to one side and rotate the compressor wheel and check for smooth operation 5. Bearing Housing: - • NOTE: Removal of the compressor or turbine housings will invalidate the Warranty 1. Check oil feed and drain port for loose fasteners, adapters or damage to flanges, housing faces or threads which may cause leakage - 2. Check for loose or broken turbine and compressor housing fasteners. If mounting flanges are damaged, replace or tighten (torque to manufacturer's specification)
-
andrew love the tint covers...but how do they stay up ? or how do you fit them? so that they dont fall off. also can you get one for the rear. as you say good idea for when its sunny.
-
very very nice, also what a lovely shine on the bodywork, and in good old british racing green, what a classic colour. your engine bay is perfect too. do you still service the car yourself ? thanks for the pics as i love looking at such great cars.
-
this is the front bonnet plate catch. its been stripped of old paint and rust treated and now zinc galvanised sprayed. next stag will be primer then gloss black finish. man do i love my jaguar...sweet :-) all work done by myself..

-
gary.. its a grin that stays on your face for ages. and no doubt yours will be too. happy motoring and enjoy, by the way nice motor.
-
this topic has given me a lot of thought? with what you first explained, i would link it up to the ( tcm ) tansmission control unit. and see what the diagnostic report says. but the abs light! well thats something else to check too. but with the right diagnostic tool it should flag up what the problem is? looking forward to your reply on when it comes back, as to what it is ? ? ?
-
peter, thanks for the reply regarding on meetings, hope to see a good bunch of you soon in future... by the way im hoping to go on the brighton run on 29may ? ( if we go it will be a spur of the moment thing) anyway back to meetings, if any please let me know many thanks dave.
-

Hi Dave,
I am getting off a boat in Dover on the 28th else I might have gone to Brighton this year.
I will be chatting to a few more active members soon, though and seeing what interest there might be in something in the Midlands, as we did last September at the Heritage Motor Museum.
One of the main things the Club needs is an active member in each of the main sectors of the country who will set about organising a meet -- finding a venue etc and then taking it from there.
Regards,
Peter.
-
-
Electronic Turbo Actuator for Jaguar X Type. look this up on ebay and read what it says. if this is you then that may be the part you need? best of luck ...
-
james its nice that you love our jag's but do you know what your insurance will be on a car like this ? as it could cost you more than the car... just a thought. my first car was a right shed, but it helped me build up my insurance.
-
hi neal, if you now a little about cars this may help? find your turbo which is at the back of the engine close to the firewall. then look at the actuator arm which works by vacum.. there is a lever off the turbo to either a electronic unit, or a metal vacum unit. you must make sure that this is moving when rev-ing the car. if not it may be the problem? in the picture mine is a metal vacum unit with the vacum pipe coming off it. check for splits on the pipe first. remove heat shield cover plate and then check. for movement on the arm as i said early.. good luck.
-
my insurance quote on my 2.0d x type, with full no claims and protection on a claim is coming out at £143 now i dont know about you but to me thats pretty dam good. wil still shop around and see if i can get better?
-
hi richard.. i own a 2.0d on a 54 plate, if you do consider on a x type diesel make sure there is no rattle from the daul mass flywheel,( makes a loud thumping noise) also on the test drive press every button going and see if they work ? service history, + stamps. no steering wobble, brake judder when pressing brake pedal, if a noise comes from the left side of the engine it my be crankshaft wheel damper or pulley tensioner, check all sills as the x type does suffer with this problem of rust so be warned to check on this. best return of miles per gallon on mine is 49mpg. also the drivers seat wears bad in the bottom corner with wear and tear. any more info i will try and help.( but i do love my car :-)
-


