david moore
-
Posts
351 -
Joined
-
Last visited
-
Days Won
23
Content Type
Profiles
Forums
Events
Gallery
Store
Premium Membership Discounts
News
Videos
Everything posted by david moore
-
hi rayan, im lucky as my locking wheel nuts are fine. but i do make sure that they are at a torque of 100nm (alloy wheels) mainly because tyre places use a air gun which does them super tight! me i would search on ebay first as a dealer will charge you the earth, but that is my first thought, last time i brought a set of locking wheel nuts off ebay for a citroen was £48. by the the way welcome to the forum....dave.
-
hi nathan, now that you have had the terraclean, and the car runs well :-) i would leave well alone, as anything would have been picked up before the terraclean. just enjoy your driving experience. dave....
-
wow- joe thats a great result on the emissions test. me i think its down to how you look after your car ? some people just get in and drive and not even bother looking under the bonnet .( hey nothing as query folk) until something goes wrong!
-
chris check out what ive not long posted in "latest topic" flat battery. as i done a down load for david to help him with a flat battery. it may help ?
-
david open this file and see if there is anything that helps in the s type, jaguar Electrical 02-20-02.pdf
-
may i suggest getting a second opinion ? you may not see a leak as the car should have an engine floor pan. also ask to see where the leak ls ! dealership will charge the earth too.... shop around and good luck.
-
finally i got round to fitting the air pollen filter. here are some pictures of how i done this,if you notice on the picture with the windscreen skuttle my lip that fits into the windscreen stops halfway as its broken. also clean the bottom channel and around the drain holes as debris collects. the windscreen skuttle channel seen with a blunt knife and wet wipe cleaned out grit,dust,debris.

-
liam, good luck with the additive. log onto the forum ( jaguar x type) then find in the previous posts, 2.0d egr valve before and after. i use an additive but i still had to clean the valve. mine runs ace, fantastic, great, pulls like a train. also change air filter too and clean all air sensors. my additive is ( BG44K) AGAIN GOOD LUCK. dave
-
john, any luck with those brakes?
-
nice to see that we still have good tradesmen who can do a good job, and charge a sensible price that is not burning a hole in our pockets too. glad to know that you are happy with the work that he has done. all the best dave.
-
hi andy, i hope to get a spare key myself ! i found a jaguar breakers up in derby (auto reserve) who if i drive up there will find the right key and will also place the key in my ignition, program it and make sure that everything works. £30 so search on the net for the same in your area to see if anyone can do the same? good luck, dave
-
it fits by the battery, pics.... look for the connector.
-
if your front dash air vent sounds like a wasp/bee then i found it was the clip had broke! so out came the vent, on inspection it was of course the clip had lost its prongs to hold down the vent. after searching on ebay with no luck, i turned to try and rescue the clip and repair it myself, which is what i done. off to the DIY store and purchased a bag of (large toggle fixings) for plaster boards. size 13-15mm 5 items in the bag. then super glue. here are some pics so you can see what it looked like? so i trimed the clip so it looked like a chocolate button, then super glue the toggle clip to the button.(cut toggle to correct length first), place air vent back in dash, then bend the toggle so it then fits into the hole, and then the clip expands to fit neatly in place. PS measure the distance from under round clip to toggle? mine was 4mm. thickness of my dashboard. job done.
-
no did not do the air con myself, as i had to have it all de-gased then the part fitted and then all re-gased. also ive had a pulley tensioner kit fitted too. but this was when i had not long purchased the car? because on a test drive i knew that the car had some issues.
-
that noise is from the air compressor/clutch! i had to have a new one, as mine burnt out. just to make sure try your air con and hear if a click noise comes on when switched on. if air con all works fine? its just a noisey air con clutch. try some WD40,
-
dave go into the forum (x type) and find, ( 2.0d EGR valve before and after) and see if the egr valve looks like yours? if it is.....then find in the x type forum again for ( occasional lack of power) and see if the turbo is the same ? as the pipe fits onto the actuator. good luck...
-
i had a similar issue when i first went to buy my jag? thinking it was the daulmass flywheel, got the car at a bargin price, but then found that it was the pulley tensioner and crank wheel. so brought a complete kit off ebay got it fitted. now runs great.( cost of kit then £130 ) 4yrs ago....
-
when bleeding brakes always start from the furthest wheel from master cylinder. using a vacum brake bleeder connect the pipe to the nipple then unscrew it partially and then apply the vacum. when fluid flows through freely lock off nipple. Then working your way to the front, but always check on reservoir with fresh brake fluid. when all wheels done the pedal should be firm with engine off ! if still spongy then you still have a leak some where.?
-
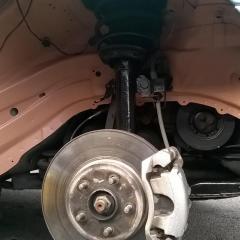
From the album: x type 2.0d se
-
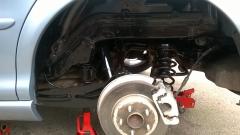
From the album: x type 2.0d se
-
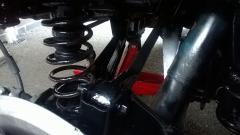
the preparation i done was clean any debris (hand wash or jet wash) all underneath. then remove rust as i first posted, but then treat any rust with an anti rust treatment, then use a rust beater paint (hamerite) then black spray hamerite, then anti chip spary paint to finish off.
-
ive noticed that when ever i have new tryes fitted they use the air gun that always does them super tight!!!! but the thing i do is undo them ASAP then for alloy wheels torque setting = 100nm and for steel wheels = 85nm and lucky for me so far ive had no problems with my nuts...(wheel nuts)
-
Before replacing my inner wheel liners at the rear of the x type, I taken onboard the task of cleaning the subframe along with the whole components of the suspension that goes with it ! i can honestly say what a task it was? from washing down the underneath first, Then different wire brush attachments on my drill to remove as much rust as i possibly could, along with a hand wire brush to places the drill could not get at. to be honest i could not believe how bad it was underneath to the lower arm, upper arm, part of the chassis, subframe, rear lower arm, anti-roll bar drop link, coil spring, tie-bar hub carrier arm, but hey im under here lets do this! two weeks later and here are my results.
-
great to hear that you`ve sorted out the reversing sensor issues, hope it was not to much of a job ? at least as you say it now works....good job done john. dave....
-
jack the car up and make safe ! remove wheel, remove ABS sensor, rearhub/bearings are a sealed unit with x4 nuts/studs to undo. remove disc and hang up the caliper if needed. the hub/bearings will be a very tight fit so caution when trying to remove so no damage is done. then when removed insert a lever between the inner drive shaft joint and the drive casing, with a thin piece of wood against the casing. prise gentle until free from the differential, but if it proves to be a bit reluctant to move strike it with the palm of your hand. make sure that driveshaft oil seal is in the differential and not damaged. you may get a bit of oil spillage but not much? that is when you withdraw the shaft from the unit. fitting is the reversal noting....... new circlips to inner ends of driveshafts, all fasteners tighten to specified torque, then replenish drive fluid. ( torque settings) :- driveshaft/hub nut = 270nm universal joint bolts=44nm
- 1 reply
-
- 1
-